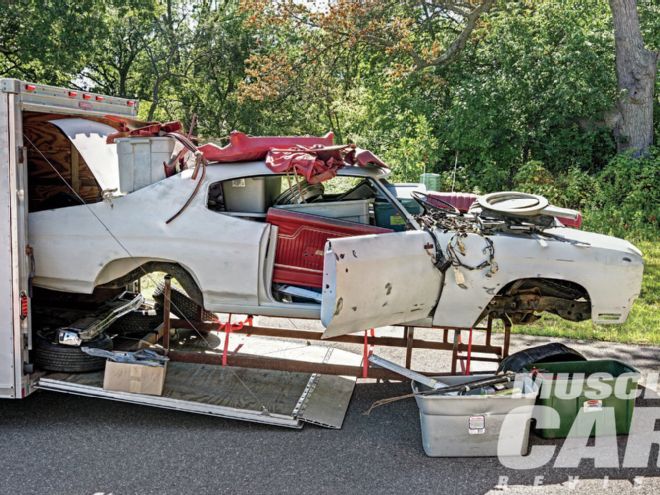
Congratulations! You did it. You brought home your dream car. Well, at least most of it. Actually, you’re not exactly sure how much of it you have. But you’re pretty sure you have all the important stuff. You did the research. The car is authentic. The title was good. You’ve carried in all the boxes and stashed all the parts. Now what? You’re anxious to get started but not sure where to begin.
To help get you started down the right path, we contacted John Balow, owner of Muscle Car Restorations in Chippewa Falls, Wisconsin, for some insight on how to take your basket case from a pile of parts to a righteous ride. In the last two and a half decades, John and his crew have seen plenty of basket cases come through the doors. But even if they didn’t come in that way, nearly all of them were completely disassembled as part of the resto process, so Muscle Car Restorations has plenty of experience reassembling an entire car.
Without specific goals, you’ll be trying to assemble a jigsaw puzzle without the help of the box top
Perhaps the best way to look at this is to compare it to that old saying, “How do you eat an elephant?” One bite at a time, of course. While it is very important to have a clear view of the desired end result in front of you, you can’t do the whole car all at once. You must break it down into individual manageable steps. That way you’ll keep that overwhelmed feeling at bay and not waste a lot of mental energy on areas of the resto you’re not ready for yet.
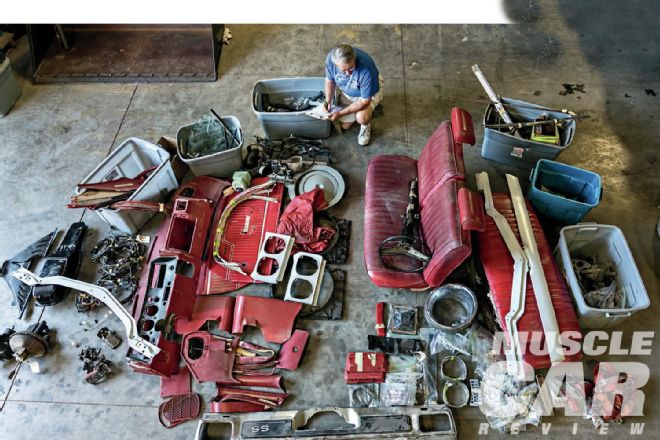 There’s no way around it--you are just going to have to spread everything out somewhere and start making a list of what actually came with your car. Organize it by each major system, assembly, and subassembly. Decide what meets your quality standards and what doesn’t. Ultimately you are putting together a list of what you need to finish each phase of the project.
This is critical. Your success or failure depends on how well you execute this step. Every job at Muscle Car Restorations starts with the car owner answering a very detailed list of questions about how they want their car restored. There is no way to get to where you want to go without a map to show you the way.
Do you want a first-class showpiece or would you prefer a really great driver? Does it have to be absolutely factory stock or would you like some modern upgrades? Are you planning some sort of tribute or clone car? It’s totally up to you, but without setting specific goals, you’ll be trying to assemble a jigsaw puzzle without the help of the box top.
 Having the factory build sheet is a big bonus because it tells you exactly how this particular car was assembled. Not all cars have them, and certainly not all of them survive, but it’s worth asking the seller if he has it. It’s certainly worth looking for it if your car is not completely apart.
This is almost a subset of Step 1, but there is an important distinction. Again,you can’t do the whole car at once, so separate your project into stages: engine and driveline, chassis, bodywork, interior, wiring, paint, and so on. Now make the necessary decisions about how you want to handle each subsystem. Figure out what work you think you can do versus what you’ll need professional help with, as well as in what order you want to proceed. Certainly, some restoration steps need to be done in a specific order, but for much of it you can decide what makes the most sense for you.
 There are more resources out there to tell you about your car, both printed and online, then ever before. Don’t guess at how it’s supposed to go together. Look it up and do it right the first time.
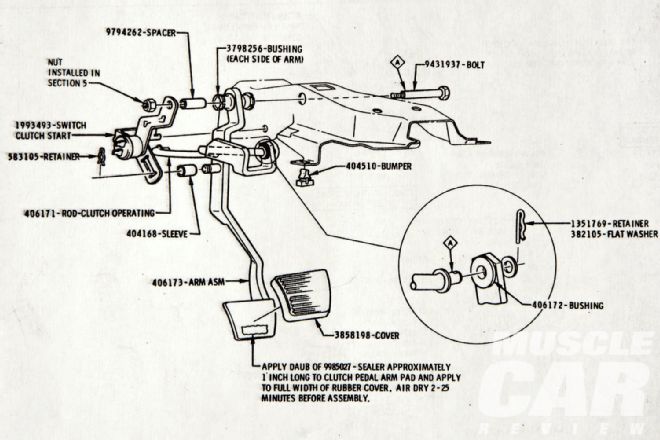
No matter how much you think you know about your car, you don’t know enough about all the little subassemblies to put them all back the way they’re supposed to be. Locate as many resources about it as you can. Factory assembly manuals and master parts books are extremely valuable for getting all the small parts in the right order. Online registries will also help you with things like options and parts that were available for your model year.
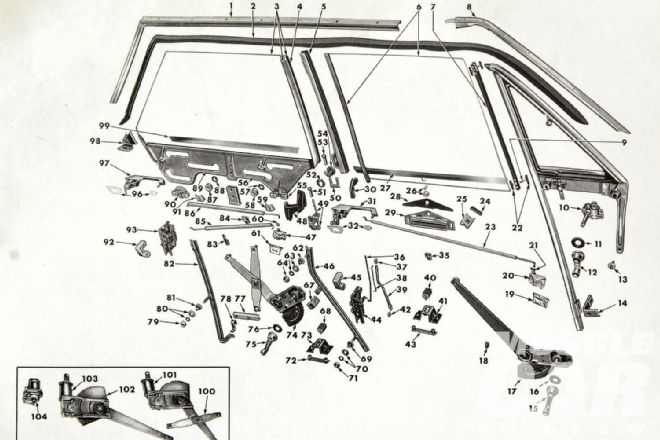 Flip through the pages of an assembly manual and you’ll likely be shocked at how many small parts, especially small fasteners, there are in every area of your car. If the factory needed one of these to put your car together, you’d be wise to use one too.
You’ll need to go through everything you have to create as complete an inventory list as you can. At the same time, gather related parts together. Your goal is to determine what is missing and which of the parts you have are usable. This is where the assembly manuals and parts books are worth their weight in gold.
Locate sources for everything you’ll need. Obtain the new parts catalogs for your model. Research Craigslist, eBay, and other online sources. Don’t forget about salvage yards. No matter what part of the country you are from, many of the southern yards will ship to you.
Also search for the services you’ll need, like an engine builder/tuner, an upholstery shop, a body shop, or maybe just someone to spray the paint for you.
Rarely is any cost going to be less than you thought
Note that this step is shopping, not buying. Refer back to Step 2. Don’t buy the wheels and tires at the beginning if you aren’t going to need them until the end. As you shop, keep a running estimate of what you expect the parts and services to cost. If in doubt, guess high. Rarely is any cost going to be less than you thought.
Be realistic about your skills versus your expectations. Very few, if any, can do a whole car at the highest levels of excellence. You are likely going to need some professional help, so make some hard decisions about what you should tackle and what’s best left to a pro. Is it possible that the money it will take for the tools and equipment you’ll need to do a certain phase would pretty much cover the cost to have an expert do it? Would working another temporary job to earn the money to pay a pro get the job done faster and better than you could do it? Think about it. Your time is worth something. Doing it yourself is not always the least expensive way to go.
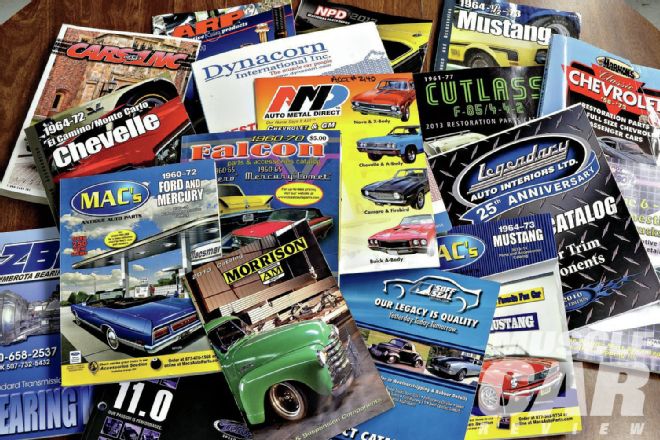 Fortunately, there are also more parts sources than ever before. You’re likely going to need a lot of things, so locate as many new parts catalogs as you can. Hopefully, if one doesn’t have what you need, another one will.
Do the vendors you want to use own their building or rent? Do they own a home in the area or rent? Married, divorced? How long have they been in business? Can you find referrals for them? What is their reputation in the resto world? Some excellent craftsmen are not good businesspeople. Some basket cases are basket cases because the shop went out of business and left the car behind. Don’t turn part of your dream over to just anyone. Know who you will be trusting with your baby.
We don’t mean to sound like your mother, but the number-one reason most people fail to finish a resto project is because they run out of money or overspend to the point of damaging their personal finances. Determine how much you have to work with each month, for instance, and budget your spending accordingly.
Doing it yourself is not always least expensive way to go
Referring back to Steps 5 and 2, only buy what you need right now. John has seen way too many owners buy a bunch of big-ticket items up front and take much-needed cash away from the earlier parts of the project.
Also, don’t store a bunch of stuff you are not going to use for a year or more. Some parts shouldn’t be stored long term. Engines and transmissions shouldn’t sit for several seasons before they are put into service. Unless you’re going to drive your car a lot, the tires will probably age out before they wear out. Don’t waste part of their lifespan sitting in a corner. Upholstery especially shouldn’t be purchased until just before you are ready to install it. John has had to throw away new seat upholstery sets and headliners because they were stored in their shipping boxes too long, and they couldn’t get the creases and folds to come out.
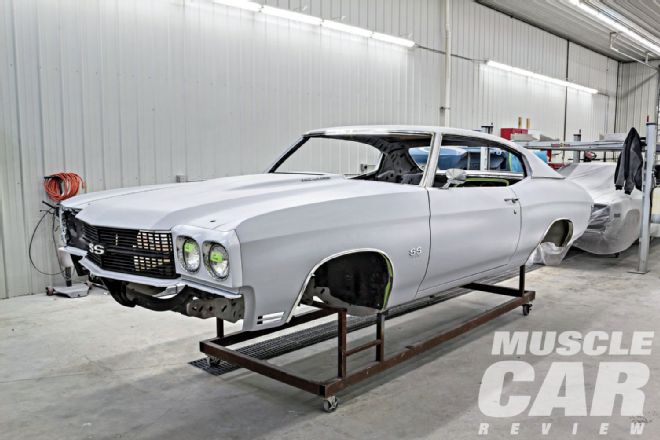 Don’t find out after your car is painted that some of the parts don’t fit properly. Put the exterior of the body and the glass and trim on the car while it’s in primer. That way you won’t have to choose between living with something that doesn’t fit correctly and cutting up your fresh paint. Notice even the vinyl top trim around the back window was installed. This is also the time to double-check that all the body seams between the fenders, doors, hood, and decklid line up correctly.
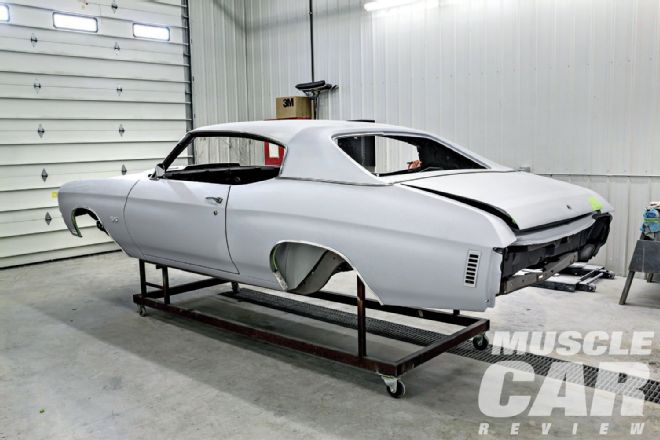
Before you begin any finish bodywork, mock up all of the body parts. Line up all the body panels and install the glass, bumpers, trim, grille, headlights and taillights, and so on. Make sure everything fits correctly when it’s still relatively easy to make the needed changes.
You’ll notice that we haven’t spent any time on how to do the actual work. That’s because how organized and focused you are is more important than your skills or techniques. A step-by-step, slow and steady approach will get you to your dream.