A key ingredient of a good-running engine is a well-maintained and properly functioning set of cylinder heads. Whether the heads are bone-stock casting #16s from a '68 GTO or a set of LS1s, eventually they will have to be serviced. The procedures can range from replacing the valve seals to stop the engine from using oil, all the way to porting for increased performance. Since many hobbyists take pride in working on their Pontiacs themselves, having a well-made cylinder-head stand for head maintenance and/or modifications can make the job easier and less costly.
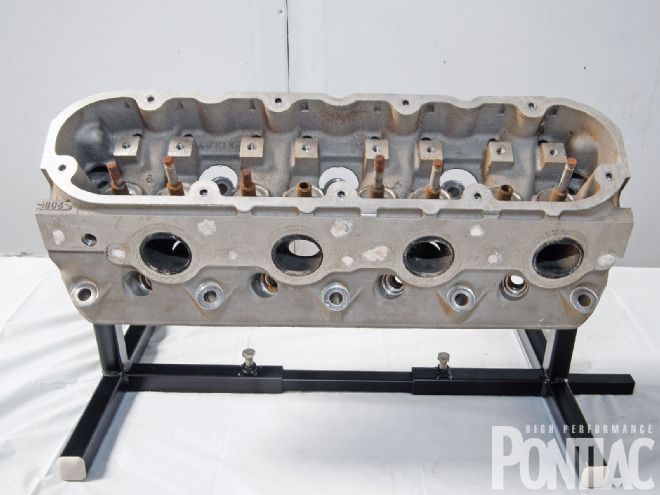
An LS cylinder head is mounted to the head stand. Thanks to the stand's adjustability, any Pure Pontiac head can be mounted as well.
Although many manufacturers offer cylinder-head stands at prices ranging from $30 to over $100, the dominant design can be described as spikes or Vs. A set of cylinder-head-stand spikes are designed to spike through the cylinder head bolt holes on each end of the head. A V simply cradles the head, so that it doesn't move while the piece is being worked on. Although both designs are useful and can be used on most cylinder heads as they are adjustable length-wise, what they lack is the ability to rotate the cylinder head a full 360 degrees into the perfect position for the service that is being performed. A second significant shortcoming of these stands is that they don't always raise the cylinder head high enough.
What if a cylinder-head stand could be constructed for under $30 in parts, and allow both the adjustability of the common designs and a full 360-degree rotation with adequate height? Since almost everyone is budget conscious, why not build your own head stand and save a few bucks to get a very useful tool?
We contacted DuSold Enterprises to work out a plan. According to Steve DuSold, "A cylinder-head stand is a great tool to have around the shop. Although some procedures, such as replacing valve guides, are best performed by automotive machine shops, many can be done by mechanically inclined hobbyists. Although spike-type stands are useful, we set out to design a cylinder-head stand that would be easy to build and provide increased functionality over the common designs."
Steve and his son David built the stand at the shop using tools any well-equipped shop would normally have-a chop saw, drill press, professional-grade welder, and so on. Don't let that lead you to believe that you can't build the stand at home if you don't have those tools. You can do it with a hacksaw, heavy-duty hand drill, and an inexpensive welder or oxygen propylene (propane) torch kit capable of welding. It will just take a bit longer to get it done.
Follow along as we build a cylinder-head stand and demonstrate a few common uses for it.
Time-Saving And/Or Low-Buck Tips
A hobbyist doesn't have to own or rent an expensive TIG welder to complete this project. Other types of welding will work, including MIG welding or welding with an oxygen/acetylene torch.
• Use the thickest 1-inch and 3/4-inch-square tubing you can find. Usually 14-gauge steel is preferred for the 1-inch tubing, but lighter gauge will still support an iron head.
• Aluminum square tubing should not be used in the build: It isn't durable enough to bear the weight of cast-iron heads. If all you have are lightweight aluminum cylinder heads, it's still more expensive to purchase aluminum stock and requires accomplished welding skills to ensure a successful build.
• Steel and iron retailers are usually significantly cheaper for square tubing than large retail hardware stores. A good example is the 6-foot, 14-gauge section of 1-inch-square tubing, which costs just over $7 at the steel-and-iron retailer, while the hardware store charged over $13 for a 4-foot section of 16-gauge tubing.
• Due to the weight that the cylinder-head stand might have to bear, it is not recommended that you "braze" rather than weld.
• In order to load a cast-iron head to the stand, it's much easier to place the cylinder head with the combustion chambers on a flat surface, flip the head stand on its side, adjust the width, and thread in the bolts for the head. Bring the stand to the head rather than attempting to hold up that much weight and thread in the bolts. Once complete, it's easy to push the whole assembly onto the legs and put the head in the position that you want.
• A second set of nuts can be welded to the outer portions of the left and right legs. These are a great place to store the 2-inch-long bolts that are used to bolt the heads to the stand when it isn't in use. (This is another great idea from Floyd Hand, and a revision to the stand that will be easy to incorporate.)
• Painting the stand is purely for aesthetic purposes. For those of you who want to paint the stand to make it look better, if you don't own a sandblaster, simply wipe the metal down with grease and wax remover, and spray paint it.
• Build or buy a set of cylinder-head stands and store your "spare" cylinder heads on the stand, wrapped up tightly with plastic. Cylinder heads should never be stored face down in the corner of the garage nor left to collect dirt and debris that might one day turn your collectible head into a rusted paperweight.
• Don't ever be temped to display your cylinder heads over the fireplace mantel. They may look great to you, but your wife or significant other may give both you and your ornamental display a quick boot to the garage.
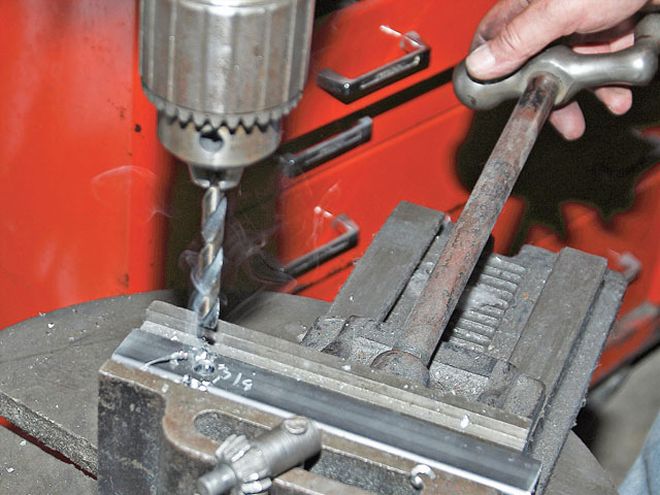 The two 71/2-inch adjustment sections of tubing will be drilled next. Steve measures down 11/2 inches from the end of each section and then uses the same procedure as described above, except he drills only a single side of the tubing. A 3/8-inch shoulder nut will be welded on top of the holes. After all four pieces are complete, he deburrs the holes using a belt sander and round-file.
Cylinder-Head Stand: Testing And Uses
• In order to test the functionality of the cylinder-head stand, we rounded up as many different makes of cylinder heads as we could find. In addition to two Pure Pontiac D-port iron heads, we successfully mounted an LS1 cylinder head, as well as a small-block Chevrolet and a big-block Ford (460) head. The Chevy head was the smallest, while the Ford head was the largest. Every head tested was able to be rotated through the full 360-degree arc and there was ample room under the stand.
• We learned that the proper procedure for getting a head set onto the stand is to slide the head stand width-wise up to the head, get each of the 2-inch bolts finger-tight, and then fully tighten the two adjusting bolts down before using a 9/16-inch wrench to lock the heads into the desired position. All the cylinder heads tested had a minimum of two parallel accessory bolt-holes and used 3/8-inch bolts. Although the LS1 heads were designed for 10mm bolts, the smaller 3/8-inch bolt worked fine and didn't damage the threads.
• Port your own set of cylinder heads. For owners of Pontiac D-port heads, pick up a copy of Jim Hand's book, How to Build Max-Performance Pontiac V-8s, and follow the directions on home-porting in Chapter 7 ("Porting Pontiac D-Port Heads"). Note the small shop-vacuum hose affixed to the back of the cylinder head to collect debris from the porting process (see upper-left photo). The heads that are displayed are an actual set of Jim Hand-ported "7K3" heads owned by Floyd Hand. The carbide bit attached to the die grinder shown in the intake port is for porting demonstration purposes only! Jim has a tutorial on building a Pontiac-specific headstand in the book, which is a different design than this one, yet is also easy to build.
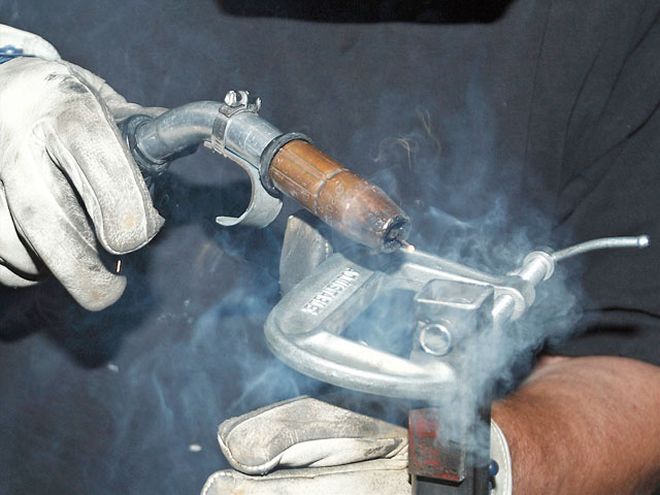 To ensure the sleeve is properly set into the stand, Steve tack welds the 11/2-inch-long collar on both sides. He completed the opposing side (shown) weld. Since this was the last of the tack welds, Steve let the metal cool, and then clamped the completed stand in the vise and continued welding around the remaining weight-bearing tubing. He put a total of two tack welds on each adjusting nut, while the sleeve received two longer tack welds on each side. He built the other side of the stand in a similar fashion. Since its cross-leg is a solid piece of 12-inch tubing (rather than two pieces of 51/2-inch tubing and the 1-inch width of the 71/2-inch adjustment/support leg), he completed the welding more quickly.
• The head stand holds the head in place to use a valvespring compressor to pull the springs without having to balance the head and compress the springs at the same time. Pulling the valvesprings, retainers, keepers, and valves is very helpful to ascertain the condition of the valve job and the valve seals. For a hobbyist who is going to restore or port a set of heads bought at a swap meet, he would want to pull the springs and then deliver the bare heads to an automotive machine shop to be tanked to remove all accumulated dirt, oil, and varnish; then have them magnafluxed to check for cracks before proceeding. A racer can pull and test the valvesprings to ensure they still meet the manufacturer's rated open-and-closed pressures.
Tools
Welder
Bench vise
Drill press (or a heavy-duty hand drill)
Electric chop saw (or a hacksaw)
Grinding and filing tools
C-clamps
Supplies
6-foot, 14-gauge, 1-inch-square tubing (1.0 x 1.0 x 0.083)
2-foot, 16-gauge, 3/4-inch-square tubing (0.75 x 0.75 x 0.065)
1/8 and 3/8-inch drill bits
3/8-inch bolts and flanged nuts (3/8 x16)
9/16-inch wrench
Black spray paint (optional)
Grease and wax remover (optional)
Conclusion
For hobbyists who want to build their own stand, it should take approximately 4 to 5 hours or less with the proper tools. Although fancy shop equipment, such as chop saws and drill presses will speed up the build process, any form of cutting or drilling tool will get the job done. Just remember to measure twice and cut once. If you don't have welding capabilities, an oxygen propylene (propane) torch kit capable of welding can be purchased for around $70 at a local hardware store.
The most difficult part of the build is ensuring that the piece you are welding is "square" to the other piece of metal being welded. A set of squares and a friend to help you align and clamp down the pieces is very helpful. If you don't have all of the tools or assistance around the garage that you need to build a cylinder-head stand, a car club or group of hobbyists in your area can probably pool resources and build several stands in an afternoon.
According to David DuSold, "The beauty of the design is the ability to have the cylinder head rotated exactly where you need it to perform a service, and the multiple makes of head that it will [hold]. Since the cylinder-head stand can range in width from 15 to 34 inches and the vast majority of cylinder heads have "parallel" front and rear threaded accessory holes, the stand is capable of supporting short heads, such as a Turbo Buick V-6, through long heads, such as that from a straight-six engine. In addition to the adjustability, the head stand is very strong. Heavy cast-iron heads, such as the Pontiac or even heftier Ford 460, didn't cause the stand to distort or become unstable."
For those who would rather purchase a cylinder-head stand, DuSold Enterprises can custom build a painted stand for you for $99.95 plus shipping (PN DE-ADJHSTND-REV2). David DuSold states, "The first 50 web-based orders will get a 10-percent price discount off the head stand by using a discount code of 'HPP.' Since the stand weighs less than 10 pounds and breaks down into a compact box, it can be to your door in a relatively short time."
Whether you build your own stand or purchase a stand, there is no doubt that it will prove to be a very useful tool to have around the garage.
Special thanks to Floyd Hand, who helped design a prototype stand that was a derivation of a fixed-width stand he made in the '90s. The result of the combined design team of DuSold Enterprises, Floyd Hand, and the author is a great example of what can be accomplished by a dedicated group of individuals who share ideas to come up with solutions for do-it-yourselfers.