
You may remember that last month I installed a Vintage Air evaporator under the dash (almost!) in my project '49 Chevy, converted the stock heater controls to operate the air conditioning, and fabricated a bulkhead fitting to route the plumbing from the interior to the engine bay. Well, it's been a busy month, as not only did I plumb the brakes (see page 40), but also plumbed the air and heater hoses, and wired the air conditioning.
I'll not go into great detail on the wiring, as not only is it simple with wiring harnesses supplied by Vintage Air, but it's covered in the instruction manual that comes with the system; and other systems will be different. I will show you the major components, like the trinary safety switch, heater control valve, and their associated relays. Likewise, I won't delve into how auto air conditioning works, since we covered that in great detail in our May '08 issue. What I will concentrate on is the plumbing and how to crimp the hoses, as well as how to prepare them for crimping if you're not going to do it yourself. And let's face it, most of you won't because the tool is somewhat expensive and impractical if you're only going to tackle one or two systems. Your local automotive A/C supply house should be able to crimp hoses, but you need to make sure they crimp the fittings exactly where you want 'em, using the proper crimping tool!
Vintage Air offers its Sure Fit A/C kits for a wide range of cars with tailor-made bracketry, moldings, and ready-crimped hoses or hard lines, but can also help you with universal components. If you're like me, you require a unique system. Having never installed an A/C system before, I was pleased to see the Vintage Air kit was very complete, the instructions were easy to understand, and the whole deal was simple to accomplish if a methodical approach was taken. Yes, I actually read the instructions! Once the major components-the compressor, condenser, dryer, and evaporator-were mounted in the car, I plumbed the whole system without crimping any fittings, as the hose pushes into the fittings and will stay there during mockup. This turned out to be a wise move, as I moved the location of the hoses on the bulkhead fitting more than once, and added a Pro Line TiteFit hard line kit to the compressor after running hoses to it at first, for a neater appearance, and ease of removing the valve covers down the road.
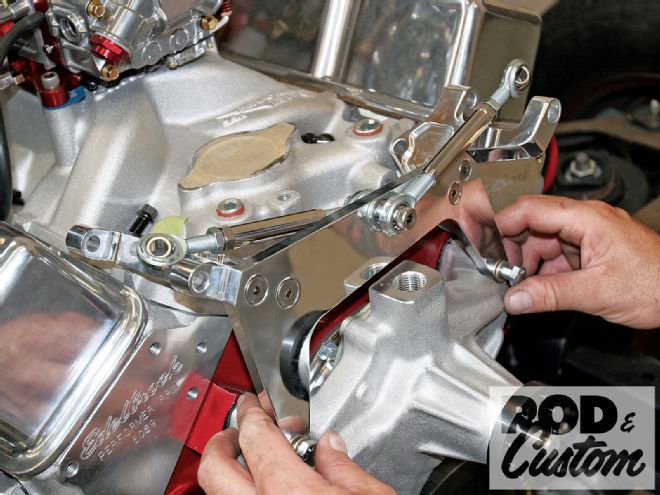 After installing the Edelbrock cast-finish water pump, I fitted the polished Vintage Air Pro Line compressor/alternator bracket. Not only does this align the two components, but allows them to clear the tall valve covers required to clear the roller rockers in the Smeding 383. Make sure you install all of the bracket's hardware before tightening any of the bolts.
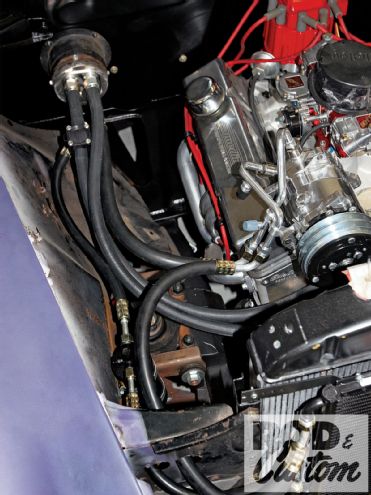
Once I was happy with the way the hoses ran, and had ensured that all the writing on them was "facedown" so it couldn't be seen, I marked the hoses and fittings and was ready to get crimping. Or at least I was ready to let our resident tech center whizz, Jason, get crimping. Oh, and while it should be obvious, there's a circuit to be followed with the hoses; from the evaporator to the compressor, then to the condenser, to the dryer, through the safety switch, and back to the evaporator. Make sure you get this right and use the correct ports on each component! Some of the hoses and fittings are different sizes. There are three used-No. 6, No. 8, and No. 10-but it's still worth mentioning. Route the refrigerant lines as per the Vintage Air instructions and you can't go wrong.
There are a couple of other things worth mentioning before we dive under the dash, and that's that the evaporator needs a drain, for which I haven't decided where to drill through the floor yet. One refrigerant and both the heater fittings are tucked way up behind the evaporator and aren't easily accessible in my particular installation. If your's is the same, do yourself a favor and make sure you can access any hose clamps from underneath. This is especially applicable if you do as I did and attach these hoses before you fit the evaporator. Plan ahead, it'll be worth it in the future.
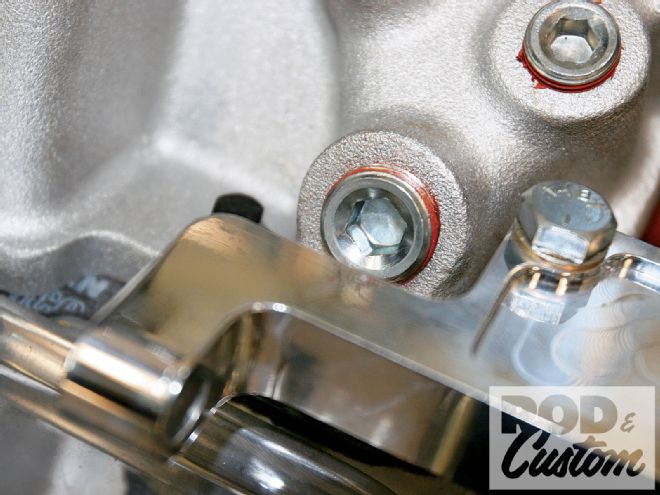 Before the above bracketry was fitted I installed these bungs in the water outlets of the intake manifold, as the larger one would be impossible to get to afterward.
It should be noted that the four major components are sealed and filled with dry nitrogen under pressure, and the caps should not be removed prior to installation, as this will cause them to collect moisture and lead to reduced performance or even failure. Once the caps have been removed, you should aim to plumb the system as quickly as possible and have it evacuated to boil away any moisture before charging with 1.8 pounds of R134A refrigerant.
Before the system can be used, since I modified my controls using a '61-62 Impala conversion kit, I'll have to calibrate the control panel, but again the instructions for this are in the conversion kit manual and are straightforward. Finally, there's not much point having A/C in an un-insulated car, so invest in some form of heat insulation, and make sure all door and window seals are doing their job. OK, sleeves rolled up, here we go.