
There are always certain elements to building a car that intimidate the average enthusiast. Some examples include paint and body work, recovering seats, electrical systems, and plumbing the brake and fuel systems. Good body work is an art, so when a novice takes hammer and dolly in hand, the end results are predictable. With the quality of reproduction interior kits today, installing a fresh interior is something the average enthusiast can master--it's just a matter of practice. Unfortunately, most of us won't do enough interiors in our lives to get that good, so we drop it off at a pro shop. As for electrical system work, does anybody really understand that whole "electricity is like water" thing? How come it seems like every time we "complete the circuit" we end up with a blown fuse?
Okay, so not everybody can handle those aspects of building their own vehicle, but what about plumbing hard lines for the brake and fuel systems? Like many areas on your car, special tools are required to do the job, but running lines is truly a job that, with just a bit of practice, anyone can do. Although it sounds strange (and I've received more than a few looks from the rest of the guys in the shop when I've said it before), I enjoy bending my own lines. I can't explain it, but there's something satisfying about taking a straight piece of hard line and making it run the route I need it to go. All it takes is a little (and I mean very little) practice, a modest investment in tools, and you'll be able to run professional-looking lines for the rest of your life!
Today, complete pre-bent line kits are available from companies such as Inline Tube. While these lines are fantastic, if you've modified your car, chances are somewhere you're going to have to modify the lines as well. A case in point is the '70 Duster 340 we installed headers into a couple of months ago (They Fit! Mopar Muscle, May 2000). The automatic transmission lines had already been modified using a spliced-in length of rubber hose. A bad situation was made worse after we installed our Tube Technologies headers and discovered that the length of rubber trans line was now squeezed between the header tubes and the oil pan. It would probably take about twelve minutes for the rubber hose to burn through if we'd have left it like that. The solution was to replace the old cobbled-together length with pre-bent lines from Inline Tube; however, with the addition of headers to the car we wanted a little more clearance between the trans lines and the header tube, so even our pre-bent lines needed a bit of bending.
We called Inline and asked for some pointers for this article. They gave us trouble-shooting tips and recommended tools for the job that would make things easier. We already had a Snap-on Tools bender and flare kit, but they loaned us a real nice bender that we now can't live without. Inline Tube can supply you with complete pre-bent kits, individual line sets (like the A/T lines for our Duster project), straight line kits in stainless steel or original steel, all the fittings needed to install them, and any tools you might not already have. Once you learn the basics of running your own hard steel brake and fuel lines, you'll have the satisfaction of having done the job with professional results, right in your own garage.
A Flare for Fittings
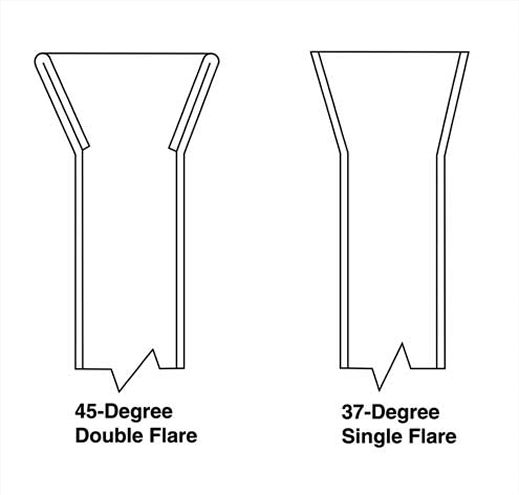
There are two types of flares commonly associated with hard lines: 37-degree single flares and 45-degree double flares. We talked to the guys at Inline Tube to get the scoop on the differences (besides the obvious), and the proper applications of each.
Commonly referred to as A/N fittings (short for "Army/Navy"), 37-degree flares are primarily used only with aircraft-style fittings, and were never used in any production car. They are often seen incorporated on the fuel system of race cars and hot rods, and are usually used with braided steel lines. These fittings, however, are not recommended for automotive use because they are of the single flare variety and not strong enough.
The popularity of these fittings probably dates back to the days when you could purchase government surplus items from the local surplus store. These components are aircraft grade, but that's not necessarily better in automotive use. One of the main disadvantages is that the tube splits and cracks during the flaring process, and the crack will grow during use and vibrations, causing a leak.
Another problem is that any component (wheel cylinder, master cylinder, etc.) requires an adapter to work with A/N-style fittings, and these adapters aren't easy to find.
"Inverted flare" 45-degree fittings are used on every automotive application from the '30s to the present. The flared end is stronger and less likely to crack, and they also seal better than 37-degree fittings.
Swearing and Knuckle Busting Cure
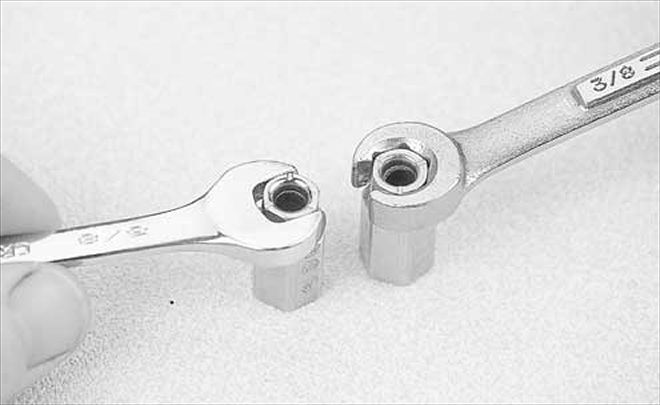
Fuel and brake line fittings are made of brass, which is inherently soft. Line wrenches, sometimes called flare nut wrenches, are specially designed to grip as much surface area of a fitting as possible. This helps prevent rounding off the corners--a common result when using open ended wrenches. Contrary to popular practice, Vise-Grips are not the proper tool to work on line fittings! A good set of line wrenches from Craftsman costs less than $30, and should be considered mandatory. We've got two sets of line wrenches, so we can put a wrench on each side of a connection. Spread the investment over a birthday and Father's Day if you don't want to drop $60 all at once. It beats getting a tie!
Tale of the Tape
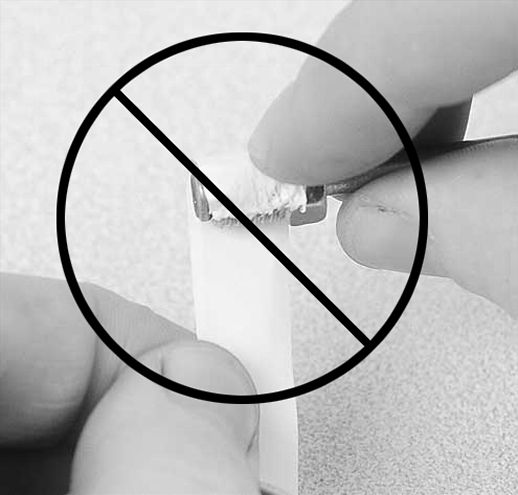
Never use Teflon tape to seal 45-degree flares. The flared end of the tube seats against the brass insert in the components and fittings, creating the seal. Teflon tape is used only on tapered thread components (pipe threads). A 45-degree fitting that is leaking is not leaking past the threads--it's leaking through the top of the fitting at the seat. To stop the leak, loosen the fitting and tighten it up again to reseat it. Repeat until the leak goes away. If the leak doesn't go away, the seat in the fittings is scarred or damaged, and needs to be replaced.
It's also important that you don't over-tighten the fittings. Simply snugging them up will cause the fittings to seat together. Over-tightening won't stop a leak.