
Modern automotive disc brake designs share common features. The primary components are a rotor and caliper. The rotor attaches to the wheel hub and rotates at the same speed as the wheel and tire assembly. Machined flat and true, the rotor's parallel faces are the braking surfaces for lined brake pads.
Whether your truck is a stock restoration project or a modern street truck build, performance and safety always include brakes and steering. Last month, we covered drum brakes and the hydraulic system. In this month's lesson, we'll explore disc brake basics and upgrades.
The caliper is a clamping mechanism that straddles the rotor and squeezes the two brake pads inward toward the rotor when the brakes apply. On a single-piston caliper, the piston presses outward against one brake pad back. This transfers force across the bridge of the caliper and pulls the opposite pad toward the rotor. At this stage, both pads squeeze against the parallel rotor faces. Pad friction slows and stops the rotor.
Some calipers have multiple pistons. On some designs, the pistons push toward the rotor faces from opposite sides. As a rule, high-performance calipers have multiple, opposing pistons. Popular racing calipers have as many as six pistons.
 Single-piston calipers are popular original equipment. Older calipers can be pitted, worn, or scored. Vehicle manufacturers recommend discarding a housing that requires more than light touchup with crocus cloth.
For the modern OEM or custom disc brake system, stopping power equates to the clamping force of the caliper, the diameter of the rotor, the surface area of the pad, and the pad and rotor material. There is no self-energizing effect* with modern disc brakes, just clamping pressure against the rotor. Power boosters are common on disc brake systems.
*1949-54 Chrysler-Crown Imperial models used twin-disc, internal expanding disc brakes. This Ausco-Lambert design featured self adjusters and ramping ball bearings between the discs. The spreading, self-energizing action of the ball bearings increased braking force-without additional driver input. Chrysler tested these brakes on Dodge military Power Wagons.
Brake Proportioning
When the brakes apply, a vehicle pitches forward. Depending upon suspension, speed, height, and chassis weight distribution front to rear, a brake "bias" exists. Bias relates to the transfer of weight; all vehicles pitch forward under braking. In pickup trucks, where manufacturers grapple with the dynamics of a tall vehicle that must carry a load, brake bias is a challenging issue.
 By 1967, disc front brakes were original equipment on most domestic passenger cars. A majority of the braking effort is at the front brakes. Rear drum brakes reduce production cost and solve the issue of how to incorporate an emergency brake. Disc front with drum rear brakes became a standard.
An engineer sizes and matches up brakes to bring a loaded vehicle safely to a stop. The pickup truck must have brakes capable of safely stopping a load at the vehicle's Gross Vehicle Weight Rating (GVWR). Yes, classic trucks were once beasts of burden.
Now let's unload the truck. If that same vehicle must make a sudden stop, and if brake design and bias are for a vehicle with much more weight over the rear axle, we now have a problem; the percentage of front weight is greater, which increases the pitch forward. The frame lifts at the rear of the truck, lightening weight on the rear tires. Rear-wheel lockup and skidding can occur, risking the loss of vehicle control.
The goal is to balance out the braking under a variety of driving conditions and loads. Can the brake hydraulic system adjust for weight and load transfer? Yes, hydraulic controls can compensate for weight bias changes. Trucks have benefitted from devices like a proportioning valve at the rear axle. Here, the hydraulic valve has mechanical levers that fit between the frame and axle. As the light load causes the rear frame to lift under hard braking, the levers move the valve. The valve reduces brake apply pressure to help avoid wheel lockup.
The federal mandate for a dual master cylinder ensures that if the brakes fail at one axle, the other axle's hydraulics remain functional. Such a failure requires an immediate warning to the driver. Pressure lost to one hydraulic circuit shifts a valve over and activates a warning light on the dashboard. The switch, which mounts between the two brake lines leaving the master cylinder, is the pressure differential brake warning switch.
 By 1967, disc front brakes were original equipment on most domestic passenger cars. A majority of the braking effort is at the front brakes. Rear drum brakes reduce production cost and solve the issue of how to incorporate an emergency brake. Disc front with drum rear brakes became a standard.
Engineers took the concept a step further. The "combination valve" addresses three concerns: One is the safety warning for a hydraulic circuit failure; another would be the proportioning of fluid pressure front to rear. When the brake pedal applies, and fluid pressure increases in the lines, the proportioning valve restricts hydraulic pressure to the rear wheels. The restricted ratio is an amount determined by the vehicle's design, weight distribution, and chassis dynamics. The proportioning valve compensates for weight bias. The last function of a combination valve is metering. A known issue with disc front and drum rear brakes is the lag time for the rear shoes to push through the return spring pressure and shoe-to-drum clearance before applying shoe pressure at the drum. By contrast, disc pads have no return springs and ride at the sides of the rotor. Lag time is virtually non-existent if the rotors run true
A metering valve delays hydraulic pressure to the front disc brakes. The aim is to synchronize the application of the front and rear brakes. For slick road surfaces and light braking, the metering valve helps prevent front-wheel lock up. Hard braking will push through this metering and deliver immediate front brake pressure.
If a disc brake changeover involves use of OEM components from a donor vehicle, the donor's combination valve may work well. The swap should include the master cylinder, combination valve, and complete wheel brake system from that donor vehicle. The "may work well" factor depends upon whether the donor vehicle and your truck have similar weight bias, center of gravity, roll center, and curb weight.
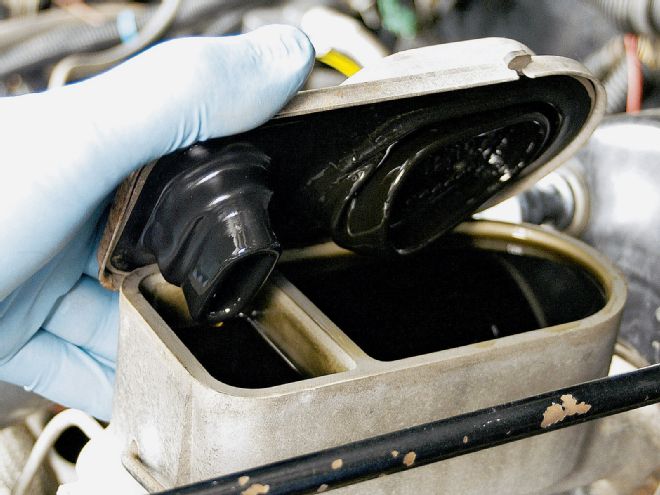
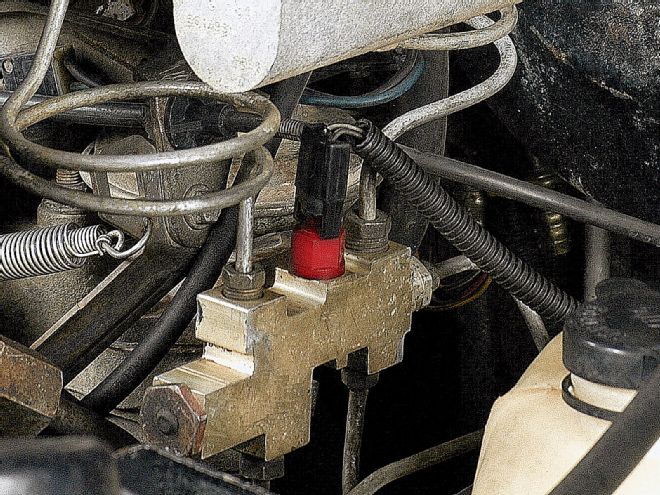 Mandatory safety switch over valve and brake warning lamp switches have been incorporated in a "combination valve." Brake front-to-rear proportioning, metering, and the safety switch are part of the same assembly on this application.
When installing an aftermarket disc brake kit, proportioning is important. Most kits include a manual proportioning valve. Use care adjusting the manual proportioning valve. Follow the manufacturer's directions to avoid a rear brake lockup that could cause the vehicle to spin out. If hauling in the bed, find a setting that works for the vehicle under various load and weight transfer conditions. Perform brake tests away from traffic and obstacles.
Note: There are knob and lever-actuated manual proportioning valves. One lever type uses a six-position notch lock handle. Mounted within reach, the valve can be adjusted quickly to compensate for changing track or road conditions, off-road driving terrain, bed loads, and so forth.
Disc Brake Service Needs
Unless the rotor needs surfacing, pad and caliper work can be performed without removing the wheel hub. Many brake and repair shops now have equipment for resurfacing rotors on the vehicle with the hubs installed.
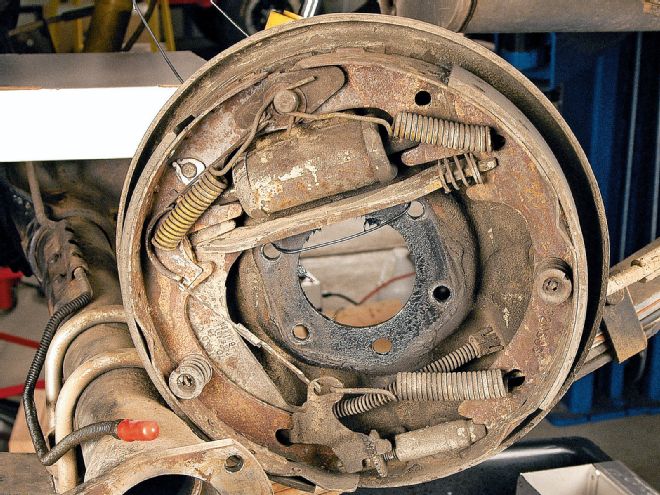
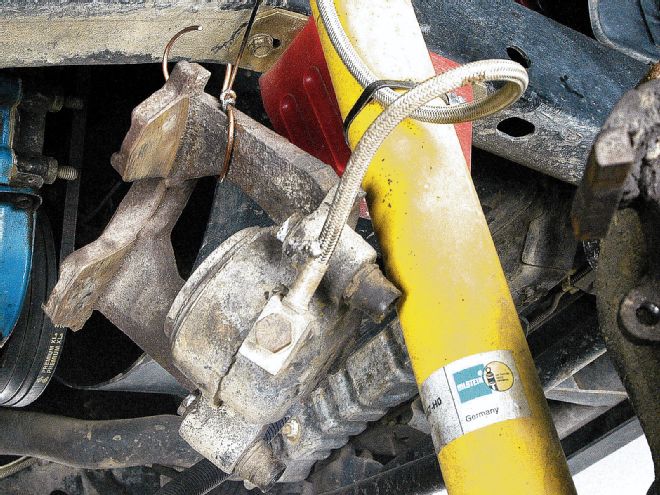
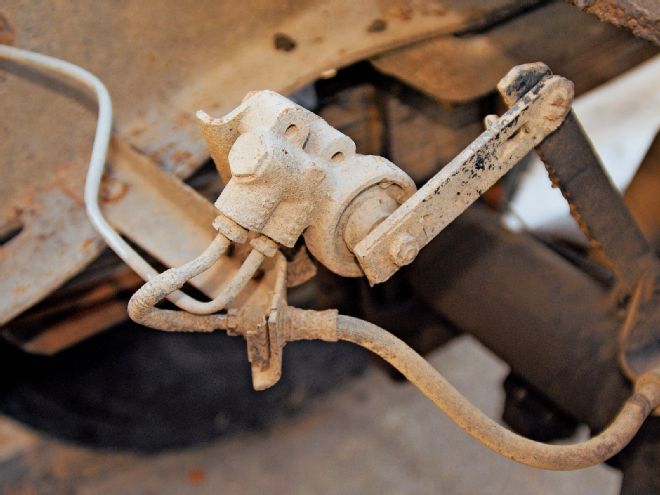 To reduce risk of rear brake lockup, this GM truck uses a mechanically actuated proportioning valve. When braking causes forward pitch, the rear of the frame lifts. The space between the axle and frame adjusts the proportioning valve and rear brake pressure.
When working on a brake system, brake dust can be hazardous. The truck might be old enough to have asbestos content lining, or asbestos type could have been installed during service work. (Don't assume that if a vehicle is new enough, the lining is non-asbestos.) Use high-quality, non-asbestos replacement lining.
Brake parts cleaners with petroleum solvents or distillates are harmful to rubber parts. Avoid spraying rubber parts like the brake hose or seal around the caliper piston. Wash down metal parts before and after removing the caliper. Keep the dust in solution, and dispose of it in a safe manner. Dry, "friable" asbestos is a hazardous material.
Caution: Do not wash brake parts on the floor. Once dry, the dust can go airborne or track around. Also, do not use a shop vacuum to clean up brake dust. The filtration is not fine enough for trapping asbestos; the vacuum will release dust into the atmosphere.
 If rotors are true, free of scoring, and measure the correct thickness, a pad change can be made without disturbing the wheel hubs. This is also a good time for a bearing clean, inspect, and re-pack. Either way, the job begins with caliper removal.
A shop manual will describe the steps for removing your truck's calipers. Among service tools, a caliper clamp will press the piston back into its bore. This is necessary to establish room for the new, thicker pad lining. The caliper can't slide over the rotor without adequate clearance between the new pad linings and the rotor faces.
If you suspect a warped rotor, check the runout with a dial indicator. A good measure is to adjust the wheel bearings for zero endplay before testing runout. Use a magnetic stand or clamp to hold the dial indicator. Make sure the dial indicator is firmly mounted, and use a roller tip to run against the rotor face. The indicator stem should be perpendicular to the rotor, or tilt it slightly to prevent chatter.
Turn the rotor slowly, and observe the lateral runout. A typical factory runout limit would be 0.004 inch or less. Equally important is the "parallelism" of the rotor faces. This is the thickness of the rotor, measured with a quality micrometer. Thickness should be uniform within 0.0005 inch (half a thousandth of an inch). If the rotor needs surfacing, remove the hub/rotor assembly (rotor only on some applications), and sublet this chore to a machine shop.
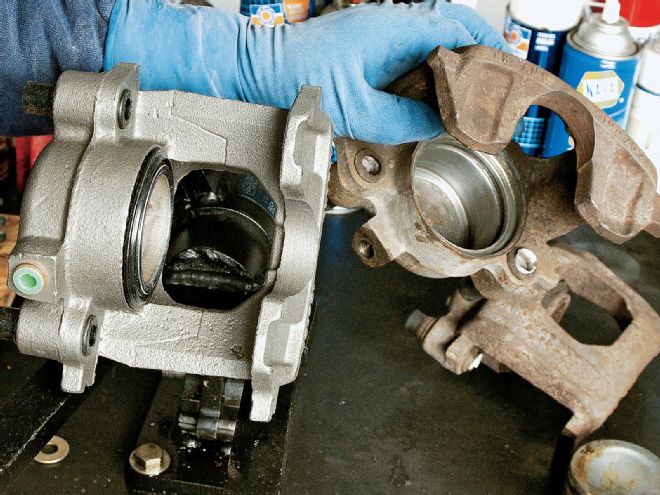
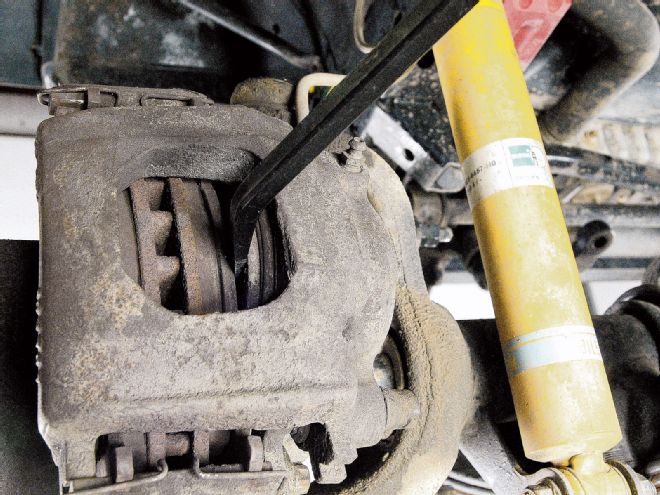 This caliper piston was frozen. Prying gently at the pad pushes the piston inward and provides space for removing the caliper. Pushing the piston into the caliper bore forces fluid back to the master cylinder. If necessary, relieve excess fluid at the bleeder. Re-tighten the bleeder to prevent contaminants from entering the system.
If wear is within specification, readjust the wheel bearings. If bearings need service, remove the hubs and perform a bearing pack. (See last month's lesson for wheel bearing details.) Clean and dry the hubs and bearings thoroughly. Re-pack with high-quality wheel bearing grease, rated for the high-heat output of disc brakes. Wheel bearing endplay adjustment is critical with disc brakes. Rotors must run true. Wheel bearing adjustment effects runout. A dial indicator is the tool for setting endplay.
If only the pads need changing, air should not get into the hydraulic system. A vacuum bleed and flush with fresh DOT 3 or 4 disc brake-approved fluid is advisable. (Use the fluid recommended for your hydraulic system.) Brake fluid draws moisture at approximately 3 percent per annum, and this lowers its boiling point. Fresh brake fluid, pulled through the system with a vacuum bleeder, will restore the boiling point, remove contaminants, and help prevent brake fade.
When calipers seep fluid or the caliper seal appears weak, there is a need to rebuild the caliper. Disconnect the hose at the caliper and head for the workbench. To remove a stubborn piston, one procedure is to use compressed air at the hose inlet. Make sure the piston points away, and use short bursts of air to coax out the piston. The piston may dislodge with force, so be cautious! Let the piston land in soft rags. Keep your hands out of the way.
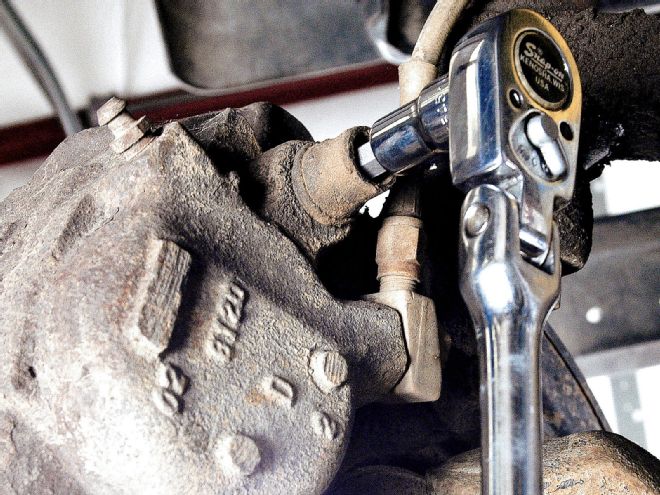
 Never suspend a caliper by its hose. Tie the caliper out of the way with mechanic's wire or welding rod. If only the pads need replacing, this is as far as the caliper needs to move. Safely clean brake dust away from the caliper before and after removal.
Use denatured or isopropyl alcohol to clean the parts. Vehicle manufacturers do not advise honing a caliper. Instead, they recommend the use of crocus cloth to hand-smooth slight bore blemishes.
Most pistons have a thin nickel/chrome coating. Never attempt to wire brush orsand the piston surface. If rusted or scored, replace the piston or caliper unit. When prying out the seal, do not damage the bore. Measure the piston-to-bore clearance and compare it to factory limits. When wear is excessive, there are new or rebuilt/exchange calipers available
Clean up the caliper bore with denatured alcohol and coat with brake fluid prior to assembly. Use care when assembling the caliper. Some calipers have two-piece shells. Replace seals or O-rings between the mating surfaces as part of the rebuild. Use a factory or professional manual when performing disc brake work. Although less complicated, disc brakes rely upon close tolerances. A factory-level shop manual will provide accurate service details.
Aftermarket Disc Brake Conversions
A classic truck means an older chassis. Many of our favorite trucks came with four-wheel drum brakes and a single master cylinder. Whether the goal is higher performance and a more nimble chassis or simply wanting safer, modern brakes, many owners turn to disc brake conversions. For cruising and mild highway driving, front disc and modern rear drum brakes work well.
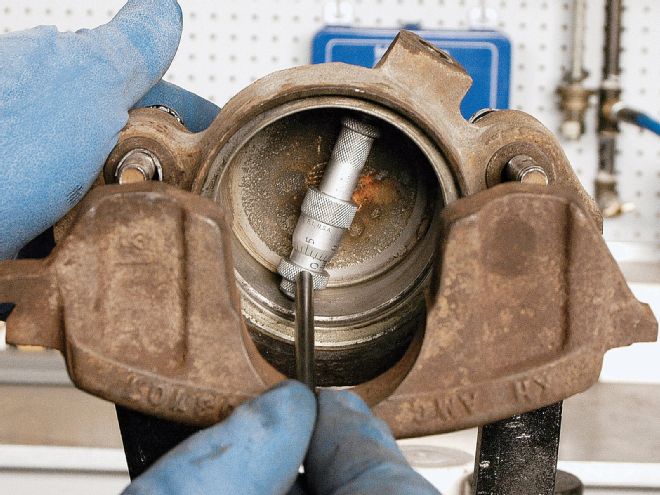 Use an inside micrometer to check for out-of-round bore. Clearances are critical. If there is excess piston-to-bore clearance and the bore is on specification, replace the piston (if available). Replace the caliper if the bore is distorted, scored, pitted, or worn.
If your project is an off-frame restoration or buildup, the use of four-wheel disc brakes can provide a technology improvement. There are contemporary OEM and aftermarket rear disc brakes that incorporate the emergency brake.
Aftermarket kits are available from several of the CLASSIC TRUCKS advertisers. Some kits are cost-conscious, using OEM-style rotors, a master cylinder, and calipers with mounting brackets and assembly hardware. For the competition-minded builder, there are upscale brake kits with high-performance calipers, rotors, and hydraulics.
Ventilated and cross-drilled rotors have been popular in high-performance circles. Under extreme braking, some brake pad materials tend to "outgas." This phenomenon creates a gaseous layer at the surface of the pads. Gas is not a friction surface, so disc brake performance suffers. Outgas and cooling were the original motives for cross-drilled rotors. Cross drilling does have a downside: Under extreme use, drilled holes can lead to stress cracks.
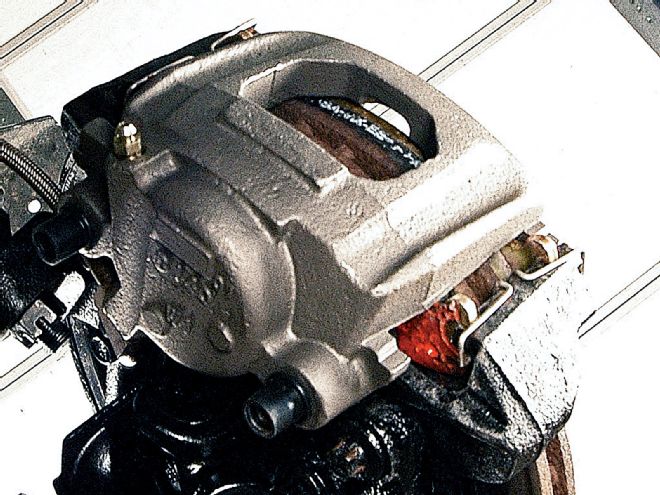
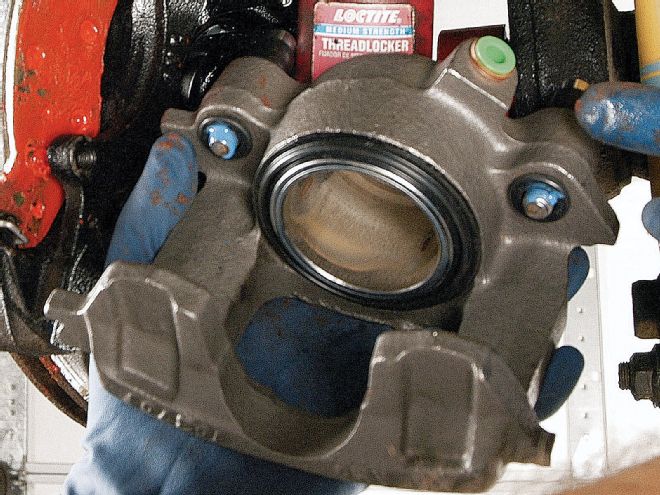 This is a new OEM caliper. The piston, seals, casting, pin sleeves, and bushings are new. An assembly like this will restore performance and eliminate the risk of brake pull if the rotor is true. Rebuild or replace both calipers at an axle to ensure uniform braking.
Another improvement is the slotted rotor, which sheds dust, water, and gas. As a racing measure, slots have the added benefit of minimizing glaze on pads. The slots scuff pad faces keep hot lining from glazing over or "vitrifying." Slotted rotors go through a set of pads quickly, not an issue at the racetrack but problematic for the street-driven vehicle.
When constructing a disc brake system, pay attention to the hydraulic system. The master cylinder and calipers must match up. Rotor size and caliper design will determine stopping force. A "kit" from a reputable source, or a complete system from a similar donor vehicle, can take the guesswork out of your parts list.
One overlooked factor when selecting the master cylinder is residual pressure. Typical drum brakes have wheel cylinder cups with lips that flare outward. If system pressure were to leave the cylinder, sealing lips could collapse and leak fluid. A traditional solution has been the use of a check valve within the master cylinder that holds residual pressure in the lines after the pedal releases.
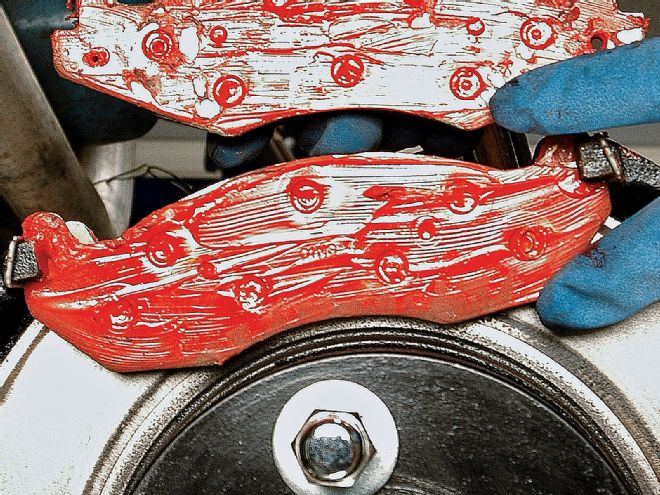 To prevent brake squeal, coat the steel pad back with anti-squeal paste. Allow the paste to dry before installing the pads. Limit paste to steel pad back. Paste will damage lining.
This pressure is not excessive. Since drum brake shoes have stiff return springs, there is counterforce to the residual pressure. Fluid stays trapped in the wheel cylinders at a pressure below that of the shoe return springs. The shoes stay clear of the drums until the next brake application. An added benefit is that the wheel cylinder is fully charged after the brakes retract. Pedal travel will immediately move the wheel cylinder's shoe links at the next application of the brakes.
Disc brakes, by contrast, require no residual pressure. The piston seals continuously, even with the brakes released. Disc pads ride next to the rotor, so brake pedal apply pressure will immediately create braking force. The disc brake system does not require residual hydraulic pressure. In fact, residual hydraulic pressure could cause brake pad drag against the rotors.
Some racing disc brake systems maintain a slight amount of residual pressure, just enough to keep the hydraulic system primed. An OEM method of charging the disc brake system is a "quick take-up" master cylinder, which dumps high-volume, lower-pressure fluid into the system immediately upon brake application. This gets the disc pads to the rotor faces quicker.
When building a custom brake system, make sure the master cylinder has the right provisions for disc versus drum brakes. Some systems use a check valve inline. Inline check valves are also available in the aftermarket with psi ratings for drum or disc brake circuits. Choose a master cylinder that is compatible with the type of brakes used at the front and rear of the truck.
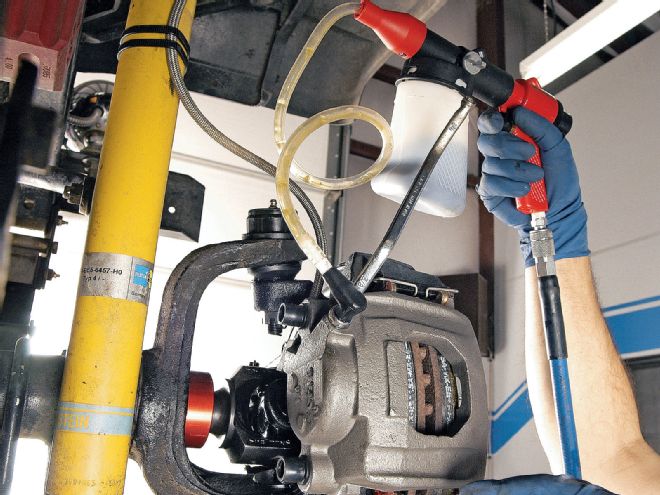 A brake vacuum bleeder effectively removes old fluid and contaminants. Vacuum the reservoirs and fill the master cylinder with fresh brake fluid. Vacuum bleed each caliper and wheel cylinder until fresh fluid flows and all air has been evacuated.
Engineering your own brake system requires a thorough knowledge of chassis dynamics, including the vehicle weight at each wheel, the center of gravity and roll center, the force available with given rotors or drums, spring rates, the effect of lining choices, and a host of other concerns. If all of that sounds complicated, it is.
Another approach is to use every hydraulic and mechanical brake component from a suitable donor vehicle. If that sounds daunting, an alternative is a complete disc brake conversion system from a quality aftermarket source that has done the research.
In every instance, braking is a safety issue. Study OEM systems. The change from front drum to disc brakes requires the right proportioning or combination valve and the master cylinder designed for a disc front, drum rear brake system. Compare part numbers between the master cylinders, combination valves, and hoses of your truck and the donor prototype.
Where possible, use manufactured brake pipes with flare nuts already installed. When fabricating tubing, always use DOT-approved pipe with brake flare nuts. Double-flare the tubing ends. Aftermarket brake fittings and caliper hoses must be rated for brake use. Route hoses safely, clear of the chassis at full turn angles and extremes of suspension travel. Build a quality system that will match or exceed modern brake standards.
What Did You Learn This Month?
"Night School" would not be complete without a quiz! Don't worry about your test-taking skills or grades. This is an open-magazine, true or false test. Clues can be found within the "Night School" text, photos, and captions. Have a good month!
True or False Questions:
1. Ausco-Lambert brakes were internal disc types with self-energizing ability. Modern disc brakes do not offer this self-energizing feature.
2. Modern disc brakes can be easier to service than drum brakes. A disc front brake pad change can be done without removing the wheel hub.
3. Brake bias toward the front makes rear drum brakes adequate for most light truck applications. Drum rear brakes provide for an emergency brake system.
4. Old brake fluid can be reused. Contaminants like moisture are of little concern, plus think of the money saved.
5. Breathing asbestos dust is very harmful. Brake pads with suspected asbestos content must be handled safely. Asbestos-free replacement lining is better for your health.
6. When checking rotor runout, temporarily adjust the wheel bearings to zero endplay. This keeps the rotor on center and provides a more accurate dial indicator reading.
7. Residual hydraulic pressure is useful on disc brakes. Brake drag keeps the pads warm and ready for action.
8. When testing a manual proportioning valve, start with any setting. You should be able to control the vehicle. Instructions from the manufacturers are all the same.
9. Shop manuals call for isopropyl or denatured alcohol to clean hydraulic brake cylinders. Always keep mineral- and petroleum-based products away from rubber products.
10. When forming brake tubing, the ends must be flared. If you don't have a quality double flaring tool, a single flare like copper tubing will do. DOT safety regulations are just to scare people.
1 true 2 true 3 true 4 false 5 true 6 true 7 false 8 false 9 true 10 false