Back in the November of 2002 issue of KIT CAR we published an article describing the assembly techniques used with the installation of a pair of aftermarket front disc brakes. At that time we tried to emphasize the importance we place on quality brake systems, and because we feel so strongly about this matter, we decided the only thing to do was to order up a set of rear discs that would be a complement to the fronts that we assembled earlier.
We've had aftermarket rear disc brakes before and have always been thrilled with their performance when it came to bringing the car down from speed. The only flaw we saw was the small mechanical squeeze-type parking brake. It was neat to look at but that's where its charm ended. Set it when the rotor was hot, and it might hold, but as the rotor cooled and contracted, well, you can see where this thing is headed (especially if the vehicle in question was on the portly side).
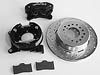
The cure for that problem comes in the form of Wilwood's new trick brake kit that incorporates an OEM drum style E-brake along with a 12.19-inch rotor, and this thing is really slick. The backing plate, E-brake shoes and caliper-mounting bracket come as an assembly that simply slips onto the OEM axel flange studs and then bolted in place. Add some Lokar E-brake cables and you're ready to go (or, more accurately, stop).
But first, some basics: Because this is a street-only application we opted to use the OEM axels in our assembly rather than spring for a pair of new aftermarket hard axels. Because these are OEM there are a couple of details that need to be handled to make them compatible with the disc brake conversion. First, the adjustable axel bearings have to be removed and replaced with nonadjustable (green) aftermarket bearings. The second item that concerned us was the axel flanges might have been damaged at some point in time, and the surface might not be quite true, which would give us fits when we tried to get the wobble out of our rotors.
It was a simple matter for the machinist Jon Huber (St. Louis, Missouri) to press the studs out and reface the flanges in his lathe. The result is a 100-percent true surface, prepped and ready to mount the hats. The added bonus is that new studs will replace the rather grungy items that were pressed out. The OEM changeover is a lot cheaper than new hard axels would have been, but if you're going to race the car or it's going to see serious street competition of any type, then by all means spring for the stronger race pieces. None of this stuff is worth placing yourself in the unenviable position of being a part time crash dummy.
There are also several ways to hook up the brake lines. The route we took was to use either steel or stainless steel hard line and the proper size adapter fitting to connect the line and the caliper, using our trusty hand bender to shape the hard line the way we want it. The reason we went with hard line over any kind of flex line is that no matter how good the flex is, it will expand slightly when under pressure, which affects the brake function slightly. Of course the older it gets the more it expands, the more it expands the more it adversely affects brake function. Because the Wilwood pads can be changed without moving the rotor, hard lines can be used without creating a maintenance problem. The other upside is the fact that steel hard line is far cheaper than stainless braided flex.
When you're all done, you'll have to bleed the brakes as well as bed the pads (a combination of hard stopping procedures and cool-down time that helps burnish the pads). Though the whole job isn't as easy a job as we just explained, we did shoot a ton of photos and broke the assembly down into bite size pieces so we could give you a general idea of just how this system is installed. For specific directions you should always refer to the product manufacturer's instructions.