We’ve been working on bringing our 1960 Corvette back to life for the last year. The car was last used as a drag car with a 396 big-block under the hood; it then went into hibernation in a fellow hot rodders garage sometime in the early ’80s. When we purchased the car the engine and transmission was long gone, but other than some minor cutting up of the frame the car was in relatively good condition. As a matter of fact, soda-blasting revealed a very nice, no-hit body with only the lower front pan having seen repairs from curb damage.
With the suspension swap completed we turned our attention to choosing an engine. We wanted an era-appropriate engine in the car, so at first we were leaning toward building a 283 or 327. Remember, this was never going to be a numbers-matching car; far too many parts were missing for that approach. While considering something like a 283ci/270hp we discussed the old 396 that once powered the car and wondered aloud: What if Chevrolet had offered a big-block option in 1960? The answer to that hypothetical question was simple enough; they would have installed a 348-cubic inch “W-motor” (so named for the unique valve cover configuration) under the hood. Since the 348 was introduced in 1958 almost any quad-headlight C1 could have been so equipped. The 348ci/335hp would have been the ultimate answer as the 409 would not arrive on the scene until 1961. The more we thought about the 348, the more we liked the idea.
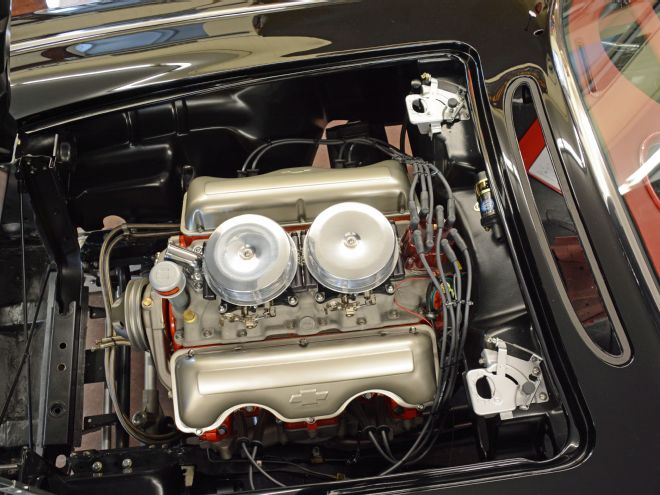
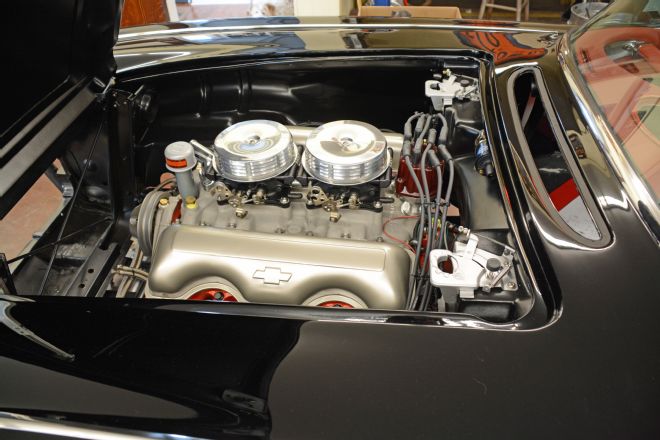
Taking the “What if?” theory one step further we decided to build a 348 and dress it out in a pure factory style. No chrome, no bling, no billet, just a painted engine with cast-iron exhaust manifolds and a dual-quad intake. Atop the Offenhauser low-profile, dual-quad intake we mounted a pair of FAST TBI units topped with early Corvette breathers. This provides a factory look, but with all the benefits of a modern fuel delivery. The engine would be coupled to a TCI Automotive 700-R4 since this particular C1 is built to cruise.
We took our engine to our local engine machine shop, Roberts & Son in Chattanooga, Tennessee, to be bored 0.030 over and balanced. They also handled the valve job after we ported and polished the stock heads in our home shop. We filled the block with forged pistons and an Isky flat-tappet cam and held everything on and in the engine together with ARP bolts. While the machine work was being done on the engine we wanted to set up the motor mounts. Now, you know you’ve brought your vintage engine to the right guy when he has an extra 348 block to loan you for motor mount setup while they perform the machine work.
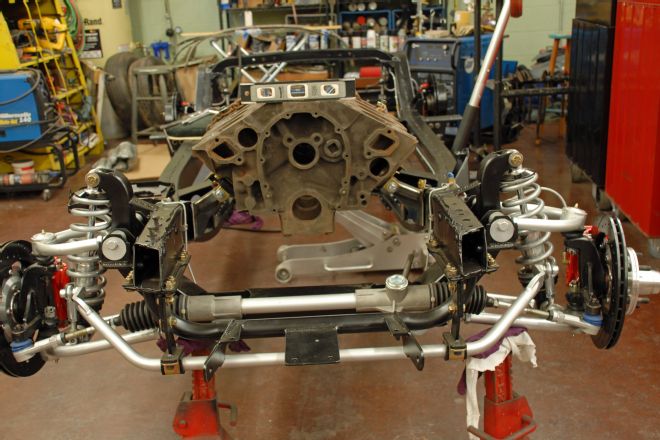
Armed with this spare block we set about installing the W-motor in the stock 1960 Corvette chassis. First, we bolted the block to our TCI 700-R4 transmission. We had ordered a rear transmission crossmember from Martz Chassis along with their motor mount kit. One of the many things to love about Chevrolet is the high interchangeability rate. The same motor mount kit for the small-block will also locate our 348. Of course hood clearance is always an issue with the C1 Corvette, but research indicates the W-motor is actually 1 inch shorter from the center of the crankshaft to the top of the intake manifold. Using the Offenhauser low-profile intake may provide even a bit more room than the stock intake.
With the engine block and transmission swinging from our engine hoist, we bolted the motor mounts and frame adapters to the block. The transmission crossmember was bolted in place using the factory holes in the frame for perfect location. We lowered the assembly into position with the rear transmission mount resting on the new crossmember, the frame adapters settled on top of the framerails.
This was almost too easy, but we did spend an hour or so fussing with getting the engine perfectly centered in the frame, leveling the engine from side to side and arriving at about a 3 degree front to rear angle. The 700-R4 cleared the center of the X-member nicely and the engine had plenty of room between the framerails. We arrived at the front to rear location by bolting the assembly in the center of the slotted holes in the crossmember.
After measuring several more times, we tack welded the frame adapters to the framerails and lifted the spare block and new transmission out of the chassis. We finished welding the frame adapters to the framerails, did some sanding, priming and blending in of our semi-flat black chassis and the job was done. We were very pleased with the entire installation and everything fit and worked perfectly.
After building our engine, we installed the TCI converter in the transmission (remember to fill it first) and then bolted a new TCI flexplate to the crankshaft. The original 348 flexplate will not work with the 700-R4. We then joined the 348 engine and trans together for the final time and installed them in the frame. A Powermaster hi-torque starter will spin the engine with ease and save both weight and space. With the stock exhaust manifolds installed on the engine, there was ample room for exhaust. The firewall clearance was perfect.
The final connection in the driveline comes in the form of a custom aluminum driveshaft from Inland Empire Driveline. When consulting the experts at Inland, they recommended an aluminum shaft as the modern overdrive transmissions do not take well to the heavier steel units. The driveshaft arrived and was a perfect fit between the 700-R4 tranny and our Currie 8-inch Ford rear. The driveline was complete. We also took the time to route our transmission cooling lines using Jiffy-tite quick disconnect lines. We also mounted the Lokar shift indicator switch, Lokar flexible dipstick and the TVR cable for the 700-R4. This was much easier than doing it with the body in place.
There is a lot to consider with an engine swap in a C1. Because the transmission sits on top of the X-member, the driveshaft angle can be extreme. This also limits how low the engine can be mounted in the frame, which in turn makes hood clearance a real issue. After putting our body back on the frame it was apparent that the front FAST throttle body was very close to the hood. However, we had to modify the early Corvette air breathers to fit the FAST fuel injection and we ended up with about 3/4-inch between the hood and the front air breather. Bear in mind the FAST TBI is shorter than a four-barrel carburetor, so that provides some extra room and the Offenhauser low-profile intake is very low. In the end it all fit but we’d be lying if we didn’t say there were some tense moments fitting the breathers. And with 20/20 hindsight we may have lowered the engine an inch and spaced the tranny down an additional 1/2-inch and let the driveshaft angle suffer a bit, particularly if you plan on running dual-quad carburetors. A single four should be no problem. Happily there were no clearance problems with the TCI tranny and the factory floor in the car.
With the FAST-EZ dual-quad injection sitting under early Vette air breathers, the engine really does look like it a factory option. The engine will produce over 300 horsepower, which is ample for the 58-year old chassis and plenty of power for a vintage road car. It all makes you wonder not only “What if?” but also “Why not a big-block Corvette in 1960?”
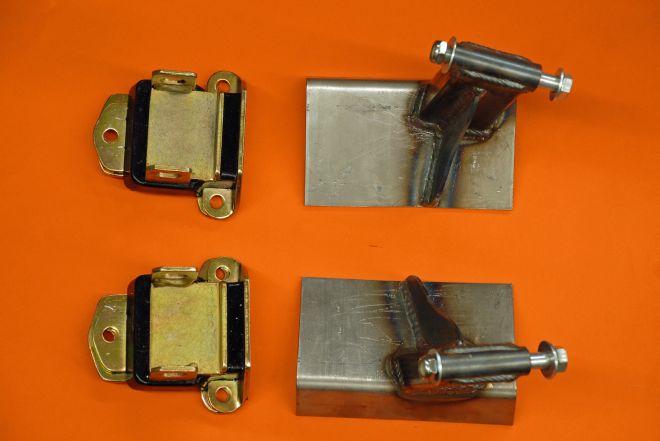
01. After swapping out the front suspension in our 1960 Corvette, it was time to convert to late-model side-mount motor mounts. While we are mounting a 348 W-motor to the frame, these adapters were designed for the small-block engines.
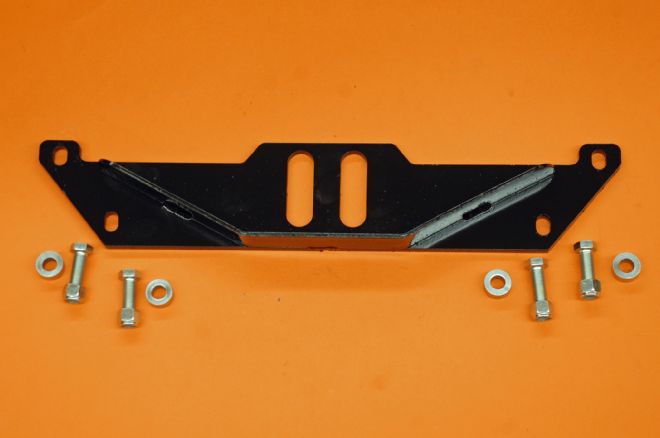
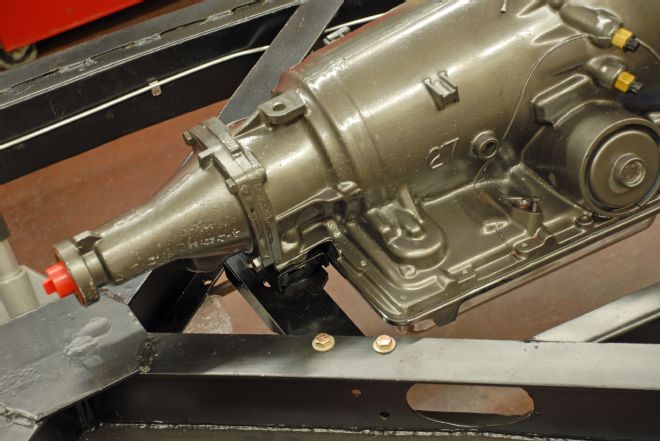
02. To complete the installation we would need a new transmission crossmember to support our TCI 700-R4. The engine mounts and crossmember are from Martz Chassis.
03. Installing the new transmission crossmember is a simple affair, employing existing holes in the frame. Spacers and bolts locate the crossmember. The rubber mounts bolt to the transmission tailshaft.
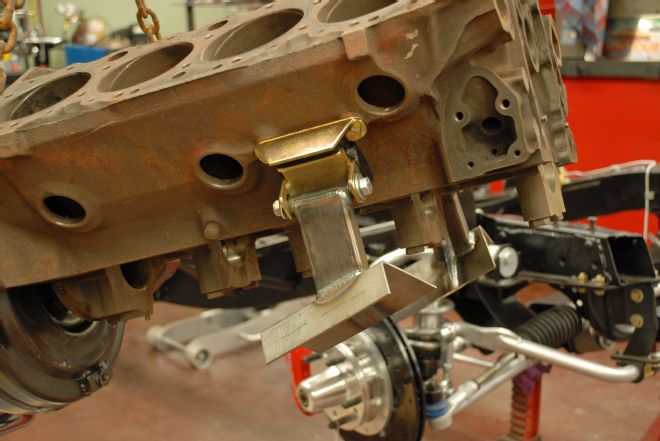
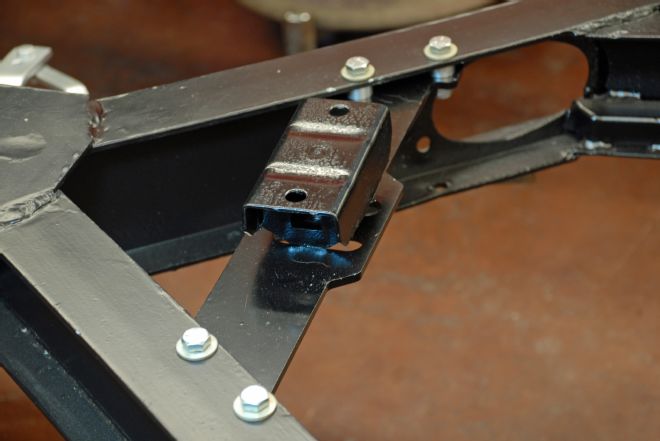
04. We located a spare 348 block for setting up the motor mounts. Using an empty block makes set up easier. The motor mounts are bolted to the engine with the frame adapter bolted to the motor mount.
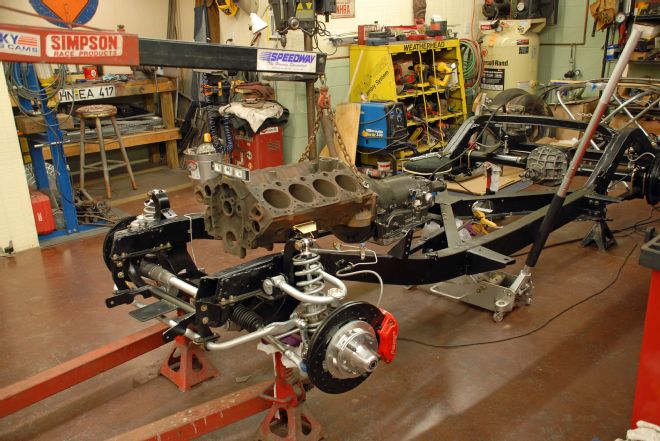
05. We coupled the spare block to our new 700-R4 transmission and lowered the assembly into the chassis. The Currie 8-inch rear will handle the power of the W-motor.
06. The transmission crossmember is slotted, and we bolted the transmission in place in the center of the slots. This effectively determines the fore/aft location of the engine.
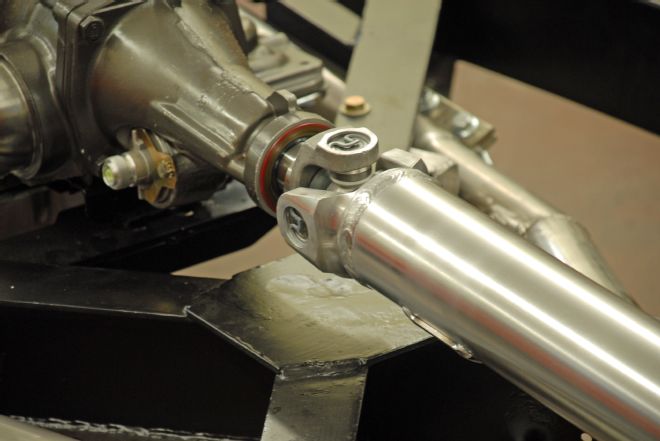
07. A test-fit of our 3-inch aluminum driveshaft shows ample clearance for the yoke. Inland Empire Driveline manufactured the custom driveshaft.
08. With the engine resting on the frame adapters, we adjusted them until the engine was level from left to right and also achieved approximately a 3-degree angle front to rear. We also checked to ensure the engine was centered in the frame.
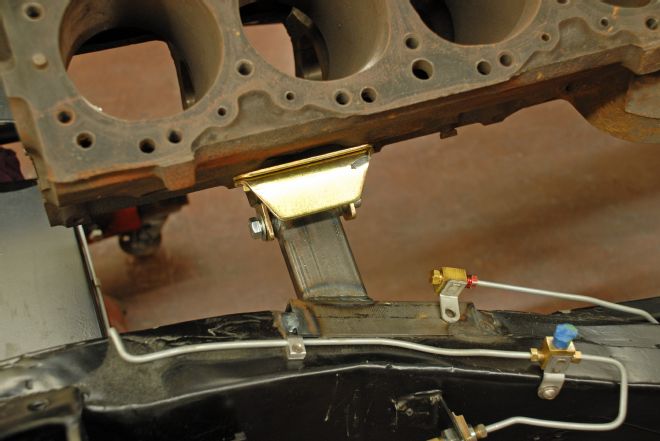
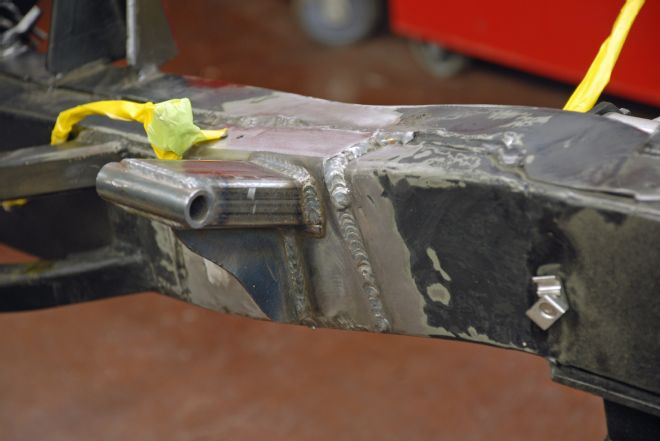
09. Next, we tack welded the mounts in place, checked and rechecked our level and measurements. One final check was to ensure the motor mount bolts slide in and out easily. They should not be in a bind. [This is the driver-side mount.]
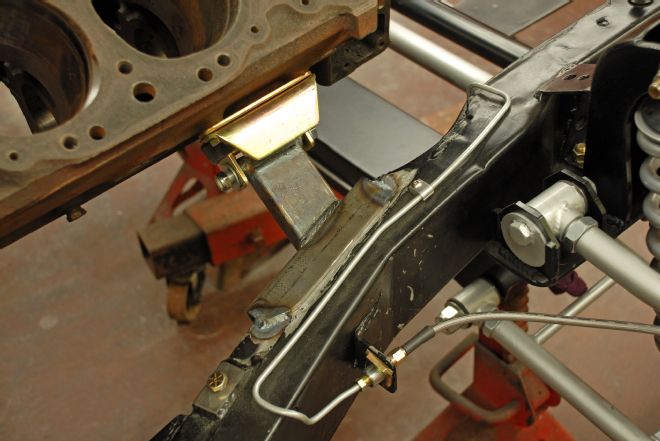
10. The passenger-side mount is very similar and we tack welded them in place with our Miller TIG welder. The brake lines were all removed prior to final welding with our MIG as welding splatter and excessive heat can damage brake lines.
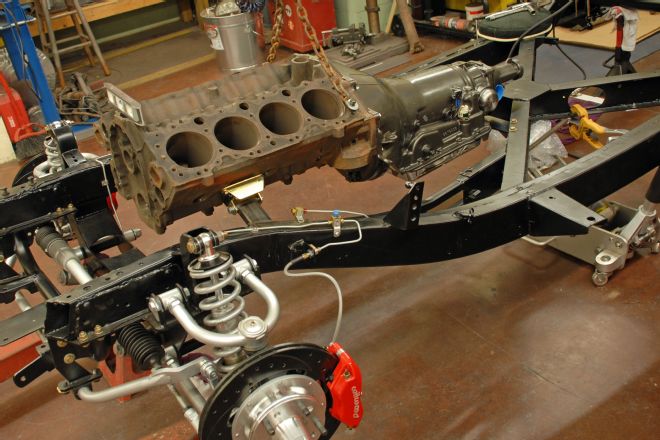
11. Here is the engine and transmission mounted in the frame prior to final welding. The engine sits quite high in the C1 Corvette frame, and while it would be nice to lower the engine an inch or so, that complicates the driveshaft angle.
12. Certain that everything was in position, we did the final welding with our Millermatic 140 MIG welder. This was followed by sanding and blending the chassis paint.
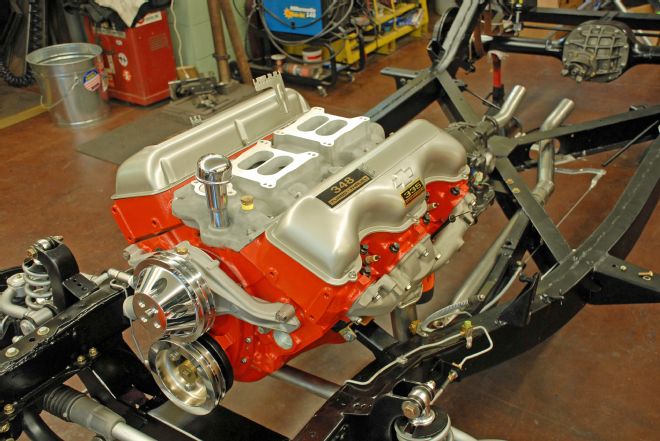
13. We built the engine in our home shop and dressed it in vintage style. While Chevrolet never offered the W-motor big-block in 1960, if they had, this is what it would look like.
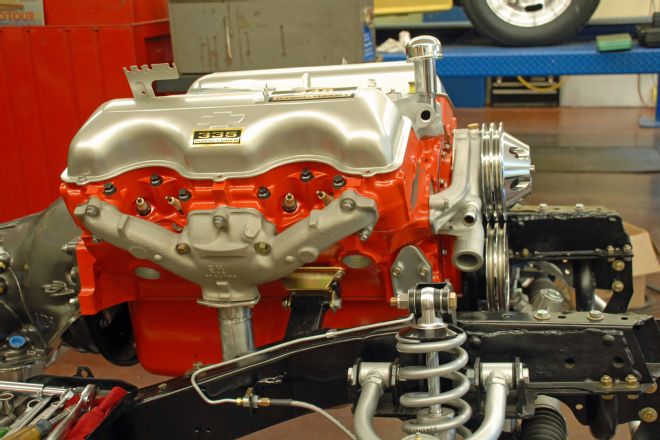
14. The motor mounts provide plenty of room for exhaust, and while we opted for stock manifolds there is room for headers, too. These mounts are designed for small-block applications but work fine with the 348 engine.
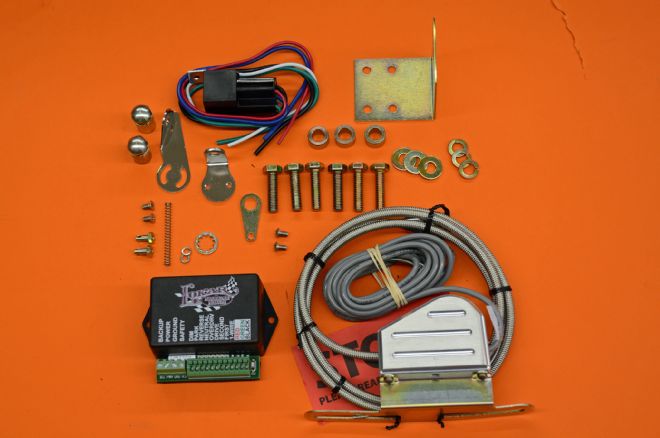
15. With the engine and transmission in place we decided to install the neutral safety switch, back-up light and shift indicator switch on the transmission prior to putting the body on the frame.
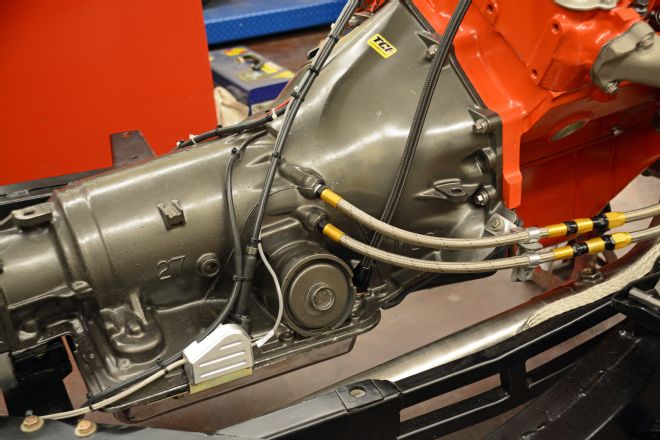
16. The Lokar unit bolts in place on the passenger side. We also installed quick disconnect cooling lines from Jiffy-tite, a flexible dipstick from Lokar and the TVR cable from TCI Automotive.
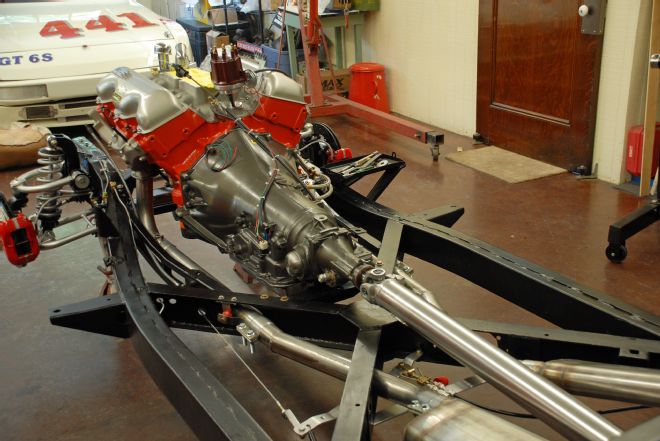
17. Looking forward from the rear of the driveline, it looks like a factory installation from the aluminum driveshaft to the homebrewed 2-inch stainless steel exhaust.
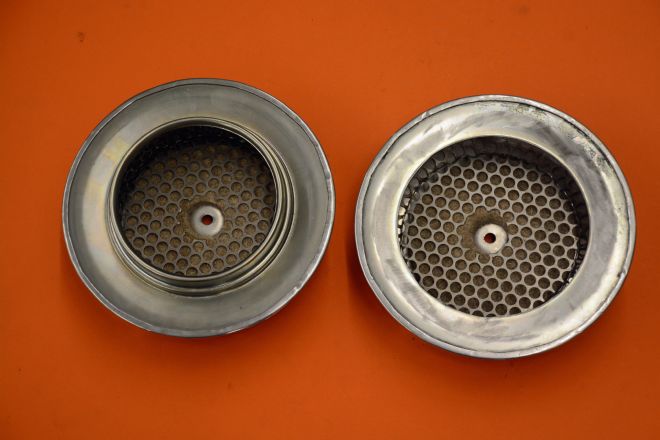
18. Engine clearance on the front FAST TBI unit was minimal. We used a pair of ’57 Corvette breathers from Corvette Central and modified the bottom to fit the FAST units. The modified unit is on the right. This also lowered the breather.
19. FAST dual-quad fuel-injection units are actually lower than an AFB carburetor. The early Corvette air breathers add vintage Corvette flavor to the engine bay giving us performance and style in equal parts.