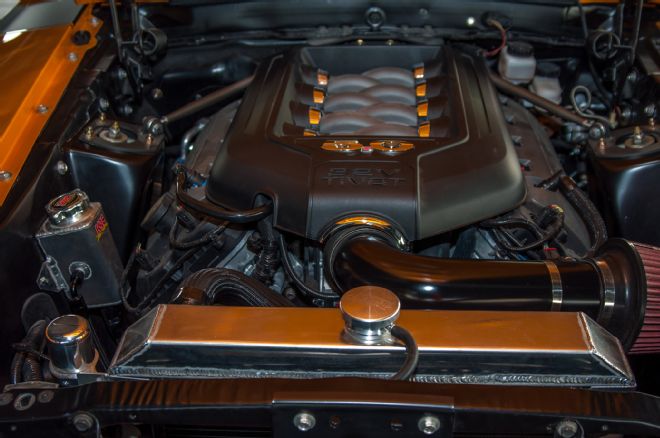
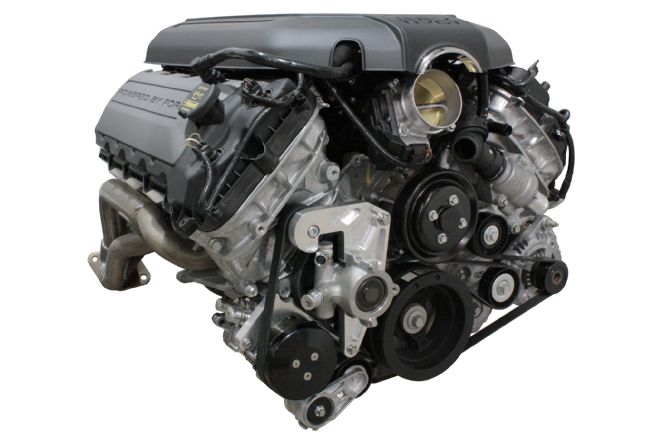
Pushrod engines can be so 20th century. Ford hasn’t produced a production engine with a cam-in-block design that actuates the valves via pushrods and rocker arms since 2001 (and that would be the 5.0L Explorer for those keeping track at home). That’s nearly 15 years ago. Much like carburetion and four-speed manual transmissions actuated by mechanical linkage, the pushrod V-8 engine was replaced due to its inefficiencies that cost it performance, fuel mileage, and even handling/braking. When you consider today’s all-aluminum engines with multiple valves, overhead cams, and six-speed (or better) transmissions that make more power than the big-blocks we croon over from the ’60s, it is easy to see why these modern engines are ending up in more and more vintage engine swaps. It’s now easier than ever to get a modern engine fitted to a vintage Mustang and there’s no argument that the 5.0L dual overhead cam (DOHC) from the 2011 to current Mustang GT, affectionately known as the “Coyote” modular V-8, is the engine of choice today.
Early modular engine offerings were rather anemic in their power offerings, with the original 4.6L two-valve in the 1996 Mustang GT, offering just 215 hp. The four-valve DOHC version of the 4.6L found in the same year’s Cobra model was good for 305 hp. It would take adding a supercharger and good internals for the debut of the 2003-2004 “Terminator” Cobra to get even close to 400 hp (the engine was rated at 390 hp). So when the Coyote 5.0L DOHC modular hit the ground under the hood of the 2011 Mustang with 412 hp, people noticed! Over 400 hp without the use of a supercharger had Ford fans running to their dealers for testdrives. The Coyote’s cylinder head design, camshafts, and trick electronic valve timing control (each cam independently controlled) meant this new modular not only made good power, but actually had usable torque down low, something the Mustang was missing since its pushrod days. The Coyote quickly became Ford’s media darling as the Mustang made waves, the engine found its way into Ford’s hot-selling F-series pickup truck, and later found its way into the Ford Performance Parts Catalog with a custom harness to allow installation in just about anything with four wheels.
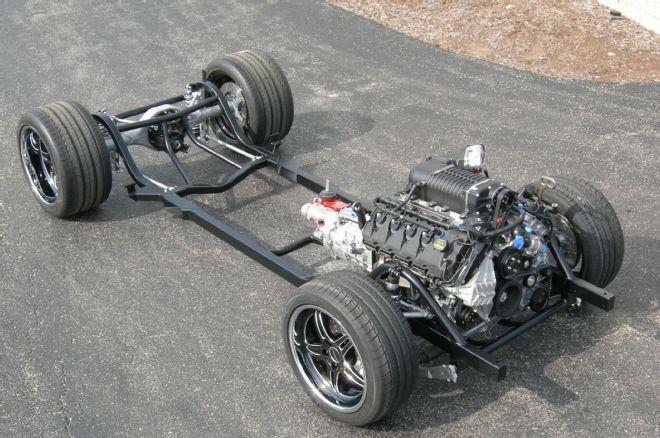
Early adopters are everywhere, whether it’s for curved televisions, smartphones, or engine swaps. As soon as the first wrecked 2011 Mustang GT hit the salvage yard people were whipping out their measuring tapes and trying to figure out how to get a used Coyote into their vintage Mustang’s engine bay. These early adopters most certainly have helped pave the way to make this swap much easier for all of us now five years later. From oil pans, engine and trans mounts, to modifying the front suspension for fitment of the wide modular engine, figuring out all of the swap’s pitfalls means today we have companies that offer bolt-in or weld-in products that make this swap very end-user friendly, with the ability to accomplish the swap in your home garage.
One of the early headaches for those blazing a trail to be the first with a Coyote 5.0L under their hood was wiring. Ford’s latest version of its Passive Anti-Theft System (PATS), until just recently, was not able to be bypassed by simple handheld tuners as in years past. Besides the Ford Performance Control Pack wiring option there are several other wiring alternatives that will get your Coyote up and running, including those from FAST, Holley, and AEM. However, only Ford Racing’s Control Pack retains the variable valve timing. All of the other systems mentioned must have the cams locked. The AEM system requires the Control Pack wiring to already be in place and swaps the Ford PCM for the AEM unit with a wiring adapter. It allows for more tuning options, but is more of a race-oriented piece and quite simply overkill for street use. From those we’ve talked to that have done the Coyote swap in a vintage Mustang, all of them have used the Ford Performance Control Pack system, but if you’re looking for something with more race-oriented features (data logging, and so on) there are alternatives like the AEM and Holley HP systems.
Other than the wiring, the one remaining big hurdle is physically fitting the Coyote into the engine bay. There are several schools of thought here, including all-new front suspension/crossmember systems that remove the shock towers completely, or strut-based front suspensions that require the very top of the shock tower to be retained, but the rest can be trimmed back for engine clearance. The strut-based systems are a bolt-in, though cutting and welding is required for trimming the shock towers, whereas the complete front suspension conversions usually require a fair amount of welding and chassis prep. If your front framerails are rusted out or you have other structural issues a full front subframe conversion might be an option for you, or a complete perimeter frame conversion.
Once you have your Coyote 5.0L in place and the wiring tackled the last few issues are relatively minor compared to actually getting the engine in place and getting it wired up to run. You’ll need to figure out cooling system routing and plumbing, engine inlet routing, and if you are going to add or adapt to your power steering, power brakes, and A/C, and if so, how to accomplish that. Lastly, you have the transmission decision. The Coyote can be fitted with numerous manual and automatic transmission options, everything from the venerable C4 three-speed automatic to the latest six-speed manual. Most are a direct bolt in with the proper installation kit or adapter from several performance transmission resources, which we’ll go over in the captions. So fear not! A Coyote 5.0L swap is becoming as popular an engine swap as ever and it gets easier by the day as new products aimed at helping the swap become a reality in your driveway hit the market.
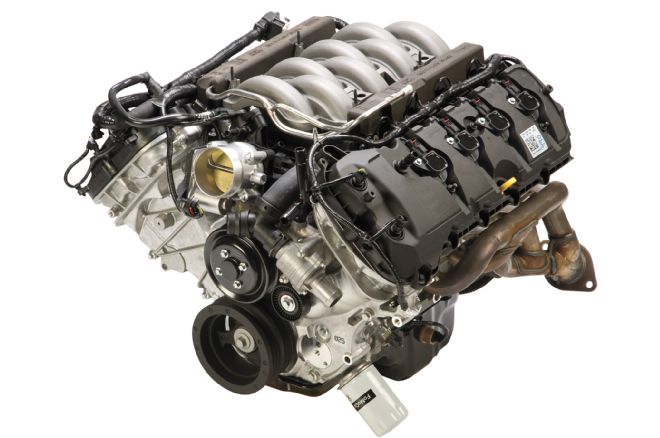
01. First thing’s first, you need the Coyote 5.0L engine. There are several choices here, first off being the new-in-the-box crate engine directly from Ford Performance. Note the engine halo cover is not shown, as that is sold separately.
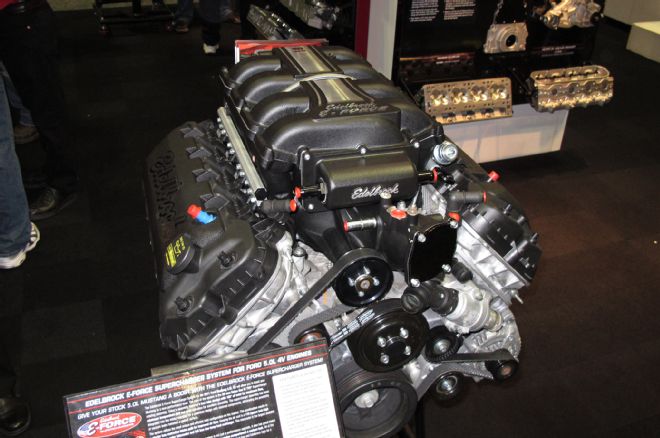
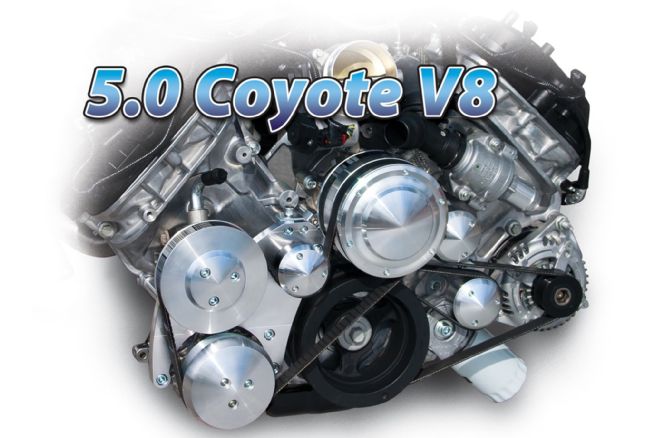
02. If you’re looking for a little more go-power, Coyote 5.0L crate engine offerings are available in several forms that are built up with better internals to handle boost. You can even get a Coyote 5.0L built with all the internal goodies and with a supercharger already strapped in place from Edelbrock (www.edelbrock.com)!
03. Of course you can still find a used Coyote in numerous salvage yards. Expect to see anywhere from 30,000-50,000 miles on these engines, but you’ll save a few bucks compared to buying a new crate motor. The Coyote 5.0L found in the F-150 is a viable option, but know that the cams are different and you get a little less power/torque. The injector harness on the F-150 engine is identical to the Mustang, so that’ll work just fine in your swap. Don’t bother with the rest of the wiring or the PCM, as it simply is too much trouble to get working in a swap like this.
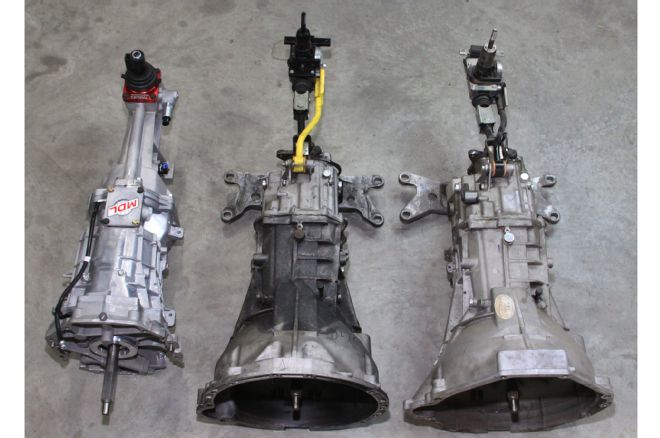
04. For transmission you’ll first need to decide if you want to go manual or automatic. The stock Getrag six-speed manual is better left in the salvage yard according to Bruce Couture at Modern Driveline. The Getrag has no speedometer provision, requires a special driveshaft, and uses a remote shifter not easily modified to work in a vintage Mustang. Shown here is a Modern Driveline T-5 next to the remote shifted Getrag. The T-5 is a capable trans behind the Coyote for light-duty use (cruising, no sticky tires).

05. The better choice is a Tremec TKO-series transmission. Modern Driveline upgrades these with carbon-fiber rings to allow the higher rpm shifting the Coyote is capable of. A low-profile top plate conversion offered by Modern Driveline also allows easy installation of the TKO without modifying the transmission tunnel. Modern Driveline’s Coyote kit includes crossmember, bellhousing, clutch, fluid, fasteners, and more. Shown here is the Tremec Magnum six-speed kit.
Manual Trans Tips
We spent a bit of time on the phone with Bruce Couture of Modern Driveline getting the 411 on manual transmissions that will work with the Coyote 5.0L modular (and most any other modular V-8 offering for that matter). As noted in the photo captions, Modern Driveline offers brand-new Tremec transmissions in several configurations, including a basic T-5 five-speed, a heavy-duty TKO-500/600 five-speed, and the Magnum six-speed. Besides the transmission itself, which Modern Drivcline can configure for your year Mustang for best fitment, proper speedometer connection, and so forth, Modern Driveline offers a full complement of driveline bits to complete the swap. From crossmembers, bellhousings, clutch kits, and even driveshafts, plus hydraulic clutch actuation.
We know a lot of our readers like the “thrill of the hunt” and often prefer to use swap meet or salvage yard scores for their projects. We asked Couture about older Ford transmissions and any “gotchas” you might stumble over. Couture tells us that to use the late-model GT500 Mustang six-speed in an early Mustang means having to cut the top of transmission tunnel, change out or remove the floor support, and more to obtain the correct driveline angle. Modern Driveline is currently working on offering a pre-formed sheetmetal piece with floor support to fit the six-speed in the future. Essentially you would trim away your Mustang’s transmission tunnel and weld this new panel in place, offering plenty of room for these larger transmissions.
Going back even farther you will find the T-45/ Tremec 3650 transmissions in the modular-powered Mustangs. These will work with the correct bellhousing, clutch, and crossmember. The downside is finding a good used one. Usually these transmissions, due to their age, have a lot of miles and shifts on them and would need a solid rebuild to be viable behind the Coyote, but it is an option. An additional note to consider is that the 2001-2004 Tremec 3650 five-speeds will work, but these years have an electric speedometer connection only. Not an issue if you’re using modern electric gauges, a GPS-based speedometer, or are willing to pay for an electric to cable-drive adapter.
Lastly, old four-speeds like a Top Loader are certainly possible behind a Coyote (the TKO and Top Loader use the same bolt-pattern) but there is no provision/room for the stock mechanical clutch linkage, nor is there a cable-actuated option for the old four-speeds. Thusly, your only clutch control option would be to utilize a hydraulic release bearing in place of a traditional clutch fork and release bearing.
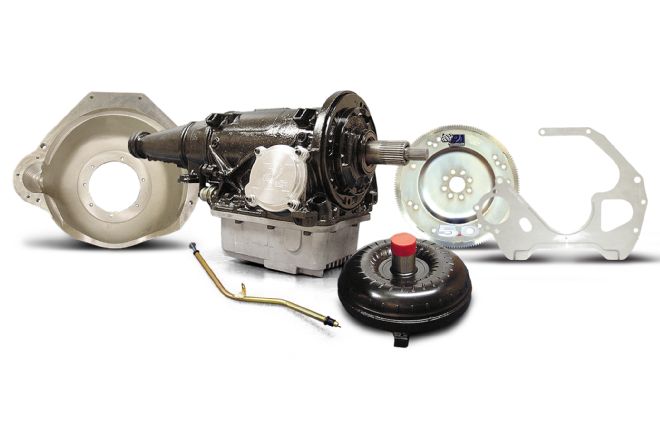
06. When it comes to automatic transmissions the easy route may be the transmission you already have. Yes, the venerable and ever-popular C4 three-speed automatic will bolt up to your Coyote with the proper bolt-on bellhousing. Shown here is Performance Automatic’s complete C4 Street Smart trans kit with bellhousing, block plate, converter, dipstick tube, and flexplate. If your C4 is up to the task Performance Automatic sells everything you need between the trans and engine block separately.
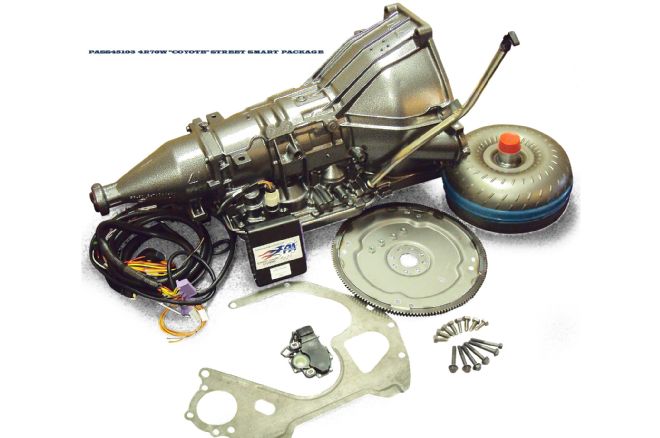
07. Your next step up in the realm of auto shift boxes is the four-speed automatic overdrive. You have a few options here, but honestly the best route with the least headaches is going to be Ford’s popular 4R70W. Performance Automatic offers a Street Smart package that includes a performance-built 4R70W and everything you need to get it behind your Coyote, including Smart Shift electronics, manual lever sensor, block plate, flexplate, converter, and attaching bolts.
Auto Trans Tips
Fitting the more modern overdrive automatics into a vintage Mustang is nothing new. People have been stuffing the AOD from the Fox Mustang into vintage Mustangs for more than 20 years. However, the same fitment issues still come into play with the modular Coyote bolted in front of these larger transmissions. The tunnel brace often requires minor trimming or flattening, especially on the 1965-1966 and its smaller transmission tunnel. While the AOD can fit behind a modular engine with a custom bellhousing, due to the fact the Coyote is a drive-by-wire modular engine, the AOD and its throttle valve (TV) shift control cable (which usually attaches to a mechanical throttle body lever) are not suitable for this application. A constant pressure valvebody, which does not require the TV cable operation, would rectify this issue, but you’re honestly better off stepping up to the 4R70W.
With the 4R70W, Ford really built one tough overdrive automatic. Learning from the AOD’s weaknesses and improving on its strengths, the 4R70W easily handles 700 lb-ft of torque in stock build configuration and features a wide-ratio gear set (the 70 and W in the name respectively). Add an aftermarket controller like Performance Automatic’s Smart Shift unit and you can easily adjust shift points, shift feel, converter lockup, and more by simply turning a knob. No more dropping a valvebody a dozen times tweaking springs and hoping you got it right. The 4R70W is quickly becoming the “go to” automatic overdrive swap choice even behind traditional pushrod engines.
The Ford 6R80 six-speed automatic found behind the Coyote in the 2011-2015 Mustang is an option, albeit one that will require some floorpan surgery and a way to control it. The floorpan modification is nothing a good fabricator can’t make once the driveline angle is set, but know that the taller/wider transmission tunnel might make fitting a stock console or even stock carpeting/seats an issue. However, there are ways around these issues as well with custom carpet, aftermarket seats, and building your own console. The biggest problem with the 6R80 is controlling it. While several aspiring builders have used the transmission along with stock wiring harnesses from the F-series truck and custom tuning, there is currently not a plug-and-play standalone controller on the market for the 6R80 transmission. We’ve heard Performance Automatic has one in the works that is currently being tested in a vehicle, but nothing that is production ready at the time of this writing.
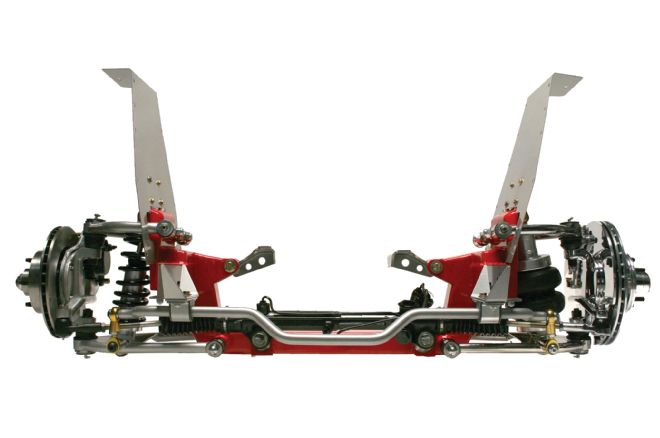
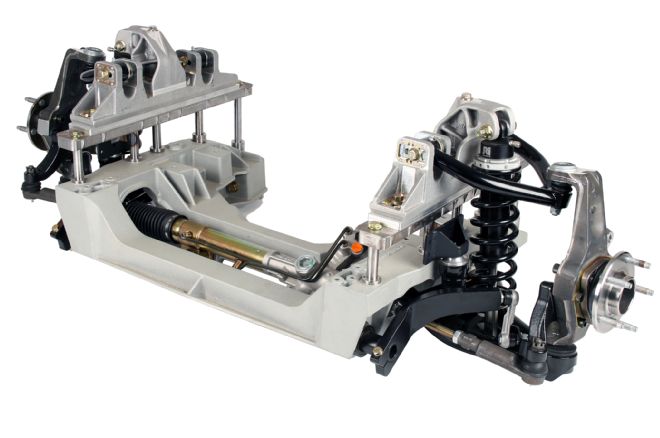
08. So you’ve figured out your engine and transmission choices and now you’re ready to go, tools in hand. If you haven’t noticed by now, actually fitting the Coyote into your Mustang is going to require some reconfiguring of the engine bay. A popular route is a new independent front suspension (IFS) that relocates the spring to the lower arm and eliminates the shock/spring towers, one of which is shown here from Total Cost Involved (TCI) Engineering. The TCI Engineering system welds into the front framerails and then the suspension pieces bolt to the new subframe, providing ample clearance.
09. The Roadster Shop offers its own IFS that utilizes modern Corvette spindles, a splined antisway bar, and other high-end goodies for a suspension that not only allows Coyote fitment, but can easily tackle the road course as well.
10. Detroit Speed’s Aluma-Frame IFS is another, very capable IFS that can be considered as well and comes ready to fit the Coyote engine. The aluminum subframe structure bolts to the stock frame rails and sandwiches it after welding in the mounting plates. Detroit Speed’s instructions offer several part numbers for Coyote fitment, including headers, oil pan, and more.
11. Rod & Custom Motorsports was one of the first IFS manufacturers to offer a Coyote-specific IFS package and they now offer a righthand-drive configuration for those countries that require it.
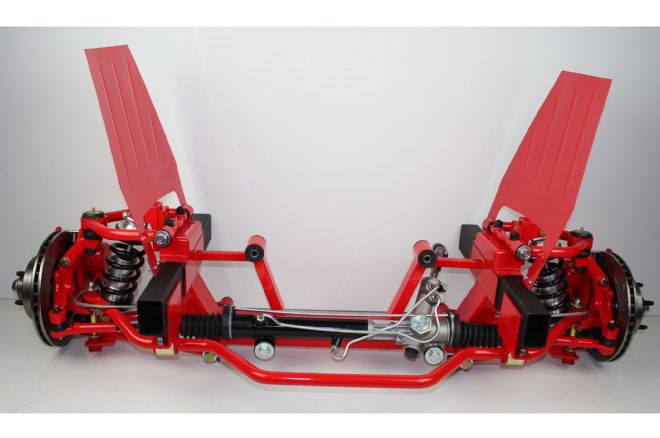
12. While the dual A-arm IFS setups are a popular route, many Coyote swappers prefer a strut-based front suspension. With a strut IFS you do have to maintain the very top of the shock tower, as it is the mounting point for the top of the strut, but the remaining shock tower can be cut back/trimmed for engine fitment. One such offering is this strut package from Gateway Mustang. As installed you can see the Coyote clears fine with the shock tower simply trimmed back.

13. Fatman Fabrications has an interesting offering for strut IFS builds. Its modular system uses a series of bolt on tubular supports and stamped metal panels to completely reform the engine bay and offer the maximum clearance for the wide Coyote. Bolt on engine mount adapters and firewall/core support bracing are included.
14. If you’re considering all-new suspension front and rear for your Coyote build then you might want to forego the typical suspension kits and upgrade to a full perimeter frame offering like those from the Roadster Shop and Schwartz Performance. Shown here is a Schwartz Performance chassis configured for a Ford Performance supercharged Coyote crate engine backed by a Tremec TKO-600. Simply trim away your stock front shock towers and framerails, weld a few mounting tabs to your Mustang’s unibody, and bolt it down on this performance frame package.
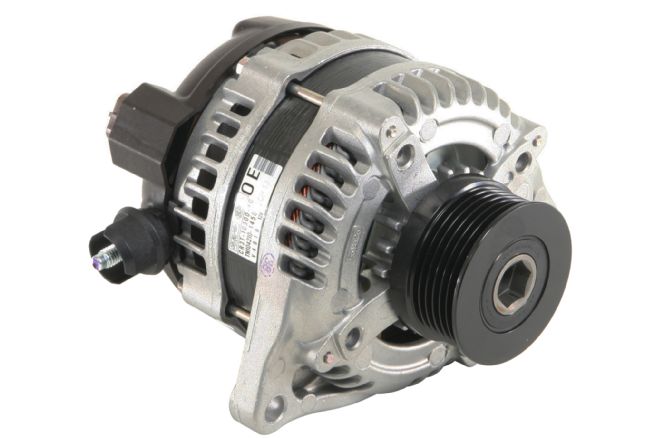
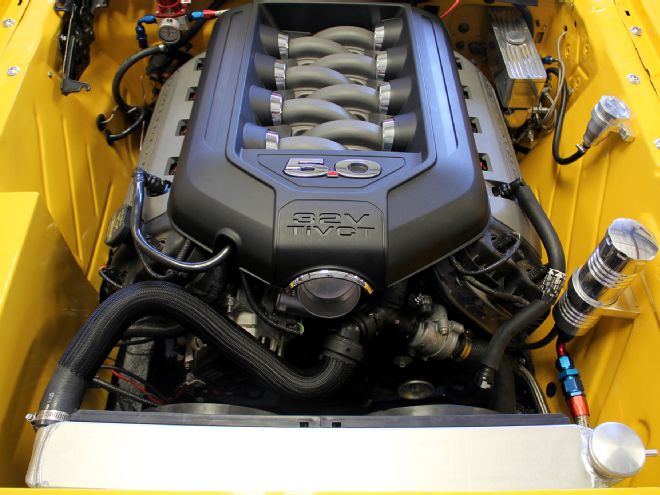
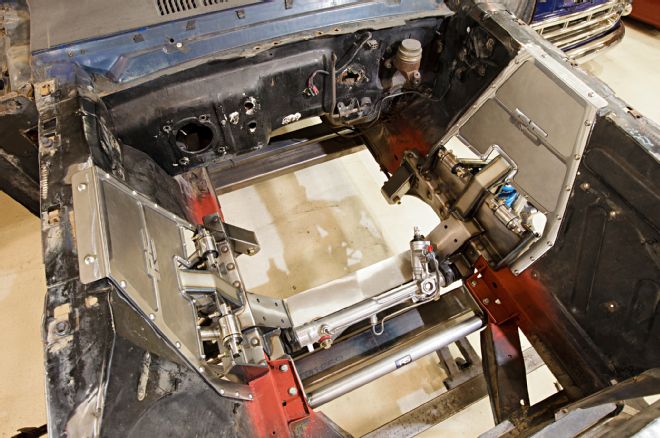
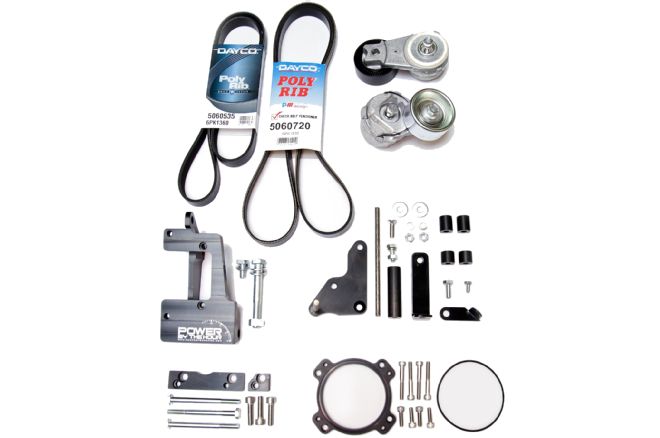
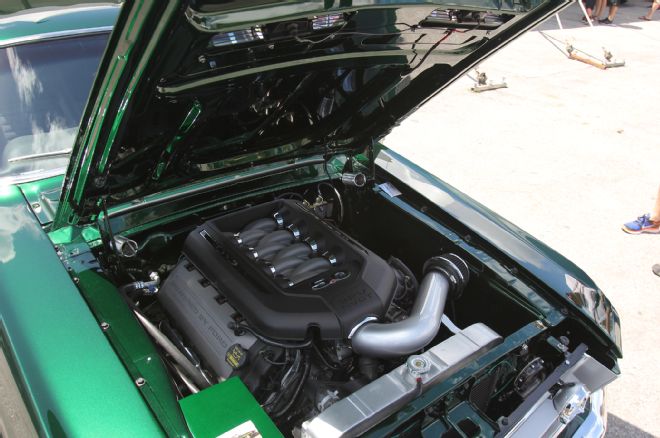
15. If you look back at our lead image to our story you’ll see the Ford Performance Coyote crate engine does not come packaged with any drive accessories. The modular engine family is quite different than the pushrod engines of past and requires tangentially mounted accessories (meaning they bolt directly to the block without brackets). Ford Performance offers an alternator kit with drive belt for the Coyote under M-8600-M50BALT, which includes the Boss 302 alternator, high-tension belt tensioner, and serpentine drive belt.
16. If you’re running manual steering and no A/C, the Ford Performance alternator kit is all you need, but if you’re looking to go all out with full accessories then you’ll need to investigate an aftermarket arrangement. One such setup is this Front Runner system from Vintage Air. The kit uses the industry standard Sanden A/C compressor and GM Type II power steering pump along with custom brackets and spring-loaded belt tensioner to offer a very compact setup on the passenger side of the engine.
17. March Performance offers a Coyote pulley system as well, also with the Sanden and GM Type II hardware, however the pump pulley faces forward and is driven off of the water pump versus the crankshaft. This means the March setup does protrude from the engine front a bit, but in our experience modular swaps into vintage Mustangs often leave plenty of room between the engine and radiator/cooling fans so this should be a non-issue, at least in a Mustang.
18. Yet another alternative for accessory drive mounting is this unique kit sold by Stang-Aholics. Originally designed for Coyote swaps into 1996-2010 Mustangs, this kit allows easy transfer of these year modular engine accessories to the front of the Coyote. You’ll still need a power steering pump, alternator, and A/C compressor, but you can easily pick up new ones from a parts store or hit your favorite salvage yard to pick these from the front of any 1996-2010 Mustang.
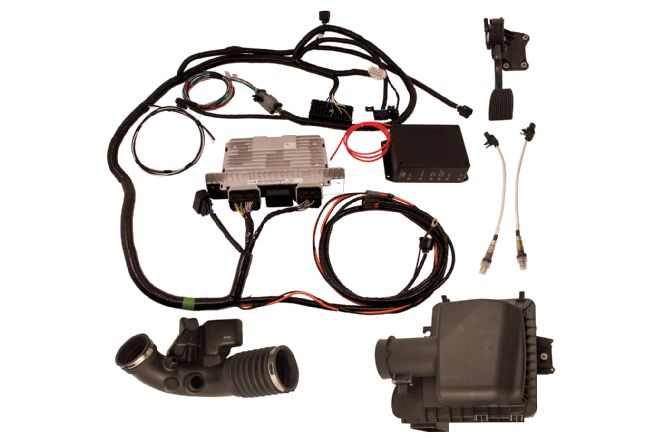
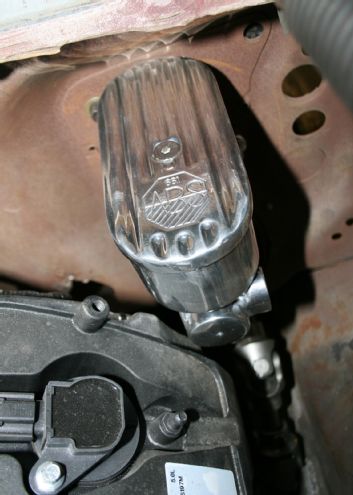
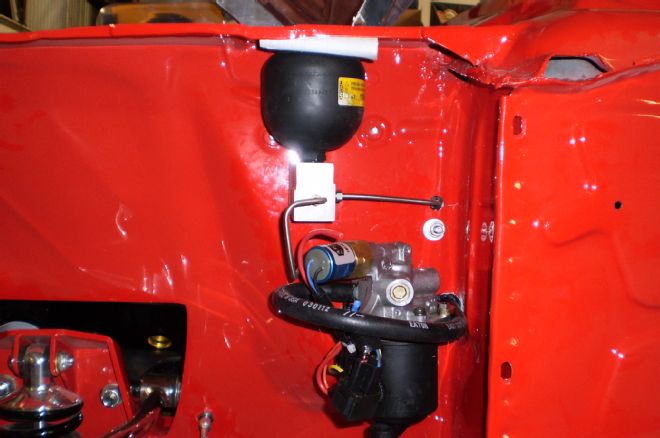
19. As mentioned earlier, wiring the Coyote is a breeze if you use the Ford Performance Control Pack kit. It includes the body harness, PCM with special calibration, inlet ducting and air box, drive-by-wire throttle pedal, oxygen sensors, and fuse box. Once connecting the harness to the crate engine and the pedal you literally have about six wire leads to connect to power the engine.
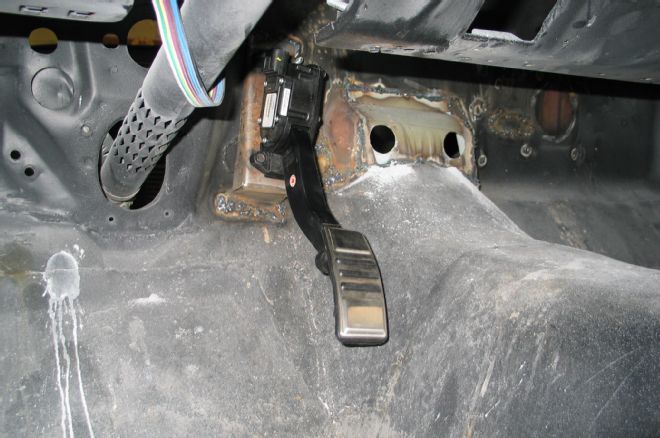
20. The Control Pack drive-by-wire pedal will need to be mounted via a custom-fabricated mount. This is an earlier pedal shown installed here, but it gives you an idea of what needs to be done. This bracket was fabbed from steel sheet and bolts welded to it as mounting studs at the top and a nut for a bolt at the bottom.
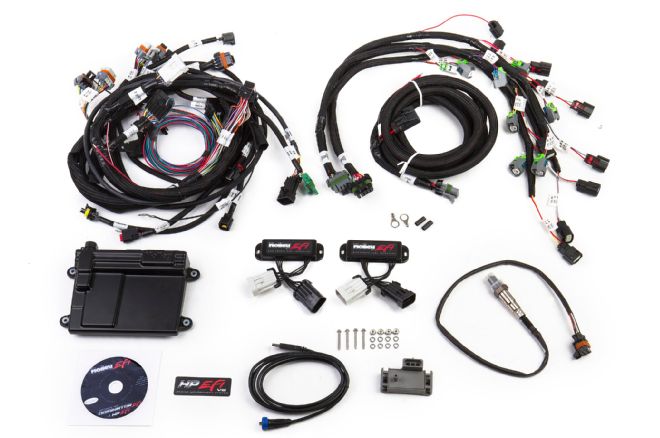
21. The Holley HP system (www.holley.com) is another EFI wiring alternative to the Control Pack from Ford Performance. Each has their pluses and minuses, but if you intend to make some serious horsepower and/or add power adders (turbo, supercharger) you might want to have a look at the Holley system.
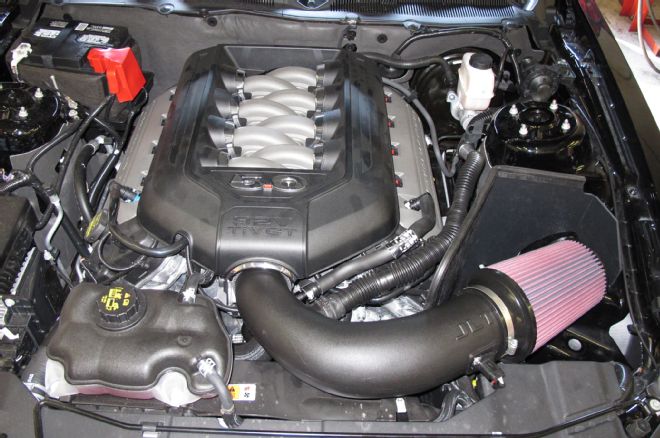
22. One part of the Control Pack that you won’t use in a vintage Mustang conversion will be the airbox and possibly the inlet ducting. Depending upon accessory mounting and your engine bay you might be able to get an aftermarket cold air kit to work, like this JLT (www.jlttruecoldair.com) system shown here on a 2013 Coyote Mustang GT with a minimum of fuss.
23. Alternatively you can fab your own inlet tubing and add a mass air sensor mount and a filter to the end, as in the case of this Coyote install in a 1967 fastback. Several companies offer universal tubing, mass air sensor mounts, and filters. Gateway Classic Mustang offers a Coyote in a vintage Mustang cold air kit too, ready to go.
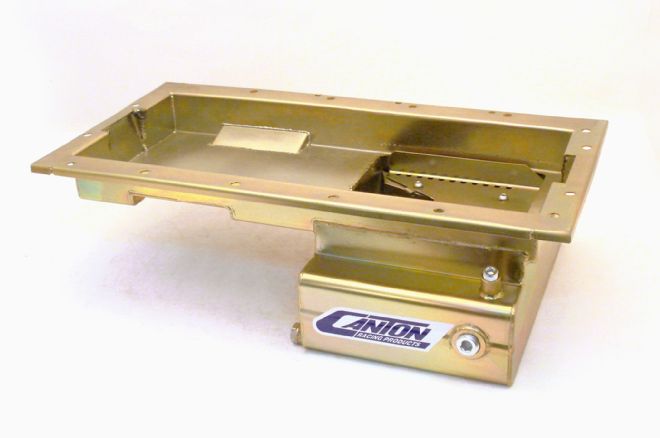
24. Getting the Coyote down on the mounts for many of the IFS setups means swapping out the production rear sump oil pan for a front sump pan. Canton Racing has the perfect answer with its new Coyote swap pan for vintage applications. Check with your suspension provider first though to see if they have a preferred pan that fits their suspension, or if the stock pan will work with their crossmember.
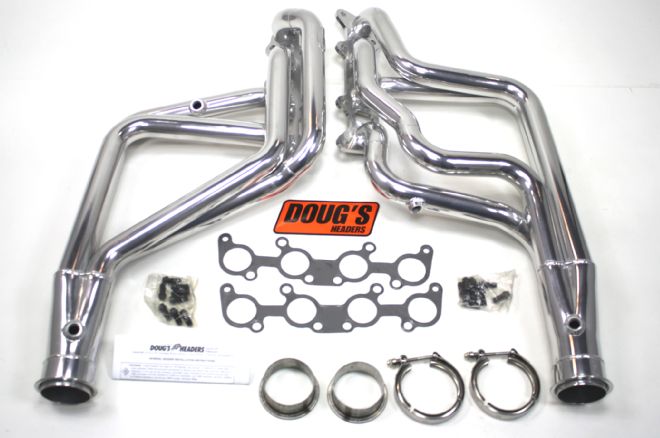
25. Some builders use the stock iron manifolds for the beginning of their exhaust fabrication with an engine swap. The stock manifolds on the Coyote, however, are a sort-of Tri-Y setup and interfere with the chassis and steering. The best solution right now is a set of swap headers, with the Coyote swap headers for 1965-1973 Mustangs from Doug’s Headers (www.dougsheaders.com). These were developed in-hand with the folks at Stang-Aholics and are designed to fit the TCI and Heidts Pro-G IFS systems, though they may work with other suspensions.
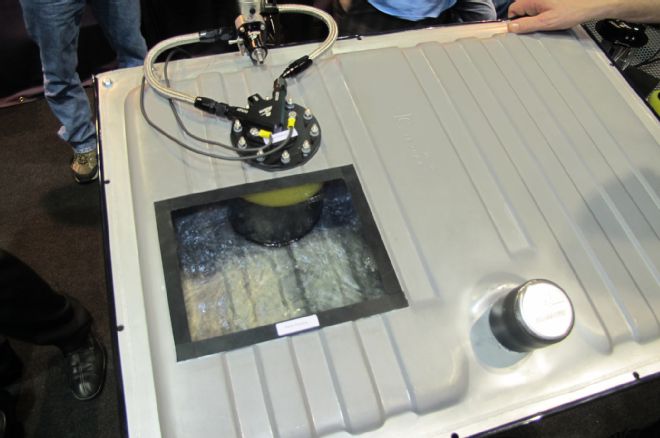
26. To feed that Coyote 5.0L’s EFI you’re going to need to completely revamp your vintage Mustang’s fuel system. The stock single feed line is not EFI capable, not to mention you’ll need a return line to the tank, a high-pressure EFI pump, and more. You have a few options here, one being the Aeromotive Phantom fuel system. In a nutshell, it is a pump, mounting bracket, and sump in one unit. Simply cut a hole in your tank and drop it in. Aeromotive offers the Phantom by itself and as a kit with EFI regulator, fittings, filter, and more. Simply add the length of -6 AN hose you need and an adapter fitting for the fuel rail and you’re all set.
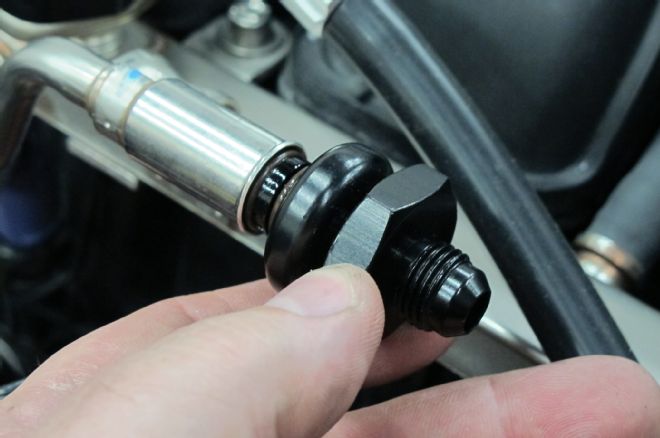
27. This is the Aeromotive fuel rail adapter for the modular engine like the Coyote. Simply slip the adapter into the open fuel rail on your crate engine until it locks in place. The opposite end is machined with a male -6 AN fitting for a standard AN hose connection. The Coyote, being returnless fuel from the factory, only has one fuel rail connection, so the fuel line routing needs to be set up so that the fuel return line comes off of the fuel pressure regulator with just one pressure line connecting to the engine.
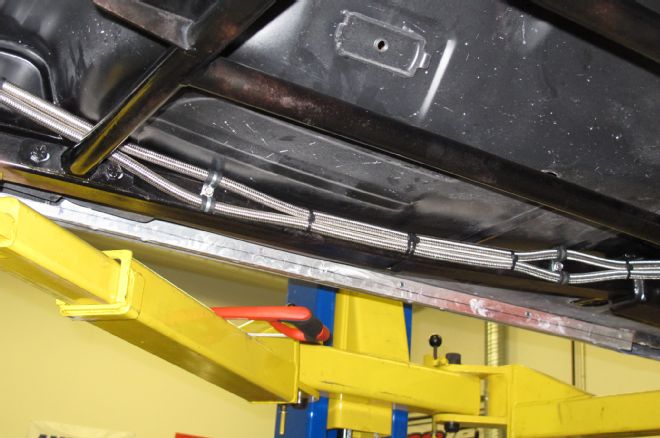
28. Aeromotive also offers a 1965-1968 Mustang Stealth tank with a pre-mounted and baffled EFI fuel pump inside. Whether you use the Stealth tank or the Phantom system with your existing tank (or have a tank made or even use an external pump), you’ll need fuel lines. Braided AN or pushlock hose is easy to work with and route, though some people prefer steel or stainless steel hard line. If you wish to use hard line we highly recommend some cheap brake line or stiff non-stranded wire (like household wiring) to create fuel line templates before trying to bend up lines willy-nilly.
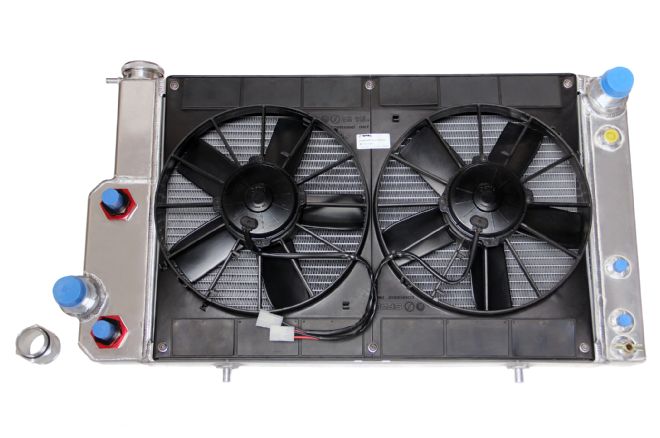
29. Cooling the Coyote 5.0L in your swap isn’t terribly difficult, you just need to understand the unique cooling hose routing of the Coyote and ensure you either use a degas tank or have your radiator fill point be the highest part of the cooling system. We’ve built modular engine swaps both ways and they’ve both worked fine. Since the Coyote, and all modular engines for that matter, were designed to use an electric fan that’s what you’ll have to do as well—buying a radiator and fan combo is your best bet here. C&R Racing offers a Coyote swap radiator and fan setup and C&R is the company that builds Stang-Aholics’ custom Coyote swap radiator offerings as well (shown here with optional transmission and power steering coolers). The C&R-based unit from Stang-Aholics bolts to existing core support holes and only requires two small holes to be drilled in the bottom of the support. We’ve also used custom-built units from Flex-a-lite for modular/Coyote builds as well with great results.

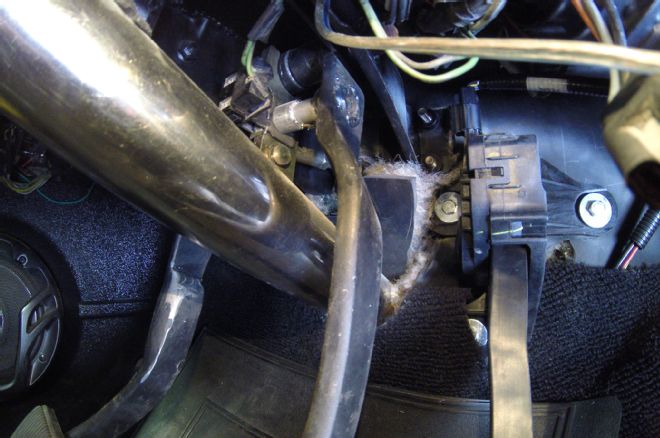
30-31. One area that can be a bit of an issue is the brake master cylinder. Due to the massive width of the Coyote 5.0L even using a manual brake master cylinder mounted directly to the firewall can be an issue, especially in 1965-1966 applications. This is due to the near flat mounting surface of the 1965-1966 firewall versus the recessed mounting area found on the 1967-1970 firewall. The answer is to move the master cylinder over roughly 1 3/4 inches. This will require widening the pedal support, adding length to the brake pedal arm pin, and moving the clutch pedal over as well, if it’s a manual trans car. You can see in these photos, provided by Stang-Aholics, how they moved the master cylinder over and modified the brake pedal and support accordingly.
32. For the 1967-1970 firewall the master cylinder will bolt directly to the OE holes and should clear the cam cover. Ensure you use a master cylinder with outlets facing the inner fender and not toward the engine. Stang-Aholics uses this dual reservoir unit from ABS Power Brake in their swaps.
33. Speaking of power brakes, as you can imagine, there is no way you’re getting a traditional vacuum diaphragm booster in such a tight spot. We’ve used hydraulic assist units in previous builds, aka hydroboost, but they require power steering and some additional line plumbing, though they work great! A new, more compact option is a remote hydro-electric setup. Stang-Aholics uses this setup from ABS Power Brake that utilizes a small reservoir (you can see it on the inner fender in our lead photo), an electric pump, and a high-pressure accumulator to provide a true power brake pedal feel.