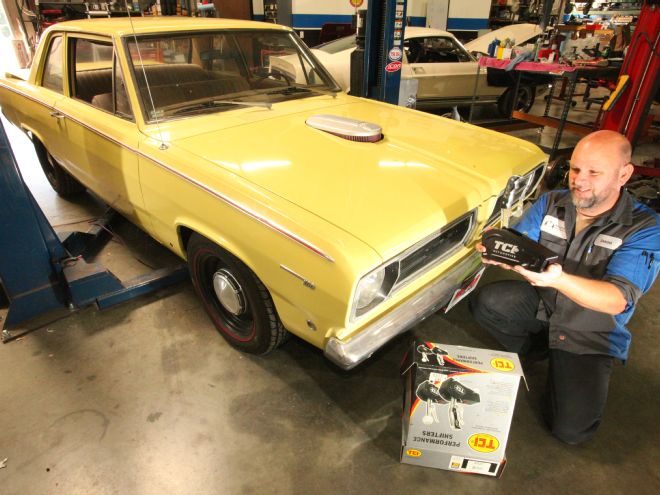
There comes a time in every serious Mopar's life when it graduates to the ranks of the truly powerful. The 1 percent. These cars have that little something extra underhood that places it firmly on top of the heap, making everything else just traffic. If you're at the point where your Mopar can walk the walk, it means you've done your homework. You've built the right engine, teamed it with the right transmission and rearend, plumbed the right fuel system, and gotten all the supporting power parts in place. You're now ready to deal street vengeance to punks with imports and other similar detritus, or are you?
Not until you get the right shifter. All too often, gear-shifting duties are put at the bottom of the "to-do" list. We can think of a ton of reasons why you don't want to ignore this super-important piece of speed equipment, the first of which is a no-brainer: If you're building up a factory column-shift car and using a serious exhaust system, you'll likely have to convert it to floor shift. Nine out of 10 times, the factory Mopar column linkage won't survive the reconfiguration of your engine bay with most large-diameter long-tube headers. And even if it could, would you really want to manually select gears on a factory column shifter at red line when the health of your engine hangs in the balance? The last thing you want is to over-rev the engine, tag the rev limiter, or miss a shift.
Quite aside from the health of your engine is the feel of the shifter. Besides the steering wheel, your shifter is the primary point of tactile interface. Shifting gears is a huge part of the sensory experience of driving a badass hot rod and the difference between grabbing cogs with a sloppy, wobbly shifter made of plastic and cheap chrome and a solidly sculpted piece of machinery can be huge. Last but not least is the visual appeal of a tricked-out shifter. Some cars beg to be driven hard and lusted after, and a sexy shifter will be a focal point that generates pride well after the money is spent. All these factors pointed us in the direction of TCI's Outlaw shifter.
Shifting gears is a huge part of the sensory experience of driving a badass hot rod…
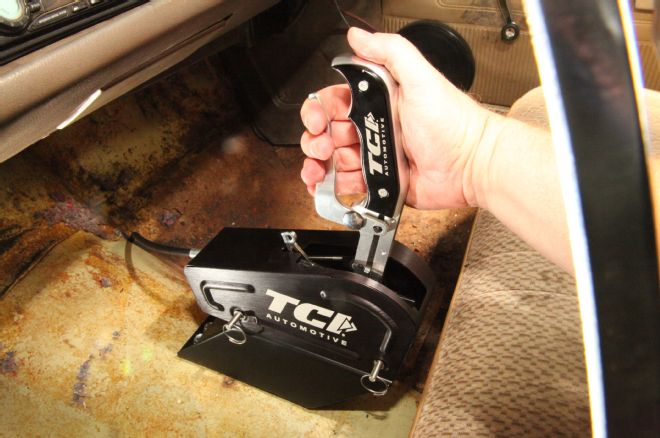
A perennial favorite with all walks of hot rodders from drag racers to street cruisers, TCI's Outlaw gear selector, which has been designed to work with A727 and A904 Chrysler three-speed automatic transmissions, is a premium billet aluminum and steel unit with a precision feel and a solid action. Available with a pinned aircraft-style anodized aluminum cover and a forward shift pattern under PN 616331 ($336.25, street price), the TCI Outlaw shifter has an ergonomic form-fitting handle that tilts forward ever so slightly to keep your wrist in line with your arm's motion. The grip conforms to the hand perfectly and is made of CNC-machined aluminum; its aluminum side plates are attached to the main handle with recessed Allen-head fasteners and are anodized black with the TCI Automotive logo engraved. This construction allows the user to swap the left side plate for one with an optional momentary contact switch in the thumb position—nice in the event a line-lock, nitrous button, over overdrive relay switch needs to be added later.
…the TCI Outlaw shifter has an ergonomic form-fitting handle that tilts forward ever so slightly…
A spring-loaded steel trigger lever integrates nicely with the shifter's gear gate so that in the heat of battle there's no possibility of overshooting your shifts at redline; once gated all the way back to First, just push the lever straight forward (without grabbing the trigger) into Second. When it's time for Third, grab the trigger, hold it, and push it forward into Third. For automatic operation, just slot the shifter into Third (the Outlaw's forward pattern yields the standard P-R-N-D-L2-L1 sequence) and let the transmission do the shifting. The TCI Outlaw delivers positive no-nonsense shifts thanks to its bedrock steel baseplate, a precision-machined lever pin, and an aerospace-quality billet aluminum shift lever. A 5-foot-long shift cable and mounting hardware is also included, and faithfully transmits the lever's motion into precise travel at the transmission's selector arm. Our overall impression of the TCI Outlaw could be summed up like this: If archeologists dig up your car a thousand years from now, chances are this shifter will be one of the few things on it that still works.
TCI also includes a reverse-light switch with its Outlaw shifter kits, which you have the option of using with pre-'69 Mopars. In any case, if your Mopar's TorqueFlite is of 1969 or later vintage, the backup light switch is already integrated with the neutral safety switch on side of the transmission. (As a point of reference, Our Valiant had already been upgraded to TCI's StreetFighter A727.) On our '68 Valiant, the reverse light switch originally was part of the steering column, which we had long since removed when we shortened the column for the RMS rack-and-pinion conversion. For that reason, we updated our neutral safety switch to the '69-up unit, which has the reverse light switch built in, and that's the solution we think most Mopar guys will turn to.
As the TCI Outlaw shifter is also compatible with three-speed (and four-speed) automatics from other manufacturers, it comes with a wide assortment of mounting hardware and brackets—much of which will not get used on your Mopar. Incidentally, TCI has written a very thorough installation manual with separate detailed sections for GM, Ford, and Chrysler, a nice plus to what could easily have been a frustratingly vague document. It's clear to us from this document that TCI really knows its Mopars. Our only gripe, and it's a small one, is that there is no hard stop in the shifter gate when putting the shifter into Park. The gate is otherwise designed for a GM Turbo 400, which needs the additional gate travel. When the Outlaw shifter is placed into used on a 727, Park will be engaged before you reach the end of the gate, so don't force it. Just feel for the noticeable detent in the travel and leave the lever in that spot.
TCI has written a very thorough installation manual with separate detailed sections for GM, Ford, and Chrysler, a nice plus…
A well-designed reverse lock-out feature prevents the Outlaw shifter from inadvertently being placed into Reverse by accident. This NHRA-mandated safety feature is aided by a large metal "R" in front of the shift lever. The "R" is actually a spring-loaded lever that must be operated with your left hand while you're right hand moves the shift lever into Reverse. As a result, there's no way the TCI Outlaw is going into Reverse without a very deliberate sequence of events.
When buying a new shifter, you will have the opportunity to install it wherever you want. Whether your situation involves a large car, small car, large driver, small driver, bucket seat, bench seat, console, or no console, now is the chance to achieve perfect gear-grabbing nirvana. We could've simply bolted it down on the trans tunnel, but we decided to enlist the services of Chris Field and Jason Muckala who run Motech Performance in Murrieta, California. These guys are two of SoCal's top Mopar wrenches, and their experience with setting up Chrysler kick-down linkages and shifters proved insightful. And although not part of this story, we were pleased with Field's fabrication work on the shifter pedestal, which he built from scratch. This places the TCI shift lever perfectly at hand while clearing the dash and the seat at both extremes of the lever's travel.
Let's take a look at what's involved in updating a potent Pentastar with a shifter that's designed to handle the punishment!
…we were pleased with Field’s fabrication work on the shifter pedestal, which he built from scratch. This places the TCI shift lever perfectly at hand…
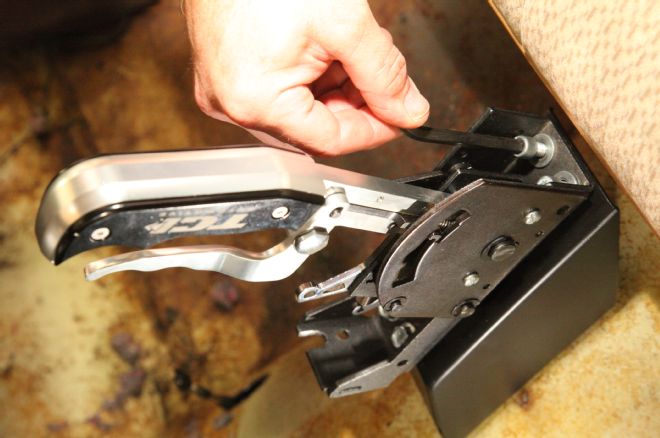
1. TCI's Outlaw shifter (PN 616331) is a rock-solid choice for a high-horsepower street machine or race car. Its billet aluminum and steel construction can take loads of abuse and its smart design feels good to the hand. The trigger lever is a huge help when making redline manual shifts from Second to Third.
2. Jason Muckala of Motech Performance in Murrieta, California, started out by establishing the position of the Outlaw shifter on the trans tunnel of our '68 Valiant. Here he marks the tunnel with the position of the shifter's attachment holes.
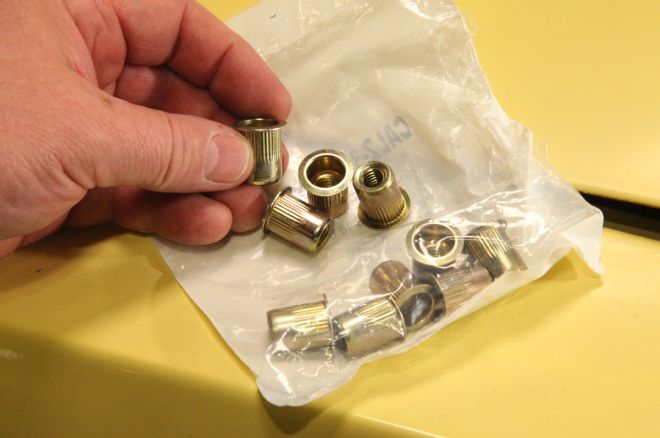
3. You could use standard nuts and bolts to attach a shifter, but with the tight confines of the trans tunnel, the transmission tailshaft, and proximity to the torsion bar crossmember, a better choice would be nutserts. They are dropped into the sheetmetal from above, and when tightened, the splined portion of the nutsert's body collapses, clamping it firmly to the sheetmetal.
4. If you're using the TCI bolts to hold your shifter, drill 9/32-inch holes in the trans tunnel, otherwise, drill some 17/32-inch holes if using nutserts. Here, Mukala uses a bolt through a hexagonal spacer to snug the nutsert into the sheetmetal of the trans tunnel, clamping it solidly to the trans tunnel sheetmetal.
5. We've skipped ahead a few steps here to show you the view of the nutserts from below. Here you can see why we chose them instead of traditional fasteners to attach the shifter to our '68 Valiant. They're just as robust as bolts and nuts, but they fit in a lot more places, and they don't move around or drop out while you're trying to install them.
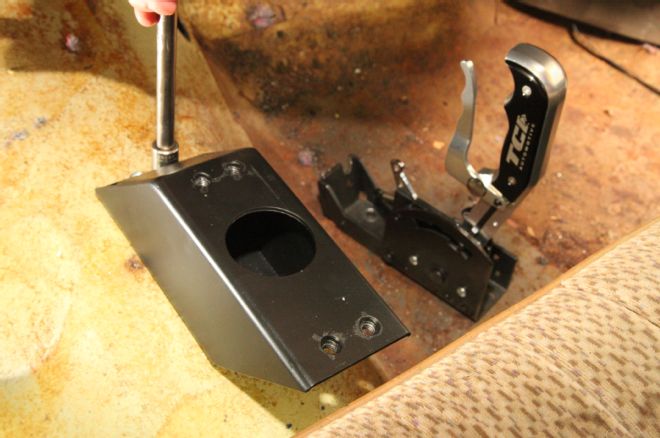
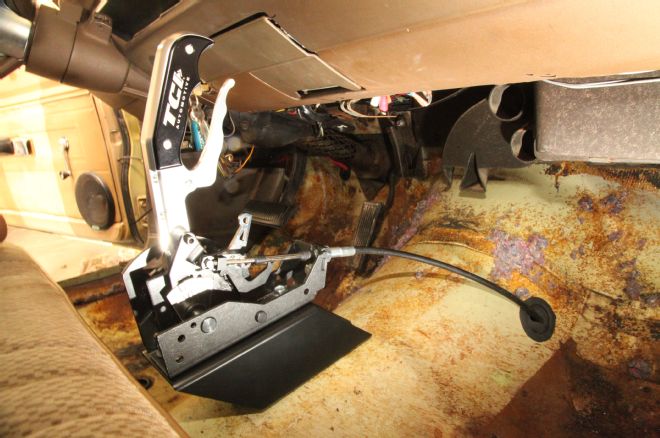
6. Part of getting the most out of our TCI Outlaw shifter was getting it to sit in just the right location for fun, easy operation. For that, Chris Field of Motech Performance built this slick pedestal to mount the shifter on. Field used scraps of 1/8-inch-thick mild steel, which he TIG-welded together, ground smooth, then painted with Eastwood Extreme Chassis Black paint.
7. By welding some 5/16-18 nuts to the bottom of the pedestal, it's much easier to attach the shifter to the pedestal with some Allen-head bolts. Closed out and boxed from the front, the pedestal allows the shifter to be solidly mounted to the chassis via the box. It's not going anywhere now.
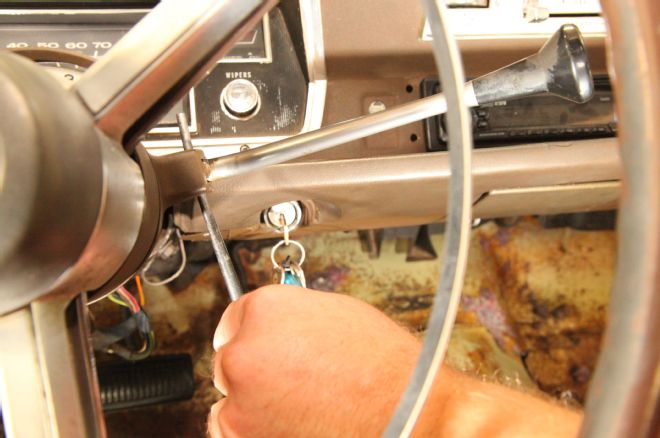
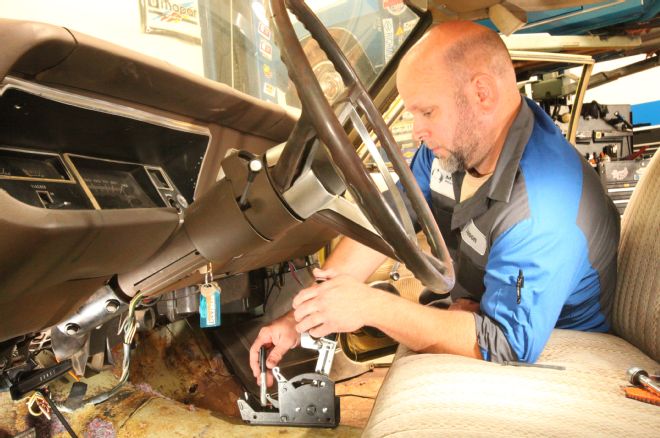
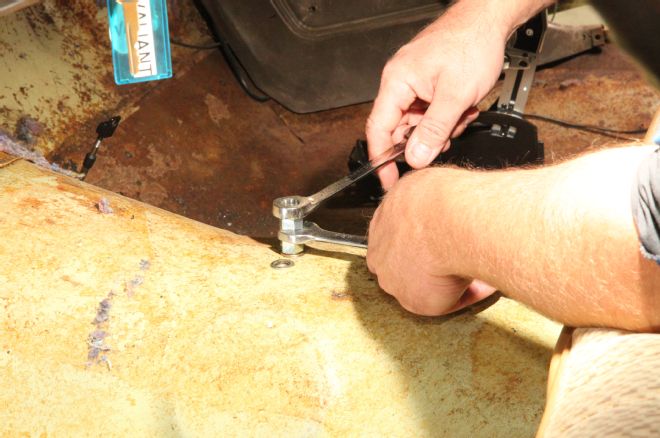
8. If you're converting from a column shift, now's a good time to remove all the mechanical linkage and the column lever. Here the roll pin that holds the lever on the column is being punched out. The remainder of the linkage was removed long ago to make room for our TTI long-tube headers.
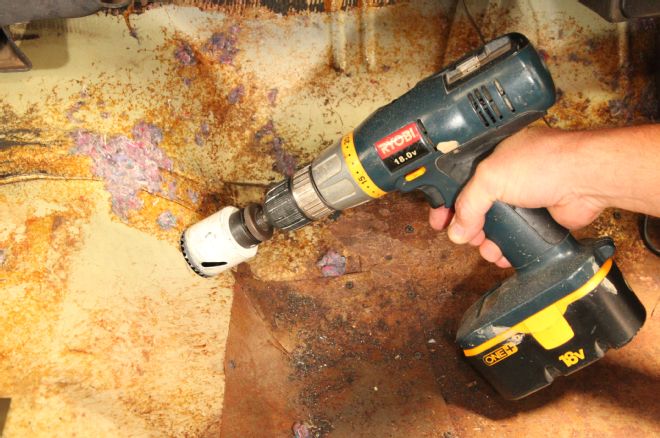
9. Drill a 1-inch hole in the tunnel where you want the shifter cable to pass through. You want to think this one out for a few minutes first because you don't want to kink the cable or run it near the exhaust. As you can see, we've clearly got some work in front of us to replace that hacked third-world passenger-side floorpan.
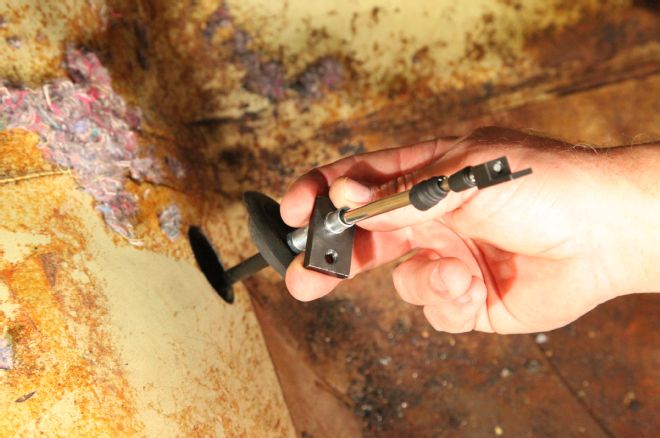
10. Both ends of the TCI shifter cable are the same. Put the cable through the trans tunnel, making sure to stage the rubber grommet, bulkhead adapter (that rectangular piece), and the cable eyelet in the right order shown here.
11. A ¼-inch-20x1/2-inch bolt with the TCI Outlaw shifter kit attaches the steel bulkhead connector to the shifter baseplate with a thread-locking compound. This can be attached from either side for convenience.
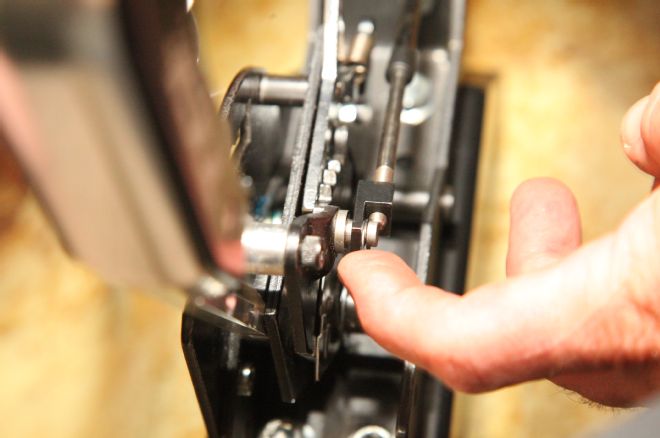
12. The cable eyelet is a precision connector attached at the end of the shifter cable's threaded rod, and fits snugly over a steel pin on the articulating shift lever. A small e-clip retains it on the end of the lever pin.
13. Here's what the top side of the TCI Outlaw shifter looks like assembled, but without the attractive cover placed over the mechanism. Note how the curve of the cable has been planned to avoid any sharp kinks. Now let's go below to attach the cable to TCI's A727 StreetFighter trans.
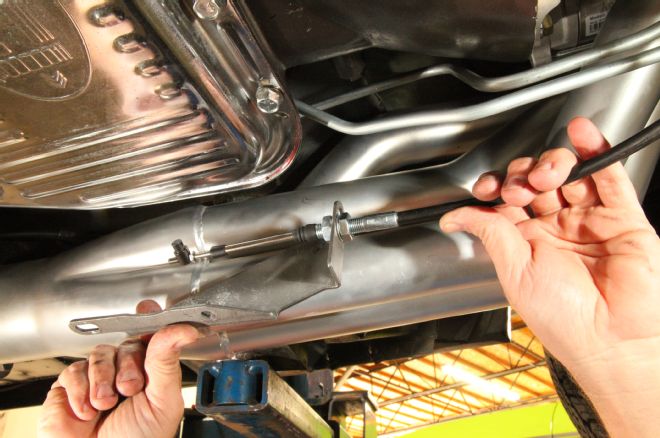
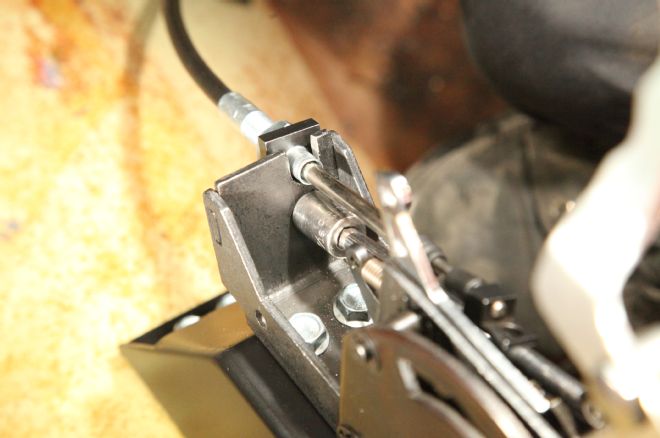
14. The TCI Outlaw shifter kit includes transmission cable brackets for GM, Ford, and Chrysler transmissions. Locate the A727 bracket, insert the shift cable, and sequence the various washers, pinch nuts, locking nut, and threaded swivel as shown. Don't tighten the pinch nuts—you'll need to adjust the cable length later.
15. Attach the Chrysler-specific bracket to the transmission using the two longer 5/16-18x1-inch trans bolts provided with the kit. These replace the two trans bolts closest to the shift lever and will use the two aluminum spacers provided.
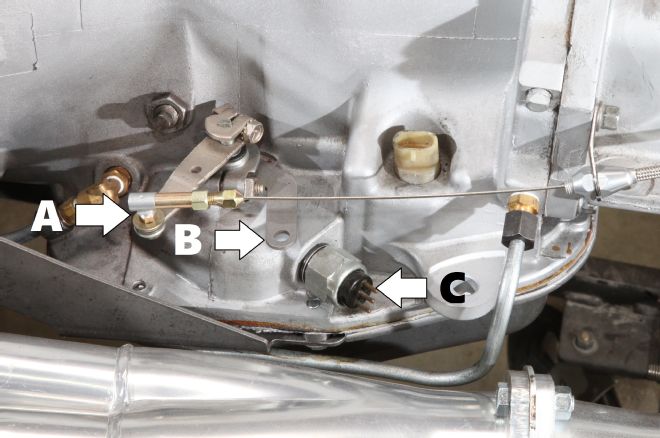
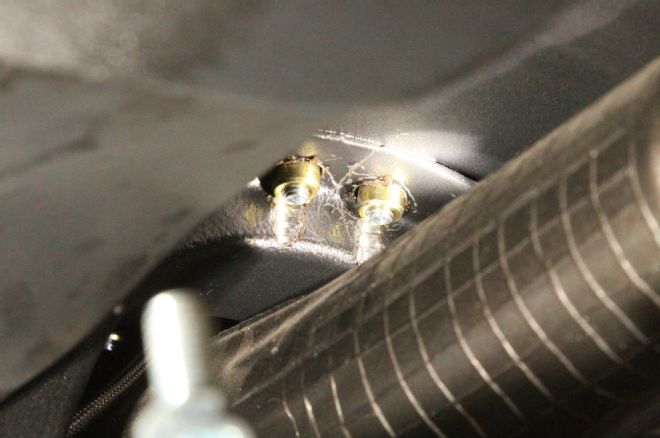
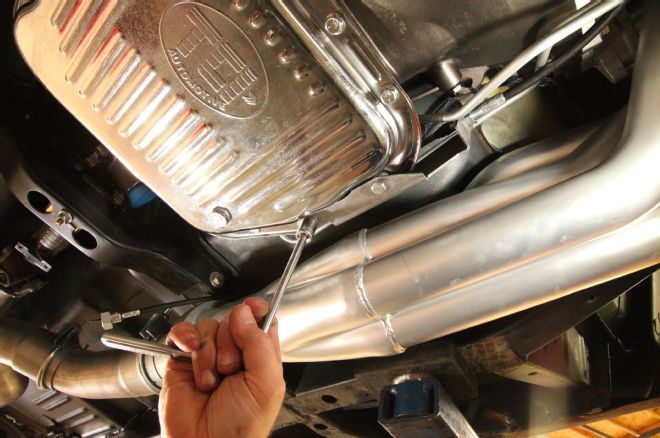
16. TCI suggests you temporarily remove the throttle lever (aka kickdown) shown as "A" here. Note we've replaced the OE kickdown mechanism with Lokar's adjustable cable kit here. The TCI cable swivel gets attached at point "B" on the shift lever, and the cable length (via the pinch nuts on the bracket) is initially adjusted with this lever in "First." Point "C" shows the TorqueFlite's '69-up combined neutral safety switch and reverse light switch.
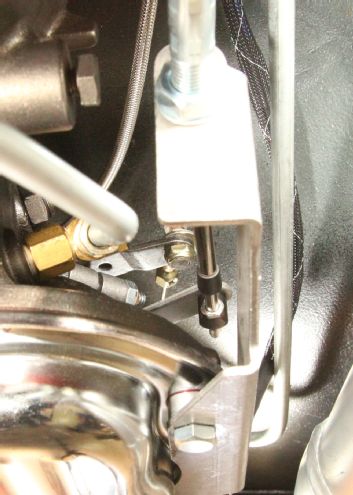
17. Here you can see the threaded cable swivel end inserted through the shift lever where it is secured by a cotter pin (hidden from view). The pinch nuts in the foreground have been adjusted such that the cable's swivel end can easily slide in and out of the lever (without the cotter pin installed) in each of the gear positions, and park. Note here the spacers holding the bracket off the pan rail.