If one thing truly leads to another, you can say the head and exhaust swap we performed on the Balls of Fury (Charlie and Chad Pirchio’s ’64 Sport Fury) in the August ’13 issue (Two Bolt-ons Bring 81 Horsepower) led us to this cam swap. We felt we were leaving a bunch of power on the table with the hydraulic flat tappet cam profile that was in the 440, ergo, we put in a call to Comp Cams thinking we could harness that power with one of their modern, solid roller designs.
We’ve learned from years of previous cam swap testing (flat tappet to roller with the same duration but roughly .100-inch more valve lift) has always meant a stronger running engine with a smoother idle, more low-end, mid-range, and top-end power. That’s close to what we were going for this time. We wanted more peak torque at a lower rpm for bottom-end grunt, and gains in peak horsepower at a higher rpm for a broader power-band and top-end charge.
 A previous head and exhaust test (August '13 issue) on this '64 Sport Fury leads us to swap out the cam. Switching to a cam with more lift would mean more air flowing through the new Edelbrock heads and tti 3-inch exhaust to produce more power. We would ditch the outdated hydraulic stick for a modern solid street-roller with more valve lift (solid .570/.576 vs. hydraulic .474/.474-inch) while having close to the same duration (solid 242/248 at .050-inch vs. hydraulic 238/238 at .050-inch). We did retain the same lobe separation angle (110 degrees). This type of cam swap will liven up most any engine with increased grunt throughout the engine's rpm scale.
When choosing a cam, it’s better to make a conservative choice for your combination’s intended purpose. Just remember: the stick with the most lift with the same duration will make for a more responsive engine, thus making for a nice street driver. Choose one from the catalog that is recommended to match your combination (engine size, compression ratio, heads, induction, exhaust, gear ratio, converter stall, vehicle weight, rpm range, etc.) or call one of the cam companies—they have experts on their help lines. If you look-up the cam involved in this swap, you’ll notice it’s only a middle choice of the street-roller type, yet it makes a lot of power over the old, outdated flat-tappet cam profiles that have been around over 30 years. Never choose a race-type cam for your street driver, or you’ll have a ride with terrible drivability and efficiency.
Technology advancements in camshaft/valvetrain design and durability have come a long way in recent years. We took advantage of this and put it to use in a typical street-type 440 to have even better drivability and efficiency. Besides gains in drivability and power, a side benefit can be improved fuel mileage. We didn’t measure it, but we used less fuel driving to the dyno and the strip. Maybe we stumbled on the perfect cam for our combination. Read along and see the cam installation and how we made out on the dyno and dragstrip.
Price Tag Part PN Cost Comp Cams’ street roller PN 23-701-9 $332.97 Comp Cams’ timing set PN 3125 $72.97 ARP Bolts PN 244-1001 $5.13 Comp Cams’ roller button PN 204 $22.97 Comp Cams’ roller lifter PN 866-16 $534.97 Comp Cam’s oil PN 1595-12 $89.97 Comp Cams’ valve springs PN 953-16 $129.97 Comp Cams’ retainer PN 732-16 $291.97 Comp’s Pro Magnum rocker arms PN 1621-16 $679.97 Comp Cams’ pushrods PN 7922-16 $154.97 Milodon bronze distributor drive PN 21525 $124.97
Never initially run an engine at high rpm. Limit rpm to 1,500-2,000 until it reaches normal operating temperature.
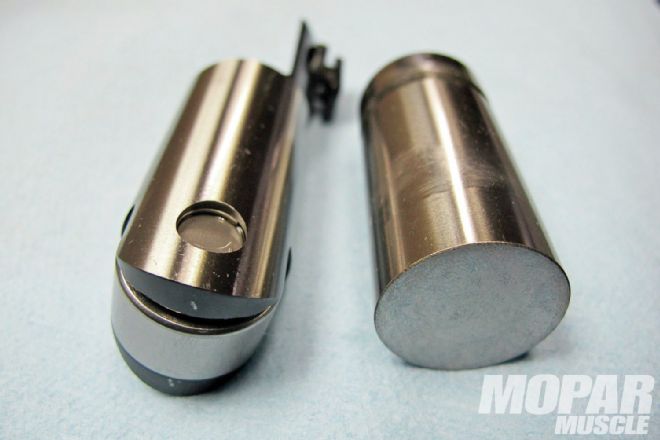
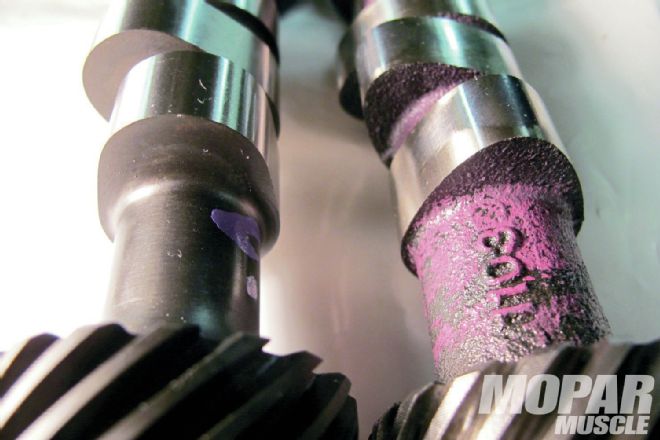 01 There’s a dramatic visual difference between the solid (left) and the hydraulic cam (right). Both are designed for street use. The solid stick’s steeper ramps will provide faster and additional valve lift (roughly .100-inch) during a similar duration period (valve begins to open then close). This faster valve action will maximize air velocity going through the ports to help create quicker throttle response, more low-end torque, with improved low, mid-range power and top-end charge.
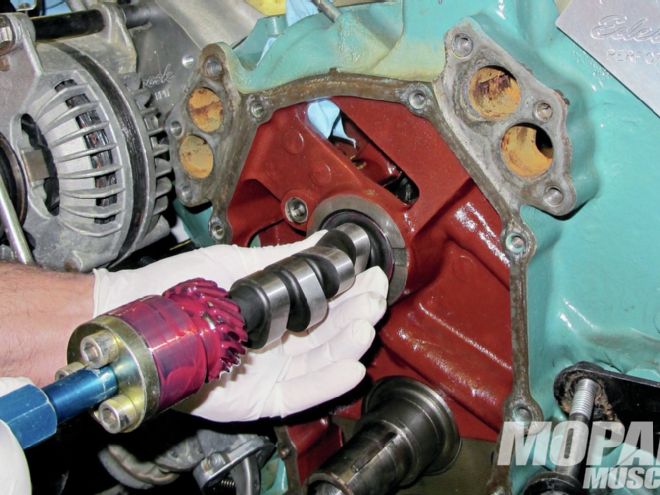
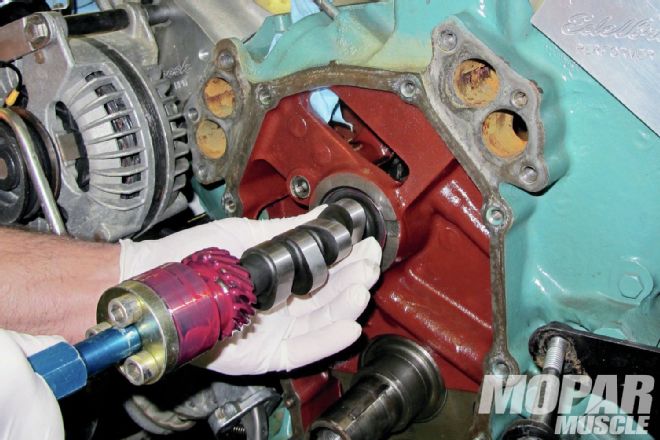 02 The new stick was lightly coated with Comp’s cam and installation lube (part number 153).We were extra careful not to nick the cam bearings while removing the old and installing the new bumpstick. Seen is the Camshaft Installation Handle (PN 5311) we’ve been using for over 15 years in all of our cam swaps and installations. This tool helps save time, pinched fingers and nicked cam bearings.
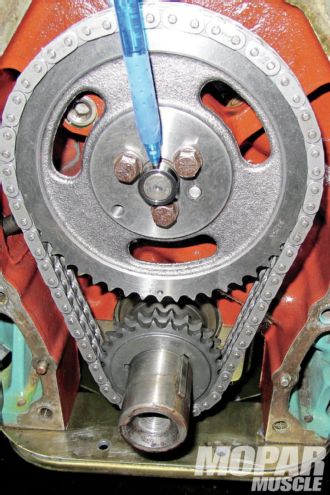 03 The new timing set would be installed by lining-up the timing marks (zero-to-zero) the same as the hydraulic stick. The solid stick uses a 3-bolt cam gear compared to the 1-bolt hydraulic cam. We used ARP bolts for clearance fitment with Comp’s rollerized cam button. Modern performance cams and timing sets are manufactured with such high precision we felt confident not to take the time to degree the cam, plus we wanted to see how well this type of cam swap would perform for the average gearhead.
 04 The hydraulic lifter typically shows valve float with power dropping off at high rpm (over 6,000 rpm). That’s ok if you don’t want to spin your 440 at high rpm or periodically set the valve lash. With the solid roller lifter, there’s virtually no valve float to drop off power at high rpm. Also, the new roller lifters were cleaned-up, and then submerged in a coffee can full of Comp’s 15W50 Muscle Car and Street Rod oil to lube their needle bearings.
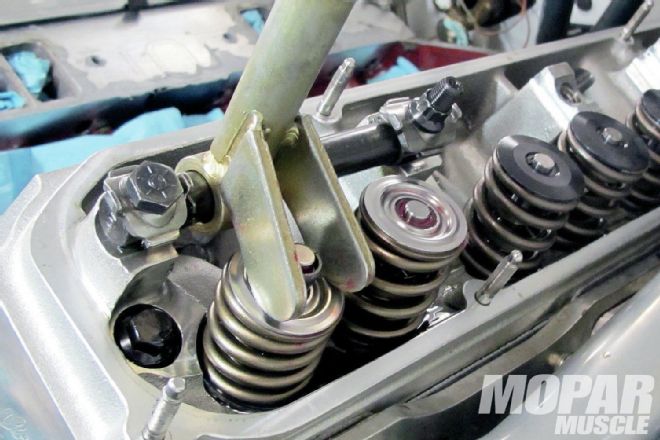 05 This type of swap requires also changing the valve springs. The new springs are set with 148 pounds at 1.900-inch seat load, and 456 pounds at 1.250-inch open load pressure, and were teamed with a lightweight tool-steel retainer for less weight at the valve tip for a faster revving engine and less chance of valve float (bounce). Comp’s Extreme Energy and Magnum series solid street-roller cams use valve springs with reduced spring pressure for less valvetrain wear and valve lash change.
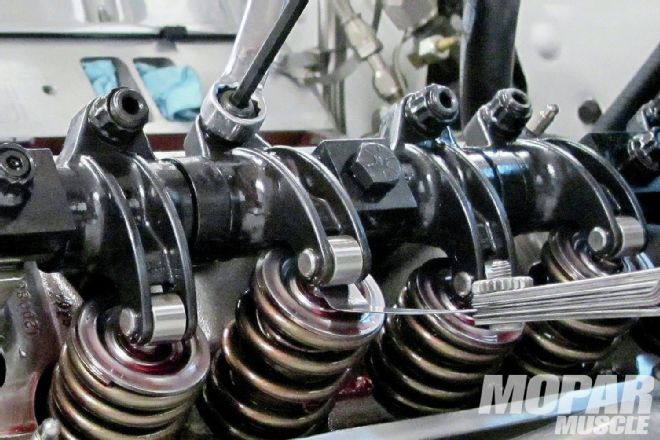
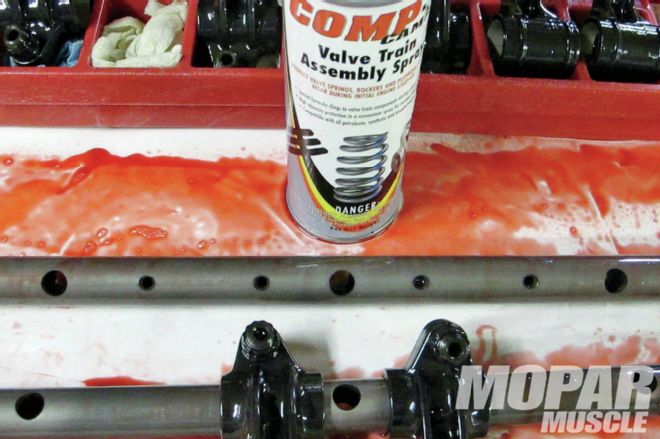 06 For this swap, we would also need to replace the stock, non-adjustable rockers, and upgrade to adjustable units. We chose Comp’s Pro Magnum Rocker Arms. Be sure to assemble the rocker arm shaft assembly with the oiling holes facing down when mounting to the head. The entire valve train assembly (shafts, rockers, pushrod ends, valvesprings and tips) were all coated with Comp’s Valve Train Assembly Spray—that’s the red stuff all over the white plastic.
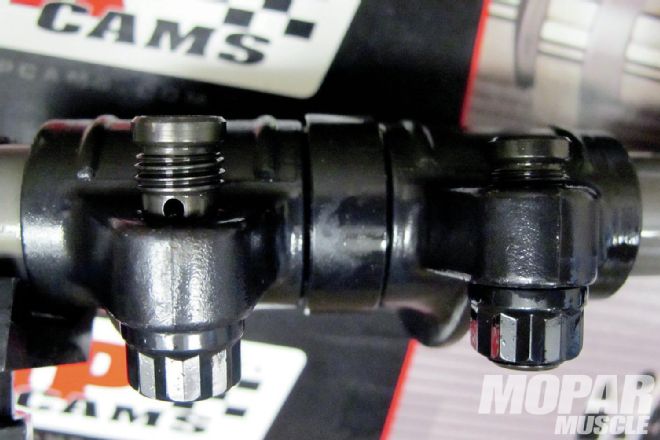 07 Switching from a hydraulic to a solid roller cam will also require different length pushrods, so be sure to measure pushrod length for proper rocker arm geometry. Notice the adjusting screw on the left is showing a thread or two on the bottom and top for proper lubrication to the pushrod and valve tip. With too short of a pushrod, the oiling hole will be exposed. For this build-up along with other RB motors with Edelbrock Performer RPM heads, we’ve used Comp Hi-Tech pushrods (9.200-inch length) with the Comp Pro Magnum Rockers.
 08 Usually at full lift there’s not any coil bind when using the recommended springs. It’s still good to be sure there’s a minimum of .060-inch between the middle coils at full-lift. It’s also important to break-in new springs. Never initially run an engine at high rpm. Limit rpm to 1,500-2,000 until it reaches normal operating temperature. Shut off the engine and allow the springs to cool to room temperature. This helps eliminate early breakage, and prolongs spring life. We rotated the engine over dozens of times while assembling the valvetrain and setting the valve lash. Comp’s crank tool socket (PN 4799) made it easy, plus it incorporates a knurled retaining nut that can sandwich and hold a degree wheel in place. The valve lash calls for settings of .016-inch intake and .018-inch exhaust. We rotated the Wedge enough times to re-check the lash at each valve about five times. Yes, we’re nuts!
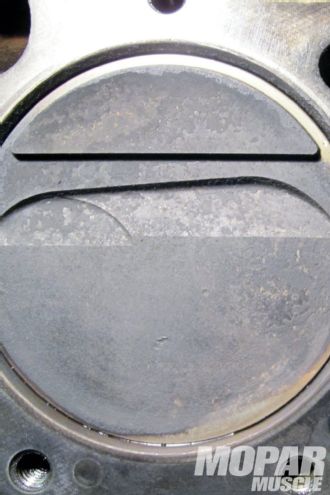 09 Whenever considering the use of a high-lift camshaft (over .500-inch lift), be sure your engine has pistons with valve reliefs. Stock pistons without valve reliefs would have hit and bent the valves on this type of cam swap.
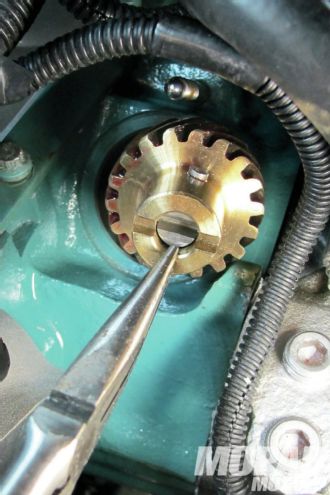 10 When changing over to a roller cam, it is the necessary to use a bronze cam/distributor gear for the oil pump shaft. We used the Milodon bronze distributor gear/shaft assembly. Be sure to check for wear after a few thousand miles. We routinely replace after 5,000-miles. Hopefully, soon, someone will offer a composite-type gear that will last for many more miles.
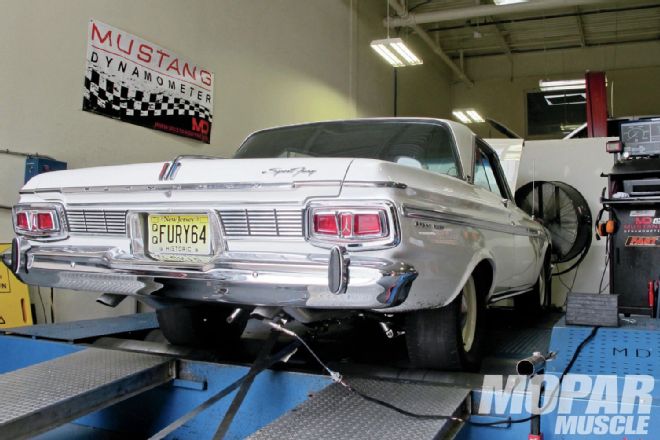 11 Tune Time Performance’s new Lakewood, New Jersey, location was a 45-minute pleasure ride to dyno test the new cam. With these torque (33 lb-ft) and horsepower (29 rear wheel) gains, we feel going with a roller stick is the way to go. We couldn’t wait to get to the track to see how low the e.t.’s would go.
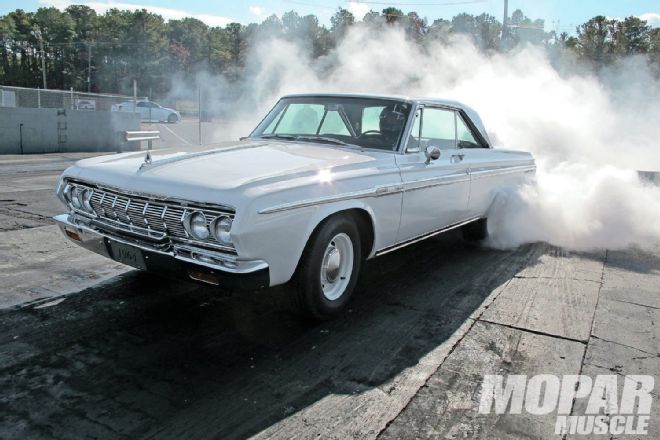 12 To keep things consistent, our drag test at Atco Raceway was on the same 15x7 cop car wheels mounted with Nitto 275/60 Drag Radials (same size as the BFG Drag Radials). With the added torque, we couldn’t mash the go pedal as quickly without wheel spin, resulting in slightly slower 60-foot times (1.73 to 1.71), when compared to testing the Edelbrock heads and tti exhaust. The Fury scooted down the 1320 with a much-improved elapsed time of 11.78 at 114.57 mph. The previous best was a 12.07 at 111.42 mph. After running 11s with gains of three tenths and three mph, Charlie and Chad couldn’t be happier and more proud of their pride and joy. Yes, this cam swap was well worth it! mm
Dyno and Dragstrip Results MODS HP TQ 60-FT E.T. / MPH Exhaust Stock 21⁄2 inch 298/5500 327/4400 1.85 12.93/103.01 TTI 3-inch 328/5700 385/4400 1.78 12.60/106.14 Edelbrock Heads 379/5900 436/4400 1.71 12.07/111.42 Comp Solid Roller 408/6000 469/4400 1.73 11.78/114.57