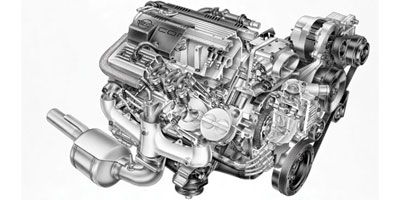
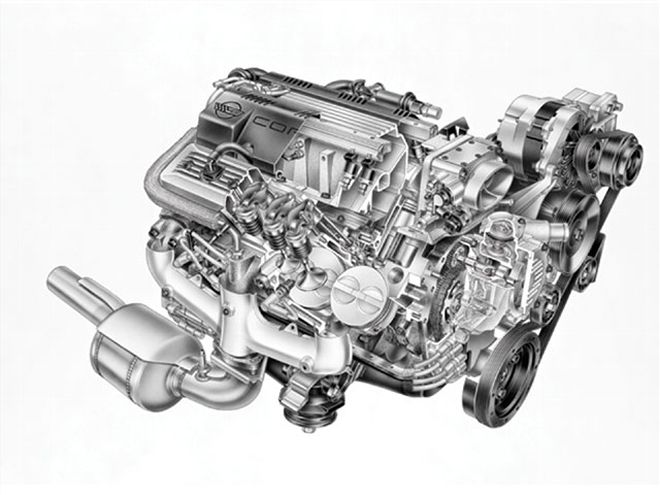
'The oddball, the anachronism, the redheaded stepchild-the Gen II small-block can be considered all these things. Conversely, it can also be regarded as the ultimate production version of the original small-block Chevy and a testbed for the technology that would advance the small-block into the new millennium. Since its introduction in 1992, much ink has been spilled (some in the pages of this very magazine) about the Gen II engine. We'll spare you the nostalgic musings on Chevrolet engine families and get to the heart of the matter: LT1s are available in junkyards right now. Complete engine, transmission, and ECM/wiring harness combinations are selling on eBay for less than a grand. So we thought it was time to take another look at these engines. We wanted to know why they were made in the first place, how they differ from the original small-block Chevy, what their strengths and weaknesses are, what their performance potential is, and what people are doing with them.
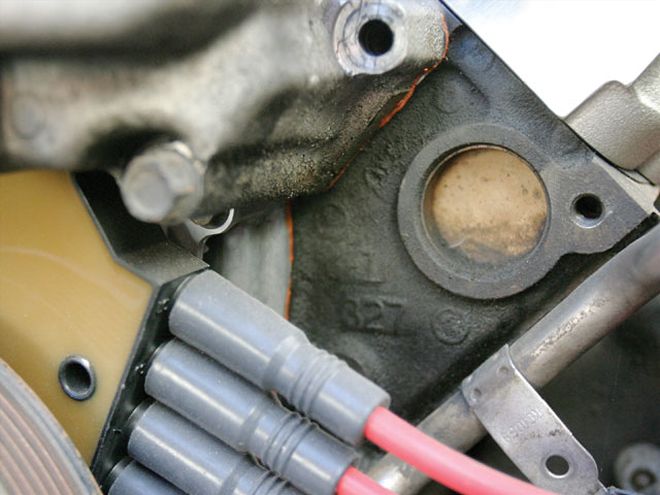
LT1 BY THE YEAR 1992: Debut in Y-body 1993: Introduced in F-body 1994: Introduced in B/D-body * Mass Airflow engine manage- ment replaces speed-density system * Sequential fuel injection * Smaller-displacement 4.3L L99 available in {{{Caprice}}} * Opti-Spark upgrades made to B/D applications 1995: Upgrades to Opti-Spark applied to Y- and F-body 1996: LT4 in manual transmission Y-body OBD-II computers B/D-body line discontinued 1997: LS1 replaces LT1/4 in Y-body LT1 remains in F-body, LT4 installed in some special-edition models Y-body: {{{Corvette}}} F-body: {{{Camaro}}} {{{Firebird}}} B-body: Caprice {{{Roadmaster}}} D-body: {{{Fleetwood}}} LT1 SPECS Casting number: 10125327 (look for "327" cast on side near freeze plugs) Block: Cast-iron two-bolt main bearing caps (middle three caps are four-bolt in Y-body) Bore: 4.0 inches Stroke: 3.48 inches Crankshaft: Nodular iron Connecting rods: Powdered-metal 5.7-inch Pistons: Hypereutectic flat-top with valve reliefs Cylinder heads: Aluminum Cast-iron '94-'96 B/D-body 54cc combustion chambers 170cc intake port 212-cfm airflow Valves: 1.94-inch intake, 1.50-inch exhaust Rocker arms: Stamped steel 1.5:1 Camshaft: Roller lifter: 202/207 degrees of duration @ 0.050 inch 0.447/0.459-inch lift (varies slightly by year and application) Horsepower: {{{300}}} @ 5,000 rpm Torque: 340 @ 4,000 rpmA Little History
Designing a new engine is a tough balancing act. Stringent fuel economy and emissions standards are always being imposed on the auto manufacturers, so any new engine being developed has to run cleaner and be more fuel-efficient. But at the same time, cars get heavier each model-year with the addition of new safety features, infotainment devices, creature comforts, and power everything. The new engine has to make enough power to handle the excess weight, plus not feel slow to the driver and burn less gas. In an attempt to improve upon the outgoing L98's 250 hp, GM's designers set a goal of 300 net horsepower for the LT1. To meet these goals they employed fairly standard techniques of increasing the compression ratio and improving the cylinder-head design. But they supported these changes with some interesting technology.
Though the LT1 and its offspring, the LT4 and L99 4.3L V-8 (the standard engine in '94-'96 Caprices), are called Gen II, they have more parts in common with the original SBC than not: The reciprocating assembly and valvetrain are interchangeable with the Gen I engine, for example. But the differences, though few, are substantial enough to warrant the new-generation designation. The engine block and cylinder heads are unique and cannot interchange with the previous design. Also specific to the Gen II are the ignition and cooling systems.
Reverse flow
Think LT1, and you likely think "reverse-flow cooling." This is understandable because the terms are used almost synonymously whenever mentioned in the magazines. But how well has the system ever been explained?
To be fair, reverse-flow cooling is not a new thing. Smokey Yunick developed a reverse-flow system for some of his Trans-Am race cars, and a few independent engineers and engine builders have developed systems of their own. But the LT1 was the first mass-produced engine with reverse-flow cooling. So how does it work?
Let's review the basics first. On the Gen I engine, the water pump bolts to the front of the block. It draws coolant from the radiator and pushes it into both sides of the block, where it circulates around the cylinder bores and up through a passage at the back of the block into the cylinder heads. Coolant then flows to the front of the heads and out through the crossover in the intake manifold where the thermostat is located. If the coolant temperature is high enough, the thermostat will allow coolant out of the engine into the upper radiator hose and back to the radiator.
This system worked fine for almost 50 years, but it could be more efficient. The engine is not cooled evenly with this flow pattern because the bores of cylinders 1 and 2 will always be cooler than the bores of cylinders 7 and 8. But the reverse is true for the combustion chamber temperatures because numbers 1 and 2 are the last to be cooled.
In the LT1, however, coolant is pumped into the cylinder heads first. Though the water pump still bolts to the block per the original SBC design, the coolant makes a sharp, 90-degree turn just inside the block and is routed up into the cylinder heads first. It then flows, like a parallel electrical circuit, evenly down the coolant jackets of all the cylinders in the engine block, then returns to the water pump through the lower pair of ports at the pump-to-block mating surface. A two-way thermostat (also unique to the LT1) is located in the water-pump housing. If the coolant temperature is hot enough, it is routed out to the radiator. If not, coolant flows through a bypass circuit and back into the engine.
The combustion chambers are the hottest part of any engine, and they are cooled first in a reverse-flow system. And because of the flow pattern, they are closer to uniform cooling from cylinder to cylinder. This provides a more stable and efficient environment for combustion to occur. More efficient combustion means lower emission levels. Plus, cooling the heads first allows the engine to safely run a higher compression level than would otherwise be possible, and we all know more compression means more power.
The reverse-flow design can also contribute to longer engine life. Since temperatures in the combustion chambers can reach 1,400 degrees, the result is a substantial difference in temperature between the top and bottom of the cylinder bores, and therefore the bores are wider near the top than they are at the bottom due to thermal expansion. The piston rings have to expand and contract slightly as they seal the bores from top to bottom, causing wear on the ring faces and ring lands. And since the temperature at the bottom of the bores can be below the dew point, water vapor, a by-product of combustion, can condense on the bottom of the bores and drip into the crankcase, eventually contaminating the motor oil and contributing to sludge buildup over time. However, in a reverse-flow system, the bore temperatures are more even from top to bottom, reducing the effects of those two problems.
So if reverse flow is so awesome, why don't all the manufacturers use it? The answer, of course, is cost. Reverse-flow cooling, while inherently better than standard-flow systems, requires some additional engineering for it to work properly. In any given engine, under most operating conditions, the coolant is boiling somewhere in the engine-usually in the coolant passages in the cylinder head. This is because the walls of the combustion chamber are much hotter than the boiling point of coolant. The layer of coolant directly in contact with the combustion chambers, particularly near the spark plugs and exhaust valve seats, is being vaporized. This is called nucleate boiling; it is normal and does not pose a problem to the operation of the cooling system as long as the vapor is not allowed to accumulate. Usually the coolant flow rate is strong enough to sweep the vapor away, constantly dousing the area with a steady stream of liquid coolant, and any vapor bubbles that did form usually condense back into the coolant stream. But if a steam pocket does form, the vaporized coolant can impede the flow of the liquid to that particular area of the water jacket and a hot spot will develop on the inside of the chamber-setting up a situation that can cause detonation at best, and engine failure at worst. This is because vaporized coolant can't transfer heat as efficiently as liquid coolant; it essentially acts as an insulator, allowing the temperature in the area to spike.
In a standard-flow system, the pattern of coolant flow is always carrying vapor bubbles up and out of the engine. In a reverse-flow system, however, the coolant flow rate is not strong enough to "blow" the vapor from the cylinder heads down through the engine block and out to the radiator. The vapor, instead, will remain trapped in the cylinder head, eventually filling it with steam until the engine melts down.
The solution to this problem is very simple. The cylinder heads are vented at a location where coolant vapors would normally collect. On the Gen II engines, these vents are on the back of the cylinder heads. Steam and a small amount of liquid coolant escape through a banjo fitting into a metal tube that eventually runs to the coolant overflow reservoir. The opening of the banjo fitting acts as a restrictor-it is small enough to hinder liquid coolant from flowing through it, but steam will easily enter. As the steam passes through the banjo fitting, it experiences a pressure drop that allows it to condense more easily back to a liquid state.
This vent tube is an essential part of the cooling system. If you're pulling an engine from the junkyard, make sure that the vent tube is in fact there and that it's not kinked or damaged.
We talked to several engine builders to get their take on reverse-flow cooling. Their reactions were mixed but affirmed what we suspected: Reverse-flow cooling works well-better, probably, than a standard-flow system. But most cars just don't need it. For the type of driving the average person does, a standard-flow system does the job adequately, and without the added parts needed to make a reverse-flow system work. For a performance application, though, Chad Golen of Golen Engine Service and Mark McKeown of McKeown Motorsports Engineering are firm believers in reverse flow and say that the LT1 wouldn't be able to generate the power levels it's capable of without the reverse-flow design. McKeown actually modified one of the Ford Clevor engines he built for a recent Jegs Engine Masters Competition to run a reverse-flow system. "It just makes sense to cool the hottest part of the engine first," McKeown tells us. Karl Ellwein of Ellwein Engines-a builder who deals solely with LT1s-is a little less enthusiastic. He says that reverse flow may not contribute that much to the engine's performance; it doesn't hurt it, either, but it really limits the amount of aftermarket parts available for this engine.
Geardriven Water Pump
The Gen II's water pump is a unique design. It looks like an electric pump, but it's actually geardriven, using the camshaft sprocket. It was designed this way to be more reliable throughout its service life by eliminating the bearing failures caused by accessory drivebelt tension. The thermostat housing is on top of the pump housing on the inlet side of the system. Placing the thermostat on the inlet eliminates thermal shock, because cold water from the radiator can be gradually mixed with warm coolant already circulating through the engine. Also, the pump is designed to maintain full coolant flow through the engine and heater core even with the thermostat closed. This reduces the possibility of impeller damage by cavitation and allows the engine to warm up more quickly.
There are currently no aftermarket performance mechanical water pumps available, but Meziere and CSR sell electric pumps that replace the impeller section of the stock housing. Flow rates range from a near-stock 35 gallons per minute to 50 gpm. You need access to a hydraulic press to perform this conversion because the driveshaft bearing assembly must be pressed out.
Opti-Spark
Another big change from the traditional small-block design was the Opti-Spark ignition system, which incorporates two functions in one unit: It's a crank-angle sensor as well as a distributor. An optical sensor made of matched pairs of LEDs and phototransistors resides in the distributor housing. Light from the LEDs excites the transistors, causing them to generate a voltage. The light is broken up by a disc sandwiched between the two. The disc has two tracks of slots or windows cut into its perimeter. The outer track has 360 windows; the inner has only eight windows, but these eight windows are all of differing widths. The disc is driven by the cam, so as it turns with the engine, the phototransistor reads the "on and off" of each window as it breaks the beam of light and generates a voltage for each event-a total of 720 pulses per camshaft revolution, which corresponds to one revolution of the crankshaft. At the same time, the inner phototransistor is generating a signal for the eight windows that correspond to the top dead center of each piston. A processor called the EBT reads both signals and determines the exact position of the crankshaft, accurate to 1 degree. The ECM then uses this information to determine the proper ignition timing per cylinder on an individual basis.
Of course, the Opti-Spark performs its duties as a distributor, too. Spark energy comes via a remote-mount coil, like later HEI systems, but through a series of paths embedded in the cap, the plug wire terminals exit the cap according to which side of the engine the cylinder is located on.
The Opti-Spark has earned a bad reputation as an unreliable unit. But those claims are largely unwarranted. The early units, of 1992 and 1993, had problems with carbon tracking and ozone and moisture collecting inside, but improvements were made in the 1994 (or 1995 depending on application) and later units. The bodies were sealed and vented via ported vacuum drawing filtered air from the intake ductwork. No Opti-Spark likes moisture, though, and a water-pump leak can kill it. Since the water pump must be removed to replace an Opti-Spark, it's prudent to replace both parts together if one or the other fails. Chad Golen recommends using an MSD cap and rotor. He says the MSD parts are made of better materials than the GM pieces were. They are less expensive, too.
OPTI-SPARK BY YEAR 1992-1994: Nonvented, spline-driven 1994-1996: Vented, pin-drive B/D-body only 1995-1996 Y: Vented, pin-drive 1995-1997 F: Vented, pin-drive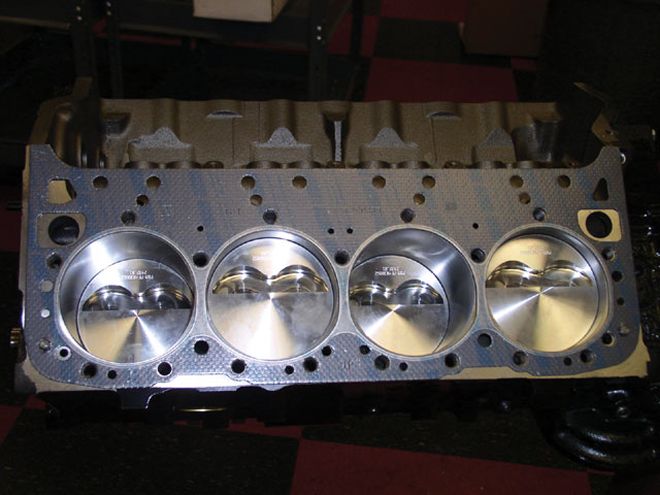
Intake And Cylinder Heads
Both of these parts had to flow better if the designers were going to meet their 300hp goal. The engineers were successful on both counts. Not only did the LT1 intake flow better than the Tuned Port Ignition manifold, it was shorter and lighter, which aided in packaging it to fit the new cars' low-profile hoods. Also, its one-piece design eliminated the labor associated with fitting the three-piece TPI manifold on the assembly line.
GM has discontinued the LT1 manifold, but Edelbrock makes a replacement. It accepts all emissions equipment and is machined to accept a 52- or 55mm throttle body as well as the stock 48mm one. Its Air-Gap design will help cool the intake charge, too.
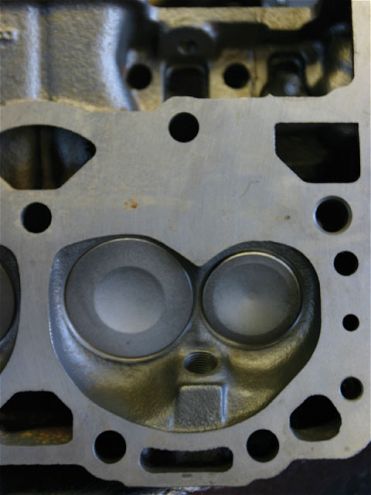
The LT1 cylinder-head design was one of Chevrolet's best. It outflowed the legendary Bow Tie heads and was the basis for the Vortec head, one of the best bargain performance cylinder heads on the market for the small-block Chevy. Much work was done to improve airflow into and out of the combustion chamber. The intake parts were redesigned to flow as a continuation of the intake runner, and the exhaust ports were reshaped to move more air at higher engine speeds. The shape of the combustion chambers was updated, and the valves and seats got three-angle valve jobs where the previous L98 engines had two-angle jobs. It's interesting to note that all LT1s came with aluminum cylinder heads except the B/D car applications. Apparently, the law enforcement community was concerned about heat soak and the longevity of aluminum heads in police service.
Trick Flow, Airflow Research, and Edelbrock each manufacture aluminum heads to fit most people's budgets. The builders we spoke to also emphasized the option of porting the stock heads. Since they are a good design to begin with, they respond very well to porting.
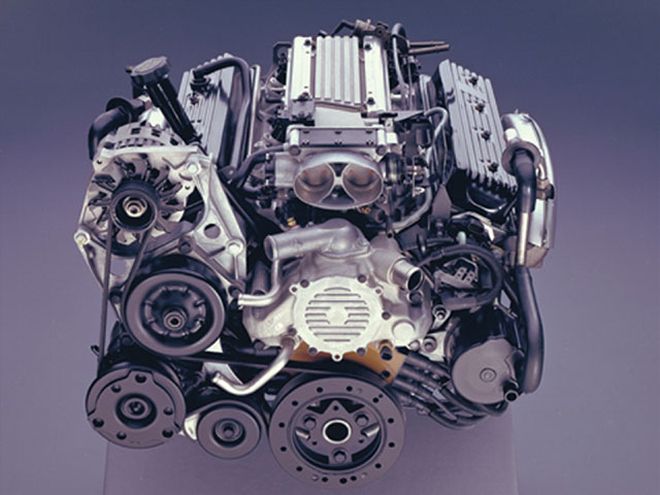
LT4
The LT4 was the last hurrah of the Gen II small-block, and did it go out with a bang. Though its torque rating was the same and it only made 30 more horsepower than the LT1, it was loaded with high-tech parts. The crankshaft was stronger, the valvetrain was lighter, and the heads flowed even better. The accompanying chart lists the specifics, but putting the valvetrain on a serious diet shed enough weight to allow the LT4 to rev to 6,300 rpm. Bigger intake runners moved more air in a more direct path into the engine. LT4s were standard in '96 Corvettes with manual transmissions and also came in a select few special-edition '97 F-body cars. There are some interchangeability issues to be aware of, though. LT4 intake runners are raised 0.100 inch higher than the LT1. They will bolt onto an LT1 block but require an LT4 intake manifold (Edelbrock PN 7109).
You can still buy LT4 cylinder heads from GM. "We have them on the shelf right now," say the guys at Scoggin-Dickey Chevrolet. At a little over $1,000 each, they're not cheap, but they're a viable option for the guy who already has a good block. Scoggin-Dickey also has a killer-sounding, race-spec CNC-ported LT4 head with 64cc chambers, 205cc intake, and 77cc exhaust runners that flow 262 cfm at 0.050-inch lift. Don't have a good block? Scoggin-Dickey sells those, too. A new LT1 long-block with four-bolt mains can be purchased for just under $5,000. If you want to go all out, Scoggin-Dickey also sells a race-prepped 383 short-block for almost the same amount of money. It comes with Milodon splayed four-bolt main bearing caps, a forged Lunati crank, Pro Mod 5.850-inch rods, SRP flat-top pistons, and JE rings.
Potential
All the builders we spoke to agreed that 450 hp is easy to get out of an LT1. Chad Golen built his business on LT1s and was the guy everyone told us to talk to. Golen Engine Service moves about 200 LT1s a year and offers a variety of packages to choose from, including a 460hp package that will pass California emissions. The most popular package Golen sells is the 440hp 383, but he can put together a 396 that will crank out 520 naturally aspirated horsepower.
"Four or five hundred horsepower is easy; you only need to do a few things to the motor," Golen tells us. "You need to port the stock heads, but you can keep the stock intake, run a 52- or 55mm throttle body, 30 lb/hr injectors, add headers and exhaust, and reprogram the ECM."
Mark McKeown has been working on a custom centrifugal supercharged application, and naturally aspirated his 8.5:1 engine is pulling 515 hp on the dyno. This is possible through careful selection of all the components. "You need to look at the engine as a whole," he says. "By maximizing efficiency, you make sure that every molecule of gasoline reacts with every molecule of oxygen during the combustion process. Nothing is wasted. We match the intake to a good set of heads with back-cut valves and a good valve job." He expects to make an easy 600 hp from the engine once the blower is on.
Karl Ellwein started out as an Impala SS owner, saying, "I just liked the looks of the car." He bought one and began modifying it and started making big power, too. Soon other Impala and 9C1 Caprice owners were asking him to build engines for them as well, so he opened a business building engines. "Guys are buying ex-police cars at auctions for cheap and racing them," he tells us. A popular customer request is for a 355-inch package that adds Mahle pistons and Scat rods to the stock crank. This $2,400 budget rebuild is a good starting point for the high-mileage, ex-cop cars. Ellwein will also build a $12,000 one-off boosted and juiced race engine. He said he has enough work to keep himself busy for several months, and he's actually been turning customers away.
To Build Or Not To Build
Should anyone build this engine? That's a tough call. The LT1 has a number of glaring strikes against it. Its run was short and its major parts don't interchange with the original small-block. The prices of used or salvage LS1s are dropping, and those engines make more power than LT1s do. All our builders agree that the LT1 isn't obsolete, however. Chad Golen says most of his customers are current LT1 owners rather than swappers. "There will always be the guy who wants to keep the engine that originally came in his car," he tells us. Mark McKeown says that the LT1 is a popular swap for the street rodder guys who want a different look for their fiberglass-bodied deuces, but it would also make a good swap candidate into older musclecars because of its affordability and tunability. The other builders agree. "They use the same oil pan and mounts. They fall right into place," Golen says. "But you get a much more modern engine with a lot of tuning potential."
Another interesting point that all the builders mentioned was that LT1s are good-looking engines. Not that aesthetics should rate high on our list of criteria when putting an engine together, but the point is still valid. Thanks to its low-profile, tunnel-ram-style intake and front-mount distributor, it is a very clean install into an older car. "They're not as difficult to wire up as people might think, either," continues Golen. "You can buy a premade wiring harness, and there aren't that many sensors to hook up-throttle-position sensor, idle air control, mass airflow, MAP, two oxygen sensors, two knock sensors. Plug in the fuel injectors, distributor, and the ECM, and you're ready to go."
Street & Performance's Mark Campbell offers a dissenting voice, however. "They're not the newest technology," he says, pointing out that if you want a fuel-injected musclecar, it makes more sense to do a Gen III swap. "The engines are becoming more affordable, and the aftermarket support is booming." Campbell's company specializes in engine swaps and makes and sells a dizzying variety of adapters, modified oil pans, motor-mount kits, and wiring harnesses. He goes on to say, "They're good engines, but parts are going to be more difficult to find. And you're still running old technology under the hood. I think the better swap candidate is the Gen III engine."
Armed with this knowledge, if you're considering an LT1 swap, the general consensus among LT1 Internet geeks is that engines from the B/D-bodies make the best swap candidates, since they were in thousands of cars that are making their way to the junkyard at this very moment. They have a couple of other things going for them. They all have the upgraded Opti-Spark unit, and because their overflow reservoir is mounted higher than the engine, their system of coolant lines and vapor vent tubes is the least complicated. Also, unlike most F-body applications, they were all dual-catalyst cars-a huge plus to guys living in states with tight emission laws. By those states' guidelines, if the engine was originally a dual-catalyst application, you are able to run a true dual exhaust in your project car. If not, you're stuck running a Y-pipe into a single cat.
If you are scoping out a Caprice in the junkyard, beware the 4.3L V-8. Though it looks the same as an LT1, it is a low-compression, grandma-friendly engine that would make for an embarrassing swap into a performance car. Let the VIN be your guide-a P in the eighth position of the vehicle identification number is what you should be looking for. A W indicates the engine in question is the 4.3 that will turn your hair blue and make you walk with a cane. RPO geeks can also check the sticker on the inside of the trunklid. The regular production option code for the 4.3 motor is L99. If all else fails, check the exhaust. All LT1 cars ran true dual exhaust, while the 4.3 cars were all single catalyst, single tailpipe.
There is one fitment issue that seems to crop up in all LT1 swaps we've seen so far. The A/C compressor won't clear the passenger-side framerail of most musclecars. An idler pulley is available for those who have no use for air conditioning, but some ambitious swappers end up notching the frame for clearance. Because of the front-mount water pump and distributor, GM stacked all the engine-driven accessories up on one side of the engine. The B-, D-, and F- bodies mount the accessories on the passenger side, while they're on the driver side in Corvettes. The Y-body accessory-drive system is usually expensive, but if you can find one it may solve most of the clearance issues.
Regardless of which car you pull an engine out of, be sure to grab all its accessories, brackets, coolant lines, and wiring. You can rewire the factory harness to fit your car or buy a premade harness from Painless Performance Wiring or Street & Performance. The harnesses use OE-style wire colors and connectors and can be made to fit your application and plug into the factory ECM, which can be fully reprogrammed by tuners like PCMforless.
Be Heard
Still interested in reading more about LT1s after all this? We think LT1s are worth another look and are considering a buildup and possible swap into an older car. But we want to hear from you. Whether you want to see an LT1 buildup or feel like canceling your subscription when you see another small-block Chevy, we want to hear from you. Send us your feedback at [email protected] or in the CC forums at CarCraft.com.