
Wrenching on performance cars, particularly if you're involved in some form of racing, typically involves lots of parts-swapping. And whether this activity is motivated by upgrades or simply the need to replace what's worn out, at some point, new parts will find their way onto your car. For the experienced gearhead, the installation of these parts is often considered routine, although even veteran wrench-jockeys often overlook a critical aspect of the installation process: the break-in procedure.
We all know that new engines have to be broken in and new flat-tappet cams also require a dedicated run-in period, but what about the rest of the vehicle? If you had the opportunity to speak with the engineers who design parts for our machines, you'd soon learn that the importance of breaking in new components extends beyond the engine bay. We did just that, and consulted with some industry experts to get their advice on the areas that need attention and the procedures that will ensure the efficient operation and long life of the parts involved. You might be surprised at some of the things you've been overlooking.
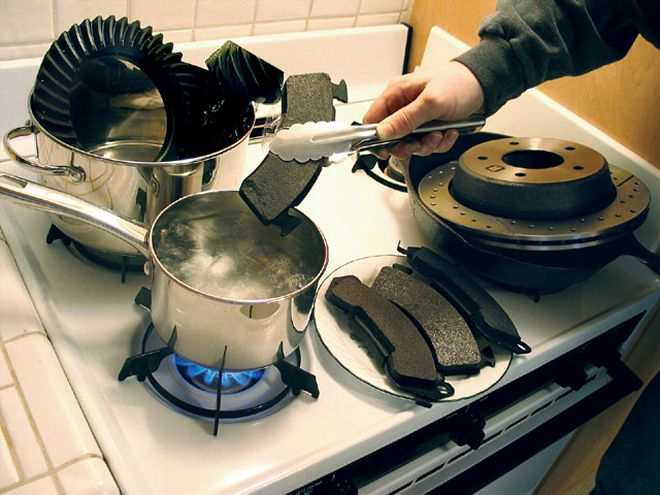
BrakesAfter consulting with some experts, it became quite clear that the most commonly ignored break-in procedures are the ones involving brake parts. Replacing brake pads and rotors is a regular part of car ownership, even for those Camry-driving lemmings that clog up the highways. But most people, if they're even aware that brake pads must be broken in, consider this a race-only necessity. In fact, nearly all brake pads must be broken in for proper performance.
We spoke with Jay Buckley, one of the Bendix Brake Answermen, to gain insight on the subject of brake system break-in. Right off the bat Buckley reaffirmed that nearly all brake pads for all applications need to be broken in, or "bedded," before they will provide the intended performance. According to Buckley, semi-metallic brake pads-the type most of us use in our vehicles-have poor performance when they are "green," a term used to describe brand-new pads. The semi-metallics just don't stop well in their as-new state, which tends to provoke drivers to use the brakes harder in an effort to compensate. When this happens, the pads become overheated, which in turn boils the resins contained in the friction material, causing them to rise to the surface. These resins eventually solidify, becoming extremely hard and compromising brake performance while also inducing squealing.
Buckley tells us this is a common scenario, occurring as often as 8 out of 10 times new brakes are installed and not properly bedded. Once the premature overheating has taken place, the pads are effectively ruined and cannot be repaired. In fact, Buckley advised against the common practice of sanding the surface of the pads, largely because this is an ineffective method of saving the pads but also because it can pose a health hazard if the filings or dust particles are inhaled.
The issue is that the friction material in most brake pads requires proper heat cycling to fully cure the resins prior to any serious usage. Additionally, proper brake bedding involves depositing a layer of friction material on the rotor surface. Most do-it-yourselfers are unaware of this or simply disregard the manufacturer's recommendations, while professional mechanics often don't spare the extra time required to bed the brakes during the testdrive, if there even is a testdrive.
As Buckley says, the brake job is only as good as the mechanic doing it-proper techniques and procedures for the particular application must be observed to guarantee optimum performance from the system. This includes proper rotor resurfacing, proper rotor installation, correct wheel-nut torque (when using hubless rotors), and proper caliper slider lubrication, among other things. That said, Buckley went on to advise us on the proper procedure for bedding new brakes.
Bendix 30/30/30 Brake-Burnishing ProcedureMost brake-parts manufacturers, as well as OE automakers, have specific brake bedding-also known as burnishing-procedures to ensure that new brake pads are cured properly prior to regular operation and to establish the desired material transfer between the rotor and pads. The ultimate procedure is outlined by SAE, but it's far beyond what the average consumer, or even professional garage mechanic, could perform. In a nutshell, the procedure directs technicians to install thermo-couples in the front, outer brake pads to monitor temps, and goes on to dictate specific deceleration rates (12 feet-per-second) from 40 mph. While monitoring the brake pad temps and deceleration rates, the procedure is then repeated 200 times to properly burnish the brakes.
Bendix has developed a more real-world procedure dubbed 30/30/30 in reference to the critical target values to aim for: Perform 30 stops from 30 mph with a 30-second cooling interval between stops. Bendix recommends that the 12 feet-per-second decel rate still be adhered to, but advises that this means a gradual, gentle stop for those of us who don't have our own on-board data acquisition system. Following this procedure beds the pads to the rotors (and the shoes to the drums if applicable) and deposits the necessary friction material from the pads/shoes to the rotors/drums. This should ensure optimum brake performance and longevity.
ClutchSince the clutch in most vehicles uses a friction material and surface similar to those found in brake systems, it seems reasonable that a new clutch would also need to be burnished prior to serious use. However, while clutches should be broken in, none of the clutch manufacturers we consulted specified a rigid burnishing-style procedure. Instead, the instructions generally outline a more basic set of guidelines for initial operation with the new equipment. These focus primarily on driving the vehicle gently for the first few trips, with no heavy loading, no harsh dragstrip-style launches, and definitely no slipping of the clutch, as is common in traction-limited drag launches.
Slipping the clutch can cause a situation similar to that of the prematurely overheated brake pads: The resins in the friction material will boil and rise to the surface, where they will harden and "glaze" the clutch disc. As with unburnished brake pads that have been misused, the glazed clutch disc will be compromised and basically ruined. Subsequent launches after this has happened will likely result in clutch slippage, and the only remedy is to disassemble the whole mess and have the flywheel re-machined before installing another new clutch disc and pressure-plate. Of course, even after the clutch is broken in with casual street-driving, excessive slipping can still damage it, though the disc should be more resilient after break-in.
Another similarity between clutch jobs and brake jobs is the importance of proper installation procedures, along with the frequency that these procedures are at least partially ignored. Make sure to check with the clutch manufacturer and the factory service manual for specific information on your application. The basics include proper flywheel resurfacing, pilot bushing/bearing replacement, throwout bearing replacement, and verifying proper clutch linkage operation, whether it's bell-crank, cable, or hydraulic.
On a final note, as with brake pads, there are countless variations in friction material compounds, and the stuff designated as being for "competition use only" is generally labeled that way for a reason: It's not practical, and probably unbearable, on the street. Choose wisely.
Rear AxleYet another part of the drivetrain that requires some special handling out of the box is the ring-and-pinion gearset in the rear axle. Although rear gears aren't considered wear items that have to be changed periodically like brakes or clutches, in our world gear swaps are nearly as common as tire changes are for Joe Commuter. But most of us don't realize that the block-long burnout typically performed while leaving the axle shop isn't actually advisable, and not just for legal reasons.
According to the tech staff at Randy's Ring & Pinion, new gearsets do need to be "run in" before they can be subjected to heavy usage. The first three trips with the new gears should be limited to no more than 20 to 30 miles each. These should be short trips that are intended to simply heat up the gears and the lube. After each one of these trips, the rear axle assembly should be allowed to cool completely, which takes at least three hours after being fully warmed up. For the remainder of the first 500 miles, there should be no heavy loading or drag-race-style launches. The wear pattern is still being established between the gears at this point, and harsh loading can have a detrimental effect on this process. Attempting to run the gears in while the vehicle is on jackstands will not produce a sufficient load to establish a proper wear pattern, nor will it bring the lubricant and gears to normal operating temps, which is critical for proper heat cycling.
After the first 500 miles have passed, the rear axle lubricant should be changed as there will be some minor metal shavings generated from the hard facing on the gears as the set breaks in. Randy's prefers to use 85/140 synthetic-blend gear lube in its passenger-car axles, though the techs offer that breaking in the gears using standard mineral oil lubricants (of the proper specification) is perfectly acceptable, and a lot cheaper. Once the rear gears are broken in, you can switch to synthetic lube and start bangin' gears.
As a side note, the techs at Randy's also advised us that the old practice of setting up a set of gears "tight" (which is to say with less lash than the factory specs call for in an attempt to boost the strength of the gearset by increasing the tooth engagement) is not a good idea. The deeper meshing of the gears will simply increase the friction between the two while squeezing out the lubricant, leading to premature wear. Use the factory specs even for drag-race applications.