
Owning a wicked cool classic truck certainly has its benefits, especially when you top off the tank and hit the open road to enjoy putting down some well-deserved miles. But, what happens when you want to head out to a cruise night or an event and you need to load up the bed with some essentials like a cooler or some additional luggage? For many owners, whose beds are finished just as nicely as their trucks exteriors, it brings forth a dilemma of how to actually make the most of their hauler without damaging some of its finer points. Here’s the deal, for a modest amount of stock and a little bit of labor, your troubles can be solved. On a recent visit to The Hot Rod Garage in Denton, Maryland, we came across a mint ’40 Ford that was there to try and address this exact situation. Shop owner Ray Bartlett guided us through the thought behind their exclusive polished stainless steel luggage racks, which can be custom-fitted to any make or model classic truck utilizing existing bed trim holes, and requiring no fabrication to the truck itself. If polished stainless isn’t your bag, you can create it in mild steel and have it powdercoated for just as much durability. Either way, you can start utilizing your truck’s full potential with a neat removable luggage rack that’s both sleek and sexy while adding even more allure to your ride.
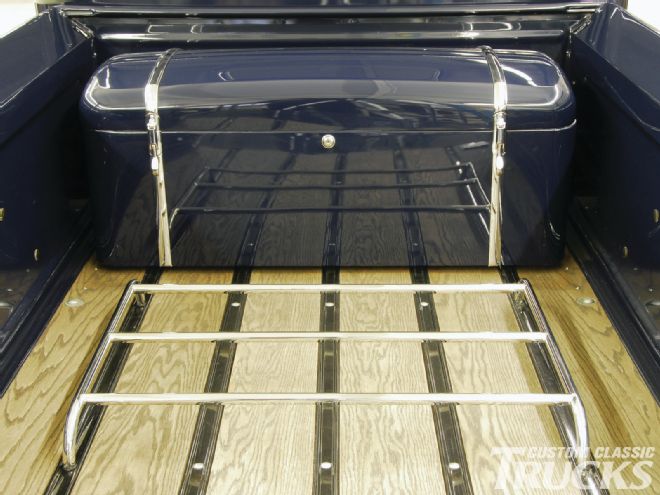
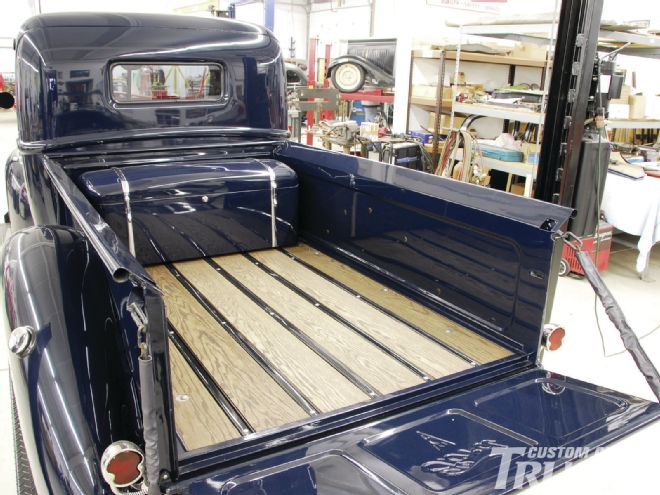 When your bed is as nice as this, you’d be hard pressed to just toss some luggage or a cooler in it when you hit the road. A custom luggage rack would easily fit the bill to change the way you travel.
Getting started, team leader Dean Alexander began by evaluating the bed of the truck and determining the exact mounting points of the new luggage rack. It was important to measure exactly from the bed trim center bolt to center bolt to assure the rack will mount perfectly in place. For this particular application the measurement was 233⁄8-inches. The hardware was then loosened and removed from the bed. Alexander then proceeded to create a template on light cardboard stock to transfer all the required measurements, starting with a straight edge for the overall length. To give the rack a subtle appearance, ¾-inch solid polished stainless rod was selected which would sit approximately 2¼-inches from the top of the bed to the bottom of the rack’s cross bars. A simple compass was used to mark a dual 4¾-inch radius. The completed template would be of great help to confirm the bends once they were made. Alexander then sleeved the polished stainless rod in plastic to help keep it from being scratched during the fabrication process. To take on the task of bending, a Hossfeld Universal electric-hydraulic iron bender made the job a snap working with the proper adjustable dies marked for a 90-degree bend. Once the work was completed, the rod was matched to the template, confirming the bends. It’s a good idea to allow some extra stock on either side of the piece to allow for a final trim to fit the application. Noting the trimming required, Alexander made the cuts on a band saw and then deburred the area on a belt sander, all the while wearing sufficient eye protection.
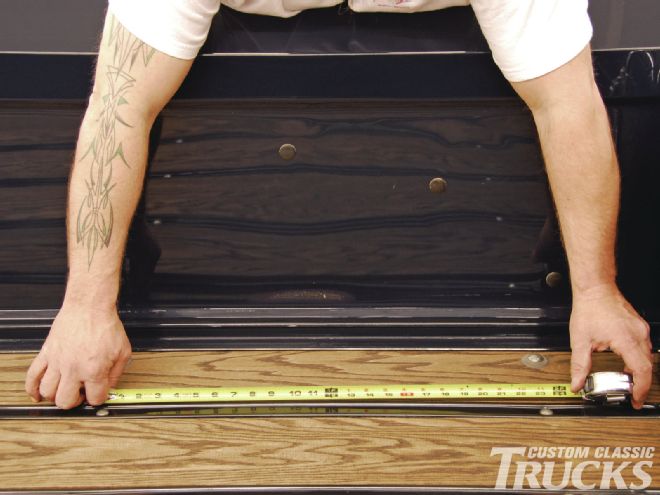 Dean Alexander of the Hot Rod Garage gets started by first making a determination of the size needed for the rack. He utilizes existing bed trim holes and measures from center point to center point, 233⁄8 inches for this particular ’40 Ford.
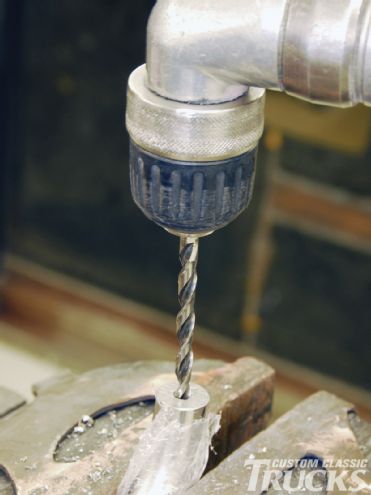
For a nice, clean mounting of the rack to the bed, ¼-inch stainless steel bolts were secured in an Enco Mfg. lathe to have their heads shaved off. By doing this, Alexander created a set of threaded mounting studs which were then countersunk ¼-inch into the mounting base ends using an air-driven drill with a ¼-inch bit. The studs were set in place and TIG welded to complete the step. During the welding process, the polished stainless steel radius ends were affected by the heat dissipation and required a little freshening up to regain their fine luster. A DA sander and 400-grit paper got the process started followed by 800-grit used by hand. Some final finessing on a rotary buffer brought back the original brilliance. In order to secure the overall width of the rack, the side mounting bars were bolted to a sheet of plywood at a measurement of 30¼-inches. This allowed Alexander to lay out the three cross bars for fitment review. The overall width of the cross bars was determined using a pair of squares and a measuring tape to confirm the 30¼-inch measurement accounting for a ¼-inch C-notch per side. The bars were then trimmed to size using a wet saw and then deburred. With the toughness inherent in stainless steel, it was a good idea to first remove some of the internal material of the bar stock to prepare it for the C-notch process. This was accomplished by securing the plastic covered rod stock in the lathe and gradually drilling out the material starting with a 3⁄16-inch bit and progressing to a ½-inch bit. The rod was then transferred to a mill where a ¾-inch Roto-Kut hole cutter was used to complete the C-notching process. It’s a good idea to have some machine oil handy for both the drilling and C-notching to help lubricate the cutting surfaces.
 With the wrapped mounting base secured in a bench vise with brass jaws (to keep the surface scratch free), Alexander used an air-driven drill with a 1/4-inch bit to drill 1/4-inch into the mounting base to locate the stud for a snug fit.
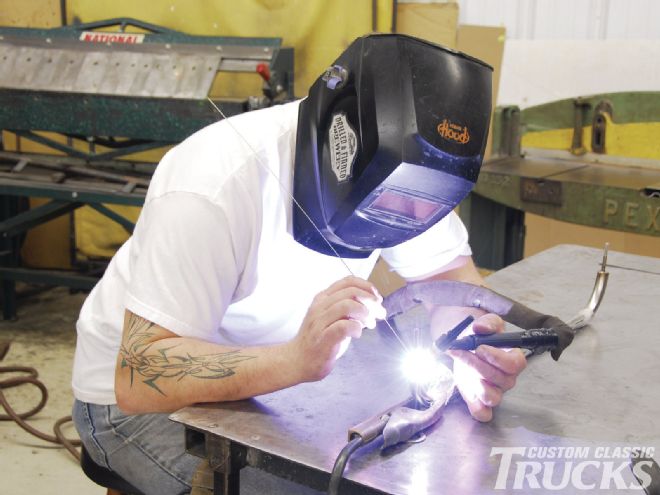
With the crossbars now ready to go, Alexander prepared them for final fitment by first establishing placement by measuring for the center bar first. He did this using a square and a ruler at either side to locate the mid-point of 12-inches. The adjacent crossbars were then located at 8½-inches from the center of the middle bar to center of each end bar. All measurements were then checked on each side with a square for perfect symmetry. The bars were then TIG welded in place to complete the fabrication of the rack. Once again, heat dissipation played a role thanks to the TIG welding. This time to correct the problem, Alexander contacted the Eastwood Company for one of their Deluxe Automotive Polishing Kits to lend a hand in restoring the vibrance to the affected areas. The kit comes with everything you would need to complete the job including a wide assortment of felt buffs, bobs, and rouges, plus an informative instruction manual. To bring back the dazzle, Alexander used an air-driven drill with a multi-stitched sewn felt wheel and some coarse grey rouge to work the affected areas. With this completed he proceeded using a conical bob topped with white rouge and worked it through every crevice and across the entire surface to finish the job with an incredible brilliance. The completed rack was then bolted into the bed using some thin rubber insulating washers. Not only does the rack look just plain bitchin’, it’s ready to hold down any of your necessities when you decide to hit the road. CCT
 Each countersunk stud was then TIG welded into place for the ultimate in strength.
 Installed into the bed of this lucky ’40 Ford, the luggage rack looks low and lean with a dash of sexy making it a perfect complement to the truck, ready to give plenty of years of service when you hit the road.