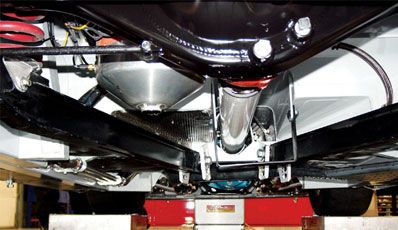
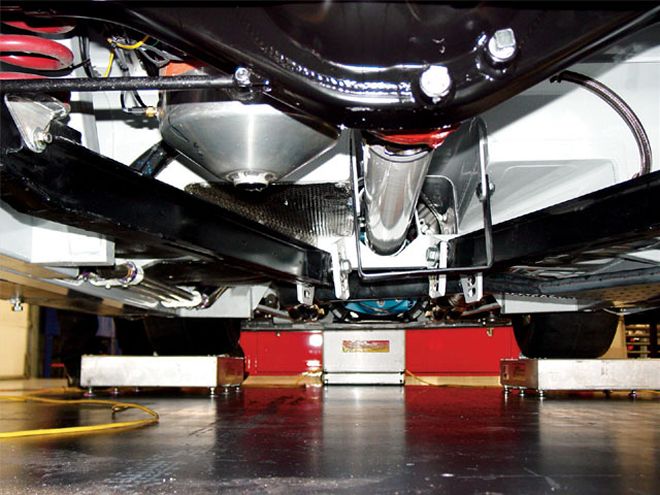
 After reading Driveshaft 101, you should be able to see the potential for problems in this photo. Unfortunately, this driveshaft will probably have a short life. Final assembly is a bad time to find out that your chassis builder and your mock-up process didn't allow enough operating clearance for your driveshaft.
Everyone who successfully completed Driveshaft 101 last semester, er, in last month's issue, now has a better appreciation of the challenging environment that the racing driveshaft must survive in and the many decisions that need to be made when specifying the best component choices for your application.
In Driveshaft 102, we will go into the shop and discuss many important concepts of working with the racing driveshaft.
In the top NASCAR teams, dedicated drivetrain specialists have learned many of these concepts the hard way through years of expensive trial and error. Here, for the first time, we will reveal many of the tips and techniques that they have developed to first specify the correct shaft and then ensure its reliable operation to meet its difficult challenge.
1. Driveshaft Measuring The length of a racing driveshaft is typically specified from the center of the front U-joint to the center of the rear U-joint in 1/4-inch increments. If you are replacing an existing shaft that is working well, the length to order is obvious. But for a new car or a changed driveline configuration, it is critical that you measure carefully. Guessing is not an option when ordering an expensive custom driveshaft.
Once you have narrowed down all the component choices and verified the actual parts that you will be using, it is time to measure for your new shaft. You want to duplicate the exact configuration the driveshaft will end up in to determine the correct length to order.
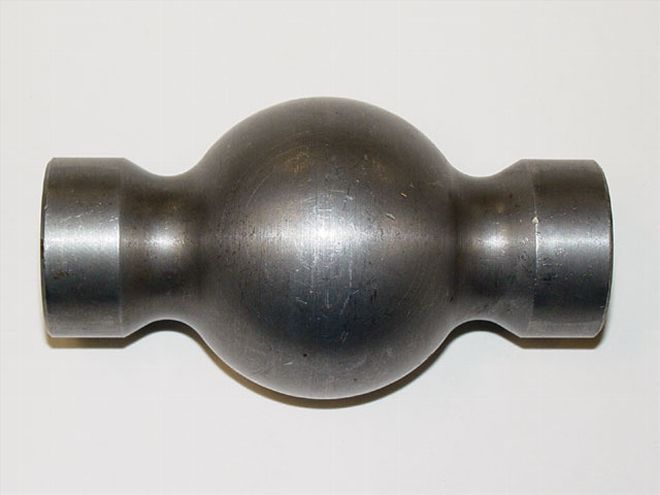
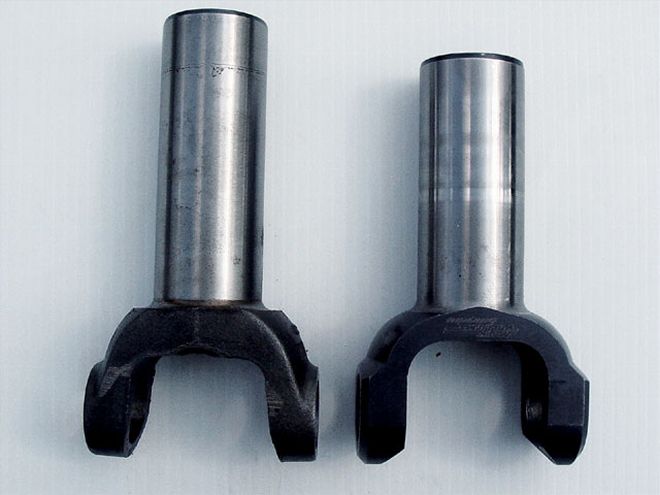 It is also important to measure with the same brand of slip-yoke that you will actually be using. Notice that the cast yoke on the left is longer than the billet yoke on the right. The cast yoke will bottom out externally on the rear seal, while the billet yoke will often bottom out internally on the tailshaft before it reaches the seal.
It is important to mock-up the actual environment in which the shaft will run. The mechanic must check that the wheelbase measurement is set, the pinion angle is set, and the measurement is taken at true ride height. With the car on high stands and the rear springs removed, raise the rear axle with your floor jack until it simulates ride height.
If available, use a shorter shaft with the same slip-yoke and U-joint configuration to determine the correct length. Push the slip-yoke all the way into the transmission and mark the barrel at the rear seal where it stops. Then, set the rear U-joint snugly into its saddle and mark the slip-yoke barrel again at the seal to show the free-play.
The correct length driveshaft should have about 1.25-1.40 inches of possible forward movement before the slip-yoke contacts the tailshaft internally or its housing seal externally. Add or subtract from the known center-to-center length of the measuring shaft to determine the measurement that will best achieve this desired clearance. A typical stock car trailing arm suspension will cause the shaft to move forward 1/4-1/2 inch in normal use, yielding an actual running clearance of about one inch.
2. Length Determination by Measurement If you don't have a similar shaft to measure with, use a long ruler to take the measurement from the end of your tailshaft housing to the centerline of the U-joint on the rear pinion yoke. Your driveshaft supplier can use that measurement to determine the correct length using the components you choose.
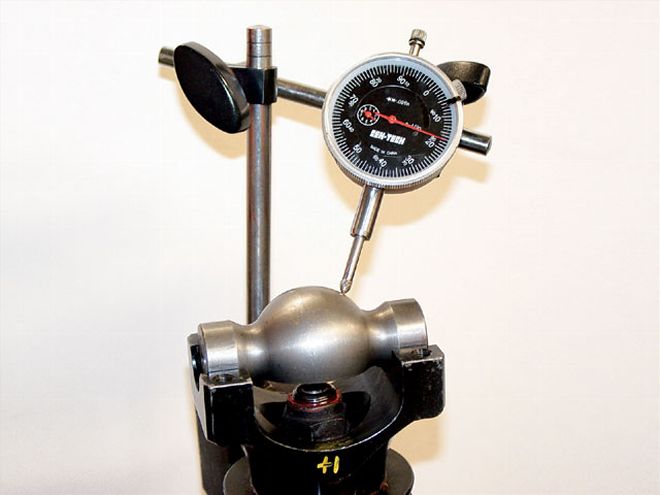 This dial indicator setup is being used to check the actual runout on an assembled rear gear yoke. The goal is to have the yoke run absolutely true. NASCAR specialists will spend hours trying different combinations of parts and positioning to achieve smooth operation.
3. Driveshaft Inspection Once you have your new driveshaft in hand, examine it closely to make sure each U-joint clip is evenly and smoothly engaged in its circular grooves and there are no sharp edges that can catch debris. Verify the center-to-center length to be as ordered with a straight-edge ruler, not a floppy tape measure. Inspect the spline of the slip-yoke inside the barrel for packing debris and lubricate the barrel of the slip-yoke with a light wipe of a good-quality, high-temperature grease, such as your chosen wheel bearing product.
4. Balance Weights Take a marker and outline the balance weights on the shaft. Then, if a weight is lost during use, it will be visually apparent that a weight is missing. If the driver mentions a sudden vibration, this may be the cause.
5. Driveshaft Installation Place a shop towel over the driveshaft loop to protect the paint and carefully guide the shaft into the tunnel while aligning the slip-yoke with the output shaft. Avoid any contact with the chassis or loop by the shaft to prevent a dent.
The slip-yoke should slide smoothly onto the transmission output shaft with a slight wiggle for alignment of the splines. If there is any binding, do not force the engagement.
It may take several tries to find a smooth entry angle or sequence of movement to insert the shaft easily while you are lying under the car. Once you figure it out, write it down or practice it with your crew members so you can do it quickly at the track when it counts. Damaging your nice new driveshaft at the track in the process of a frantic gear change will ruin your day.
 You won't find this tool on your local tool truck. A checking ball tool is necessary to verify that your rearend yoke runout is within specification. An orbiting end yoke will vibrate like an out-of-balance driveshaft and be hard to find otherwise.
6. Rear Gear Runout Often overlooked in the driveshaft installation process is the necessity that the rearend yoke rotate smoothly with minimal runout. The top NASCAR teams and gear shops use a sophisticated checking ball to determine true yoke runout with a dial indicator. They then correct it by clocking the end yoke to the pinion gear or selecting different yokes until the runout has been reduced to a minimum. It is quite common for pinion gearshafts to be bent after final heat-treating, and this procedure is needed to eliminate any built-in orbiting.
7. Driveshaft Verification After installing your new shaft, take the time to cycle the rear axle assembly through its entire range of motion, just as you would when checking bumpsteer in the front, and monitor the position of the shaft for clearances and obstructions. Remember that you will also be jacking the car from side to side in pit stops and sometimes running with a flat tire or without a wheel on one corner.
Verify that the shaft moves freely through all of these motions and never contacts any solid object. Set your axle travel limiting chains with this in mind so that the shaft can't contact the driveshaft loop at full droop.
8. Driveshaft Inspection After installing a New driveshaft, it is important to inspect it after its first on-track sessions to ensure that it is in a safe operating range and has not come in contact with the driveshaft loop or other obstructions. Most teams carry only one spare driveshaft with the goal of never needing it. Finding another driveshaft at the racetrack that will fit your car correctly is pretty unlikely, so a little caution goes a long way.
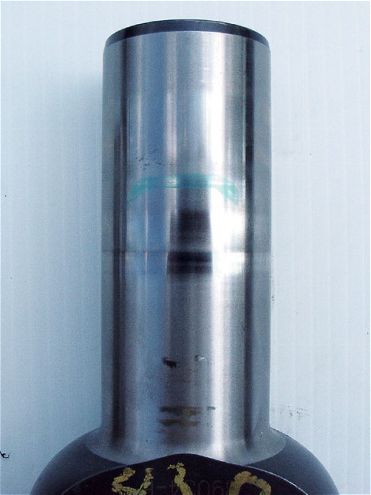 The visible witness marks on this billet slip-yoke clearly show the impressions left by the twin roller bearings located in the tailshaft housing. The actual operating range is too close to the end of the barrel, indicating that the driveshaft is too short and should be replaced with a longer one.
9. Slip-Yoke Inspection After running several on-track sessions, the next opportunity you have to remove the driveshaft is a good time to inspect the slip-yoke and determine its actual clearance. Noticeable "witness marks" will be evident on the barrel of the slip-yoke, indicating the actual typical running position that the yoke has settled into on the tailshaft housing's bearing surface.
To validate your length, these marks should be in the "happy zone," with no risk of bottoming out and a minimum distance of twice the output shaft diameter engaged in the splines at all times. A shaft that is too short will cause a random vibration or a sudden noisy disconnection. A shaft that is too long will bottom out at the transmission, breaking the slip-yoke, tailshaft housing, and internal transmission parts.
10. Post-Crash Inspection-RaceCars Crash! From a little bump on the wall to a little rubbin' to a major incident, the driveshaft is always at risk for damage. Breaking a Panhard bar or customizing the rear axle alignment on the Turn 4 wall will put your driveshaft in a very compromised position. Think of the driveshaft as a visual fuse in the drivetrain. Any crash damage serious enough to dent or buckle the driveshaft indicates that the rear end or chassis has been pushed out of alignment.
The driveshaft's operation zone will be moved and all your careful clearance checking will be irrelevant. Hopefully, the damage to the driveshaft will have spared more expensive components, such as the transmission or rear gear, from further damage. Replacing the driveshaft with your spare will not correct the rear axle alignment problem.
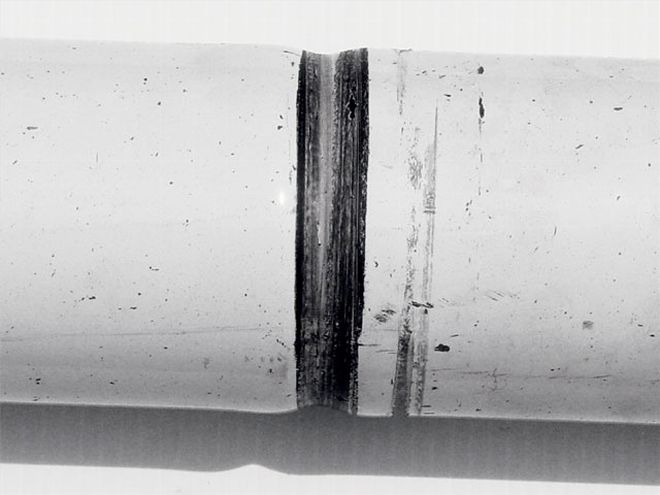 This shaft shows the result of spinning contact with the driveshaft loop. The tubing has been severely deformed and weakened. Any radial damage on the tube deep enough to catch with a fingernail will become the starting point for a stress riser that will cause the shaft to fail, beginning at that weak spot.
Before you frantically pound out the fenders and send the car back on-track, consider the consequences of damage to the driveshaft. Always inspect the driveshaft closely after a crash. If there is any doubt as to its condition, remove it from service and return it to the manufacturer for inspection and repair.
11. Driveshaft Damage and Failure In normal use, your racing driveshaft will be trouble-free for its usable life. But no one on a professional race team ever gets a bonus for using a driveshaft until it fails.
The consequences of a failure during an event go far beyond the cost of the shaft in terms of lost finishes, prize money, and points. A driveshaft failure at speed will likely cause a crash and serious car damage and injury. So recognizing when a shaft is damaged beyond further use will go a long way toward preventing catastrophic failures.
12. Driveshaft Handling With machined surface clearances measured in thousandths and balancing accurate to the ounce or gram, your driveshaft is a precision piece of equipment that needs to be handled with care. Modern racing shafts can be easily damaged by careless handling in the shop or under the car. Always hold a shaft with both hands, like you were cradling a baby. Never lean a shaft against a wall or lay it on a bench top where it can roll off and hit the floor. Contrary to Isaac Newton, racing driveshafts are affected by twice the force of normal gravity and will always seek the shortest path to the floor as quickly as they can.
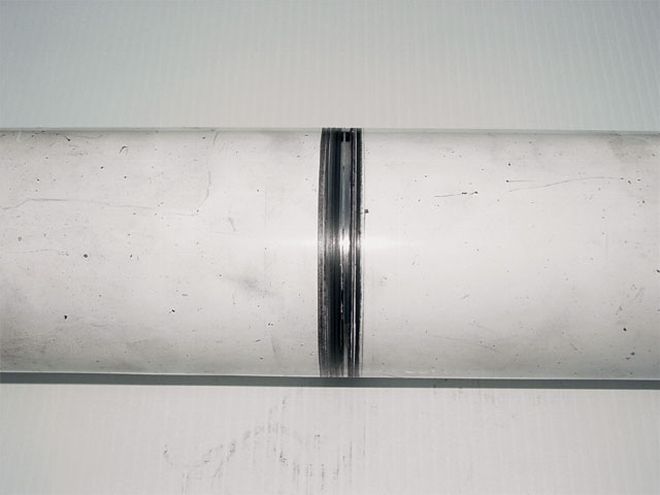 The rub marks on this shaft indicate steady contact with a rubber belt or hose. Even soft materials can quickly overheat the tubing and ruin the driveshaft. The driveshaft must be considered an expendable part and replaced immediately if such damage occurs.
13. Bending Tube runout is carefully controlled during the production of a racing driveshaft. The manufacturer will measure runout over the length of the shaft after welding and carefully straighten it to a minimum specification before balancing. While rolling the shaft in a set of V-blocks, a dial indicator will show the actual tube runout. Doing this process, before installing your new shaft, will give you reference data to compare when checking a suspect shaft after a crash.
14. Rubbing Regularly inspect the driveshaft for any indication of contact or rubbing against any part of the car. The most common culprit is a spare rearend V-belt or a loose brake duct. The friction and heat from such rubbing can wear a groove on the tube like a lathe parting tool, rendering the shaft unusable.
15. Overheating Hardened slip-yokes can easily outlive a given shaft and are routinely recycled onto new shafts at the professional level. But even a hardened slip-yoke can be ruined by inadequate lubrication or localized heating. A broken header can overheat a U-joint and destroy its seals. Post-race chassis dyno runs can deprive the yoke of lubrication. Any slip-yoke or U-joint that has been visibly overheated should be removed from service.
16. Troubleshooting If you suspect a driveshaft vibration, unbolt the shaft at the pinion and rotate it 180 degrees and re-install it to see if the driver notices a difference. Having a good spare shaft to try next can quickly isolate a vibration problem as being driveshaft related or not.
17. Driveshaft Maintenance As we mentioned before, your driveshaft is a precision piece of racing equipment that will give good service life if you treat it right. This includes keeping records on its usage and periodic inspections. The U-joints are sealed for life and require no cleaning or regreasing. Clean the shaft thoroughly, removing any built-up rubber or surface grease, and then lubricate the exposed machined surfaces with WD-40 or a light grease to prevent rust in storage.
18. Lifting A racing driveshaft has a usable life that can be measured in miles, hours, or seasons. For sustained high-rpm NASCAR applications, a team wouldn't consider running a shaft beyond five full 500-mile race events. This means the shaft has (including practice) over 3,000 miles or 30 hours of on-track use. This would be the equivalent of a season of lower-rpm short-track activity.
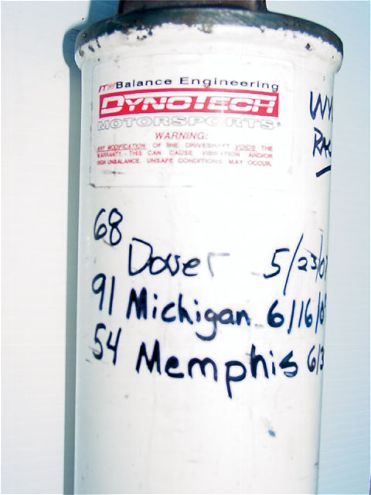 NASCAR teams often mark their driveshafts after each use so they can quickly determine the accumulated stress that the shaft has endured. A notebook like this is hard to put in your pocket, but racers have developed simple systems like these to prevent shafts from being used beyond their safe projected life.
The top teams keep careful usage records of each shaft and can determine exactly how many miles each shaft has seen. As miles accumulate, the shaft may be retired from primary competition and assigned to a back-up car or testing activity only. At the end of its usable life, the shaft will be destroyed or sold, or the hardened slip-yoke will be harvested so it can be assembled onto a new shaft. A quick way to monitor use is to mark each activity on the tube, like notches on a gun. This gives an easy visual reference to the total time on the shaft.
19. Shop Repairs vs. Manufacturer Repairs While a racing driveshaft looks like an easy assembly to tear down and rebuild on your bench, you should leave all such repairs to the manufacturer. It is best equipped to inspect the shaft and its components closely, replace the parts subject to wear with the correct parts, and reassemble the shaft correctly. Any shaft that has had any component replaced must be rebalanced. Current high-speed balancing techniques are so precise that any change to a shaft's components will destroy the initial balance.
20. Balancing A racing driveshaft should be balanced on a quality high-speed balancer by an experienced operator. Few modern cars use a conventional driveshaft anymore. The heavily used balancer at your local heavy truck drivetrain shop does not have the rpm capability nor the precision to properly balance a lightweight racing driveshaft. No matter how carefully the people at the shop try to balance the shaft at a lower speed, the dynamics of the shaft at high speed will be dramatically different.
Thanks to the efforts of the manufacturers' and teams' drivetrain specialists, the modern racing driveshaft is seldom seen on national television broadcasts and never discussed in public to the level of detail that we have now covered. Every racing car owner, crew chief, mechanic, and driver should be made aware of the critical role the driveshaft plays in car performance and safety.
This precision piece of equipment and its environment must be carefully specified and regularly inspected. The driveshaft should be considered an expendable part and replaced immediately if its condition is in doubt.
Any driveshaft failure on race day will ruin the efforts of your team. The resulting damage may render your race car unrepairable. A catastrophic crash will put the driver, other competitors, the fans in the stands, and even the entire sport in jeopardy.
Far more than being a simple connector or an afterthought, the racing driveshaft is a mission-critical link to the success of your team. Take it for granted and you will surely fail. Specify it correctly, treat it with the respect it deserves, and you will graduate to Victory Lane and Driveshaft 201.