 | Engine Build-up Pt. 3-Final Assembly - Project Boneyard Buick
You've worn a groove in the information highway, but the parts research is complete. In fact, the parts have been prepped, machined, balanced and blessed-it's assembly time. Engine assembly is all about patience and precision at this juncture, as skill will not only impact power, but reliability as well. With the Turbo 6, there a few down and dirty tricks that can further the success of a quality assembly.
It's all about identifying shortcomings and making strides to improve that area. The Turbo 6 oiling system is adequate for stock performance, but turn up the wick and it's a good idea to improve the oiling system. Lou Czarnota of Lou's Auto Service customized the stock timing cover to increase oil volume (see side bar). There are booster plates that also address oiling. Melling makes a good high-flow pump that we will use in conjunction with the previously mentioned timing cover mod. Czarnota also recommends tapping out the oil passage to lifter galleries, installing pipe plugs (instead of the press-in plugs) and painting the lifter valley to expedite oil flow. Above all, use synthetic oil religiously. However, during the break-in period, Czarnota went with conventional oil and after 500 miles switched to synthetic and changed the oil filter, thus ensuring any particles present during break-in will not enter the engine. Another trick, outlined in Part 1 of this engine buildup series (Turbo, Oct. 2000) are the Clevite bearings (MS 960-V10) that Czarnota custom-etches an oil passage groove into. A point of some contention is oil pans. Czarnota said to not get too carried away with trick oil pans. He found that some designs have so much baffling that flow to the pickup is hindered, placing the engine in jeopardy. Czarnota said the stock oil pan is good for 90 percent of the cars out there, only real wheel standers need an upgraded pan. Czarnota recommended dropping the stock pan for added capacity. As we mentioned earlier, the original rope-style main seal is barely adequate and is the leading cause of oil leaks in Buicks. The stock oil pan gasket is also a prime suspect when it comes to oil leaks. To remedy this situation, Czarnota recommended Fel Pro's neoprene main seal (PN BS 40613). For the pan, Czarnota used a cork-style gasket offered by Duttweiler Performance.
With the short block already together, the BPE Racing Heads-prepped cylinder heads (Turbo, Nov. 2000) were secured to the block. BPE's Steve Bronston performed a Stage III porting and the company's Competition valve job prior to assembly. The heads were fitted with Manley stainless-steel valves. Manley 1.775-inch valves on the intake side and 1.500-inchers on the exhaust side. BPE installed the valves using Manley springs, Manley chome-moly retainers, heat-treated Manley valve locks and Manley valve seals. For more insider information on Turbo 6 cylinder heads, check out the November 2000 issue. The heads were topped with chromed valve covers from Bowling Green Customs.
Next, the BPE-ported lower intake manifold was bolted on and topped with the same AccuFab throttle body from our bolt-on article (Turbo, August 2000). The manifold was fitted with Bowling Green show-chromed fuel rails that play host to six 42 lb/hr Lucas fuel injectors.
When it comes to exhaust manifolds, Czarnota said that stock headers work fine, up to 11-second hp levels. They are prone to cracking with the common trouble point being the driver's side header where the runner joins the common tubing. It is quite beneficial to port-match headers to the block, because smooth flow here means better turbo spool up and more power. We had our stock headers welded and after about 300 miles, we detected an exhaust leak. Our plan is to examine the header and then consider what action, if any, we are going to take.
On the intercooler front, we kept it simple at this stage, by using a stock chiller outfitted with a Duttweiler neck. When the intercooled Buicks hit the streets, Kenny Duttweiler was playing around with every aspect of the Turbo Regal. In examining the intercooler, he didn't like the harsh bend the ducting was forced make from the intercooler into the throttle body. On a lark, he decided to run the intercooler backwards and realized improved performance. Knowing that the angle of entrance into the motor was critical he developed a cast, weld-on neck that improved flow into the motor.
During the break-in period, we noticed the engine was running about 200 degrees in the summer heat. This condition could have been a factor during the tuning stages. We planned to run 15 psi of boost, just like the previous set-up to illustrate the efficiency of the Limit Engineering turbo. Czarnota played with the boost setting for kicks and noticed a touch of detonation past 16 psi. While 200 degrees in heat of summer is well within parameters, we hope to turn up the boost in the future. Since we plan to go with a front-mount intercooler, a radiator swap is inevitable. We have a heavy-duty aluminum radiator from Be Cool, which we will install at a later date.
The car is an absolute blast to drive, it moves quicker than a running back with a 350-pound linebacker breathing down his neck. Spool-up is fast and the turbo even sounds trick. In the next installment, we will look at the turbo itself, talk about turbo sizing in general, hit the dyno and the strip, and talk more about the drivability of Project Boneyard Buick.
Balancing ActWhile lining up our 42 lb/hr injectors from RC Engineering, we asked that RC's Russ Collins do a leakdown and balance-and- blueprint job on our stockers. You may remember that we swapped a set of 30 lb/hr injectors in place of the stock 28 pounders and netted a 25-hp gain at the wheels in the August 2000 bolt-on article. This was a shocking increase in power. The chart that RC Engineering provided vividly illustrated why so much improvement was made with a simple swap to a 2-lb/hr larger injector. The printout reveals we had problems with spray patterns, more than just a differential in flow problems. We had one dripping injector and two rated at Fair, while the remaining trio checked in at Good. On the flow side, system balance went from 5.2 percent (which is not terribly bad) to .6 percent, which is phenomenal. Volume was also vividly improved upon with the average jumping from 291 cc/min to 309.4 cc/min. If you have a high-mileage engine and plan to incorporate some power adders, it is wise to invest in a set of balanced and blueprinted injectors so you can realize the maximum power potential while enjoying the best fuel mileage possible.
Oiling Tricks 101Front Cover CustomizingTo maximize the effectiveness of our high-volume Melling oil pump, Lou Czarnota of Lou's Auto Service spent extra time massaging the front timing cover prior to installation. In the course of the typical cleaning and deburring, Czarnota drilled out the main feed orifice that leads from the oil pump to the block oil gallery with a 1/2-inch bit. Then using a 9/16-inch bit, Czarnota opened up the passage that leads to the oil filter. He then chamfered the openings and polished prime areas of the cover. These mods increase both volume and pressure to the Turbo 6 oiling system. In fact, at start-up, our Buick sees 45-50 psi, hot idle nets 25-32 psi and under power, pressure checks in at 45 psi at cruise and 60 psi when the hamer is dropped. The timing cover main seal is a rope-style piece that is prone to leaking. This situation was remedied by installing a Fel Pro neoprene seal (PN NU 15200), which is far superior to the stock replacement offering. Since the stock seal is a stake style unit, Czarnota had to grind down the stakes to ensure a snug fit. The neoprene seal is pressed into place and the timing cover is good to go.
With a hollow engine bay, now is a good time to touch up the paint on the firewall, swap out the torque converter and perform radiator maintenance. This is also a good opportunity to replace engine mounts, plug wires and upgrade the downpipe, if desired. It should be noted that engine removal and installation can be completed without removing the hood or radiator.
As we mentioned in Part 1, block preparation is the key to durability and power. Here the engine is a set of heads away from installation.
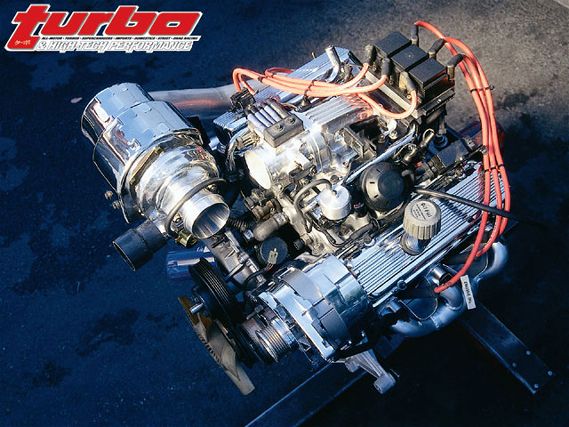
All dressed up and ready to go. Our Lou Czarnota-built Turbo 6 flexes chrome from Bowling Green.
We elected to run TRW pistons because of their cost effectiveness. Czarnota likes to use JE slugs if expected boost is more than 20 psi. It should be noted that TRW pistons are only offered in .030-inch overbore sizes, while JE's can be ordered for any size overbore. When it comes to ring gaps, Czarnota likes to run .018-inch on the top ring and .016-inch on the bottom ring. This is a closer tolerance than the manufacturer's spec of .020-inch, but Czarnota cited superior sealing and no leakdown problems, even at higher boost levels, as major benefits.
Our rotating assembly consists of a stock crank, prepped stock rods, forged pistons and Pro Gram Engineering steel main caps.
On the fuel side, we are running 42 lb/hr Lucas injectors balanced and blueprinted by RC Engineering.
This high-flow Melling oil pump (PN K-201PHV) works in conjunction with mods to oiling passages, rod bearings and the front timing cover to increase the efficiency of the Turbo 6 oiling system.
Our BPE Racing Heads ported and polished heads run Manley hardware. For more on BPE power procedures and the importance of matching head flow, with cam specs, turbo selection and torque converter stall speed, see the cylinder head tech article in the November 2000 issue.
One common oil "trick" is to paint the lifter valley. The paint smoothes the surface of the metal decreasing resistance and increasing flow.
With all the attention to oil flow it is wise to also enhance oil filtration. Czarnota recommended an AC Delco high-capacity filter (PN PF52).
The stock passenger-side header is prone to cracking. Ours were welded up, but seems cracked again after 300 miles.
After 130,000 miles on the road, the engine was quite grimy on the outside. We only hope the inside fared better.
The orifice that leads from the oil pump to the lifter gallery (arrow) is opened up to 1/2-inch to increase volume and pressure.
Czarnota opened up the passage leading to the oil filter (arrow) to 9/16-inch.
It is very wise to replace the poor-performing rope-style timing cover main seal with a neoprene unit from Fel Pro (PN NU 15200). Since the stocker is a stake style piece, the stakes must be ground down to ensure a tight fit.
This Duttweiler-modified intercooler is an excellent cost-effective option, when little increase in boost pressure is planned.
In the early days of intercooled Buicks, Kenny Duttweiler discovered the importance of the outlet neck of the stock chiller by running an intercooler backwards. The improvement led to the development of a cast replacement neck.
Rebuild time is also an excellent opportunity to upgrade to a second-generation crank sensor, which is more durable and reliable than the original.