 | Diagnostics 2 - Engine Code Breaking
 In the last Diagnostics episode, we outlined the vital information provided by compression and leakdown testing and illustrated how to use these most important tools. These tests reveal the internal health of the engine and are key when purchasing a used car, whether it be for a project or strictly as a driver, not to mention tracking the fitness of a typical high-mileage commuter.
We wanted to take a different approach here and decided to look at troubleshooting challenges from an electronic standpoint. We will look at tools that will help you determine why the engine won't start, decipher what is causing the famed "check engine" light, and track down electrical gremlins.
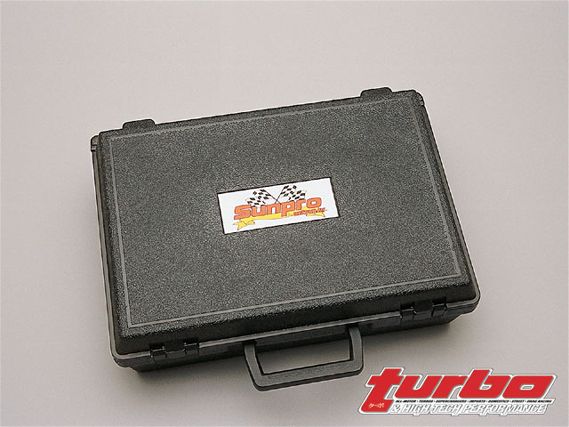 | This Sun Pro kit, available from JC Whitney (13ZH6156R), has everything the OBD-I owner needs to recall engine codes and test out the sensor or component said code identifies.
 The cool thing is we found it all in one package. Thumbing through the JC Whitney catalog we saw the perfect troubleshooting kit that addresses the concerns of beginners but provides the capability to tackle complex problems.
It should be noted that this article will focus on OBD-I controlled vehicles. The transition to OBD-II was initiated in 1995-6 models and the year of transition differed from manufacturer to manufacturer and even from model to model.
The Kit
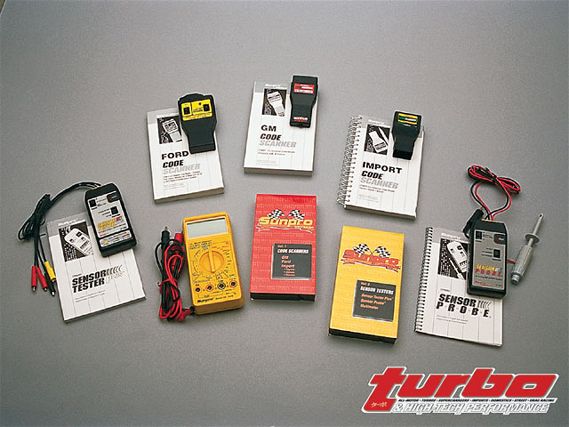
The Sunpro Master Technician's Kit (13ZH6156R) contains six diagnosis scanner/testers, detailed instruction manuals and two videos to help beginners get a handle on the tools.
There are three different computer code readers: one for GM, one for Ford and an import scanner that covers Toyota, Nissan and Honda. There is a sensor tester for engine sensors and ignition modules and a sensor probe that tests MAF, MAP and VAP sensors. Lastly is a seven-channel Multimeter-the bloodhound of diagnostics tools that sniffs out electrical gremlins.
The kit is a great investment for the enthusiast, and with its wide range of applications, car clubs would also be wise to consider investing in the Sunpro setup. The introduction videos bridge the gap between the pages of the manuals and the actual underhood of the car by visualizing the location and look of connectors and providing a better hands-on understanding of what it takes to draw the error codes from the ECU.
 | Nissan computer: On popular Nissans of the mid-'90s, it all happens right on the ECU. First mark the original position of the Diagnosis Mode Selector then turn the adjuster fully clockwise and after a three-second pause full counterclockwise. A flashing red LED in the code window on the ECU indicates it is in diagnostic mode. The LED will then flash the codes, which are all two digits in length.
 Code Breaking
Harvesting the codes requires different approaches for different makes.
For Toyotas you will either plug in a code scanner or use the supplied jumper wire to facilitate code gathering. A rectangular multi-pin connector requires the scan tool and circular two-pin connector means it's time to break out the jumper wire.
Testing is done with the key in the On position, and the codes are read on the dash in the form of flashes of the check engine icon light.
On pre-1989 ECUs, the codes are flashed in a single burst with either a three- or 4.5-second delay between codes. So a code 12 would be 12 flashes in succession.
Cars from 1989 and up have no single-digit codes and all codes flash one digit at a time with a pause between digits. A code 12 here would be a single flash followed by a pause then two quick flashes.
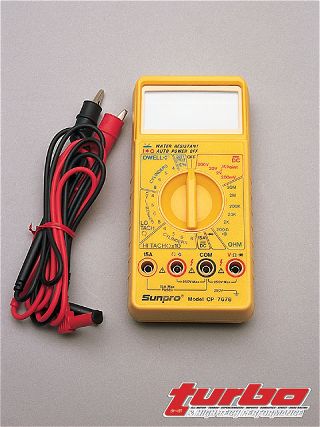 | The Sunpro CP 7678 Multimeter reads DC volts, resistance, current draw and has high tech and low tack scales as well as dwell in degrees and duty cycle in percentage. It can be used to check the health of the electrical system and confirm if switches, solenoids and relays are functioning properly. The unit's manual shows you how it's done.
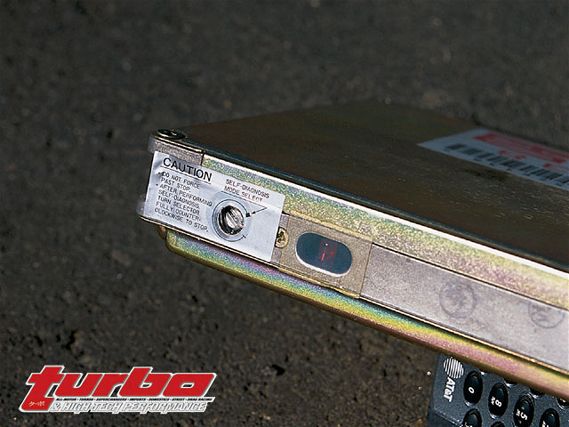
 Nissan has a different approach altogether. The kit outlines code retrieval for 1984 to 1992 models. Most of the popular models use a selector tool to access the codes at the ECU. The selector is a plastic screwdriver that inserts into the Diagnosis Mode Selector, which is a potentiometer, to switch the ECU to diagnostics mode.
Before making the switch you must mark where the potentiometer is set at so you can put the computer back into its original position and have the key in the On position.
The Mode Selector is turned fully clockwise and, after a three-second pause, full counterclockwise. A flashing red LED in the code window on the ECU indicates it is in diagnostic mode. The LED will then flash the codes, which are all two digits in length.
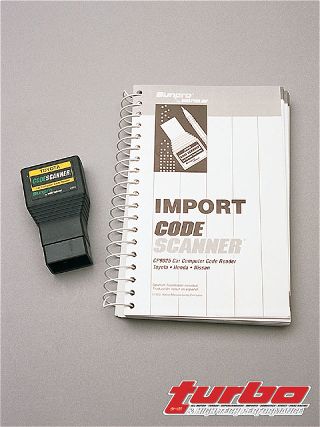 | The import code talker is used to retrieve engine codes from OBD-I Toyotas, Nissans and Hondas. The kit also includes code scanners for OBD-I Ford and GM vehicles.
 This kit covers 1985 to 1992 Hondas and during these years the Honda ECUs went through some major revisions. The early ECUs had four LEDs. Each LED had a different value (1, 2, 4, 8). If the Check Engine light came on, the computer displayed the code without requiring a switch over to a diagnostics mode.
All you do is observe the LEDs and add up the values of the lights. So the number 2 LED on means code 2. The number 4 and 2 illuminated means code 6 and so on. Later ECUs flash in short and long duration bursts. Short bursts for single digit while a long burst is the first digit of a two-digit code. Some 1991 and all 1992 and up ECUs use a jumper wire to initiate code reading and use the short/long flash method.
It should be noted that all codes must be erased after repairs and the manual details these procedures for each make.
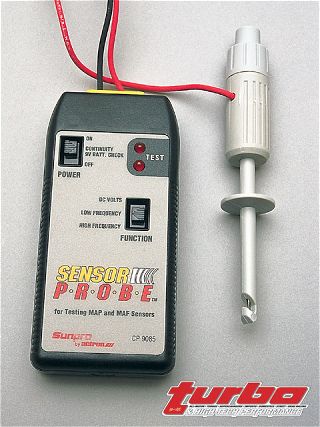 | The Sensor Probe is used to identify problems in MAP, MAF or Vein Airflow sensors.
 Deciphering The Code
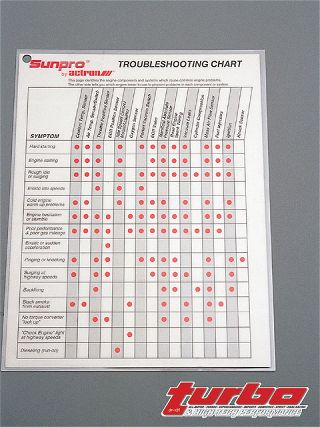
Breaking the code is only part of the battle. Deciphering the meaning of the numbers you have retrieved will allow you to pinpoint the problem area. The manual breaks down the codes and gives an insight into what may be wrong.
We have listed baseline codes in the accompanying chart for imports only because there are dozens of ECU and transmission codes for Ford and GM products and not enough room here to even come close to providing an overview of the pertinent number groups.
Component Diagnosis
Diagnosing is a chase wherein you box in the problem by eliminating possibilities and pinpointing the component that is faulty.
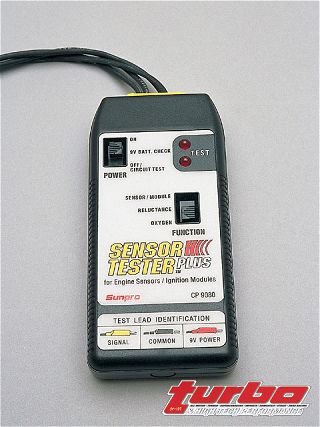 | The included Sensor Tester is used to check codes that lead to the TPS, EGR, O2, Temperature, Knock and Hall Effect sensors as well as ignition modules.
 The included Sensor Tester is used to check codes that lead to the TPS, EGR, O2, Temperature, Knock and Hall Effect sensors as well as ignition modules. The Sensor Probe is used to identify problems in MAP, MAF or Vein Airflow sensors.
The Multimeter reads DC volts, resistance, and current draw and has high tech and low tack scales as well as dwell in degrees and duty cycle in percentage. It can be used to check the health of the electrical system, confirm if switches, solenoids and relays are functioning properly. It can verify that ignition coils and wires, fuel injectors and a number of other sensors are in working order.
If you are rolling an OBD-I-equipped car this kit hits the bull's-eye. While we cover the basics here, we cannot rave enough about the info in the manuals and on the videos; it puts forth the proper information in an easy-to-understand manner. The kit gives enthusiasts the Sherlock Holmes intuition needed to narrow down the suspects and flush out the guilty party when it comes to the smooth running of their car. Next time our Diagnostics section will address the code breaking needs of OBD-II cars.
 | Diagnostics 2 - Engine Code Breaking
 Code Breaking Tech(Codes address different sensors depending on year and model) Toyota CCS 1989-up Code Translation 11 ECU Power Supply 12 RPM Signal 13 RPM Signal 14 Ignition Signal 15 ECT System 21 Main O2 Sensor 22 Coolant Temp Sensor 23 TPS Signal 24 Intake Air Temp Sensor 25 Lean Air/Fuel Mixture 26 Rich Air/Fuel Mixture 27 O2 Sensor 28 Main O2 Sensor 31 Vacuum Sensor Signal 32 Airflow Meter Signal 34 Turbocharger Pressure Signal 35 Turbocharger Pressure Signal/High Altitude Compensator 41 THP Sensor 42 Vehicle Speed Sensor 43 Starter Signal 51 Switch Condition 52 Knock Sensor Signal 53 Knock Sensor Control 54 Intercooler ECU Signal 55 Knock Sensor 71 EGR System 72 Fuel Cut Solenoid
{{{Honda}}} 1985-1992 Code Translation 1 O2 Sensor/Pressure Regulator 2 O2 Sensor/Vehicle Speed Sensor/ECU 3 MAP Sensor 4 TDC Crank Sensor/Crank Angle Sensor/Pulse Generator/Vacuum Switch/ECU 5 MAP Sensor 6 Coolant Temp Sensor 7 TPS Sensor/Clutch Switch({{{M}}}-T)/Shift Position Signal (A-T) 8 TDC Sensor/Pulse Generator/Ignition Output/CYL Sensor/Crank Angle Sensor 9 Cylinder #1 Sensor/TDC Sensor/Pulse Generator/Ignition Output/CYL Sensor/ Crank Angle Sensor 10 Intake Air Temp Sensor 11 Idle Mixture Adjuster 12 EGR System 13 Atmospheric Pressure Sensor 14 Electronic Air Control Valve/Idle Control System/ECU 15 Ignition Output Signal/ECU 16 Fuel Injector Circuit 17 Vehicle Speed Sensor 19 Lock-up Control Solenoid 20 Electrical Load Detector 21 VTEC Spool Valve 22 VTEC Oil Pressure Switch 23 Knock Sensor 30 Automatic Trans “A” Signal 31 Automatic Trans “B” Signal 41 O2 Sensor Heater/Linear Air-Fuel Ratio 43 Fuel Supply System 48 Linear Air-Fuel Ratio {{{Nissan}}} Code Translation 11 Crank Angle Sensor 12 Mass Airflow Sensor 13 Coolant Temp Sensor 14 Vehicle Speed Sensor 21 No Ignition Reference/Ignition System 22 Fuel Pump/Idle Speed Control 23 Idle Switch/Throttle Valve Switch 24 Idle Switch/Transmission Switch/Neutral-Park Switch 25 Idle Speed Control 31 ECU/Air Conditioning/Fan Switch/Power Steering Switch 32 EGR 33 O2 Sensor 34 Knock Sensor 35 EGR Temp Sensor 41 Air Temp Sensor 42 Fuel Temp Sensor/Throttle Sensor 43 TPS/Fuel Injector 45 Injector Leak 51 Fuel Injector(s) Electrical 53 O2 Sensor 54 Automatic Trans Signal 55 No Malfunctions Recorded