Questionany suggestions on removing gauge? what type of bracket is on back?
I have a replacement Smith s to install as temp not working(broken line)
Answer
 Smiths Dual Gauge
Hi Jim
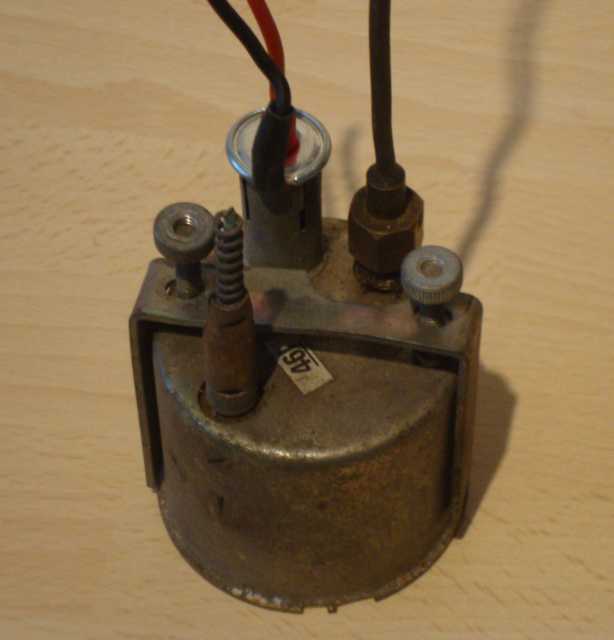
Here is a photograph showing the back of a dual gauge.
It is called a dual gauge because it is actually two gauges sharing a single casing.
The gauge is held to the dashboard with a U-shaped bracket.
The bracket is attached to the gauge by two circular nuts with milled edges.
These should be finger tight only. On a Midget or an MGB the earth wire is usually attached directly to the back of the gauge using a ring terminal underneath one of the milled nuts. This will be a plain Black wire.
The temperature gauge is attached to a large metal sensor which is bolted to the engine using a large threaded sleeve. Between the sensor and the gauge there should be a thin metal tube called a capillary tube. This is very fragile. The tube has a coil of wire wrapped around it. This wire is designed to give some extra strength to the tube and to prevent it from being bent. The tube is always too long, so the excess length should be coiled neatly. On this unit the capillary tube has broken off, but you can see where it comes out of the back of the gauge. The sensor and the tube should be full of Ether, a volatile liquid. If the tube has fractured, then the Ether will escape and the temperature gauge will no longer work.
Note also the thin metal pipe bolted to the back of the unit. This is the oil pressure pipe. It was originally bolted to the gauge with a tiny leather washer inside to prevent leaks. If the washer is missing, make a new one using a scrap of leather from an old shoe.
Finally, you can see the instrument illumination system, which can be pulled out of the back of the gauge. This will be a Red wire, usually Red with a White stripe.
When new, the dashboard was assembled before attaching it to the car, complete with temperature gauge and wiring loom. So, removing and replacing the gauge is a tricky job. I usually do it by lying in the driver’s footwell with my bottom on the drivers seat and my feet in the air.
Before you start, I recommend that you disconnect the battery, because it is easy to touch a live terminal when extracting the capillary tube.
1) Under the bonnet, disconnect the temperature sender from the engine and carefully straighten the capillary tube so that it lies over the engine.
2) Under the dashboard, remove the instrument illumination bulb.
3) Undo the two thumb screws holding the gauge to the dashboard. Catch any tiny spring washers that may be behind them. Note how the earth wire is attached behind one of them.
4) Extract the U-shaped bracket from the back of the gauge.
5) Undo the oil pipe from the back of the gauge. It may dribble a few drops of black oil, so be prepared to clean up with a scrap of tissue paper.
The gauge can now be extracted from the front of the dashboard. This is best done with a helper feeding the capillary tube through to you. The tube goes through a large grommet that you will need to re-use, so pull it off the capillary tube and fit it to the new gauge.
Fitting the new gauge is the reverse of the above instructions. Be careful not to kink the capillary tube. It breaks easily.