Although the 1992 Ford F150 featured rear disc brakes on some models, it was more commonly manufactured with rear drum brakes. Rear drum brakes and shoes are composed of many intricate springs and hardware to hold the shoe assemblies together. The assemblies are then covered and contained by the brake drums. When the brake pedal is applied, the bores of the hydraulic wheel cylinders extend outward and push the friction material of the shoes against the interior surface of the drums. Rear drum brakes only account for up to 25 percent braking capacity for the vehicle.
Place the tire blocking wedge in front of one of the front tires. Check that the parking brake is not off; if it's on it will prevent you from removing the rear drums. Make sure the F150 is in gear or in park position.
Crack the lugs nuts loose on both rear wheels with the tire iron. Do not loosen them more than a half-turn counterclockwise.
Hoist the rear axle with the floor jack and then place the jack stands below the rear axle. Slowly lower the jack until the axle is supported on the stands. Position the jack under the rear differential and raise it upward until it contacts the lower differential casing, but be sure not to raise it higher than the jack stand support.
Remove the rear lug nuts and then the tires on both rear wheels.
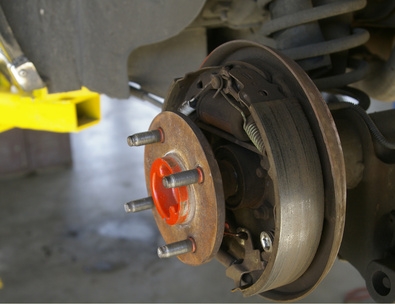
Remove the drums by pulling them off. If they do not come off then find the rubber plug at the rear lower section of the backing plate and pull it off by hand. Insert the 4-inch thin-shafted screwdriver and locate the star-wheel adjuster retaining clip. Push the clip away from the star-wheel adjuster with the screwdriver and then use the adjusting spoon from the drum brake tool kit to turn the adjuster back to contract the brake shoes. Turn the adjuster three or four turns and then retry to remove the drum. If the drum still will not come off, proceed to Step 6. If it does come off, proceed to Step 7.
Spray penetrating spray around the center mating surfaces of the drum and hub shaft. Allow a few minutes to let the spray soak in. Strike the face of the drum with a hammer sharply in order to shock the drum away from the hub. Rust, brake dust and other corrosives often make the drums stick the the wheel hubs. If necessary, once the drum is free of the hub, go back to Step 5 if the drum is still stuck onto the shoes. Remove both of the rear drums, but then only remove and replace one side of the brake shoes at a time. If necessary, you can refer to the spring and hardware connections of the assembled set of shoes when replacing the other side.
Pull the adjusting lever, cable and automatic adjuster spring down near the rear in order to unhook the pivot hook from the anchor hole in the secondary shoe (towards the rear of the truck) plate. Remove the adjusting spring and lever.
Remove the upper secondary shoe spring from the anchor using the brake shoe pliers. Place the shoe spring handle-tip of the pliers on the anchor and turn the pliers against the contour of the spring hook. Once the pliers grasp the hook, release the handle-tip and hook from the anchor. Repeat this for the primary shoe anchor spring and then unhook the cable anchor and the small anchor plate from the anchor.
Disconnect the cable guide hardware from the secondary shoe and then use the hold-down spring tool for the drum brake tool kit to compress the hold-down spring. Place a finger on the hold-down pin located at the rear of the backing plate to support the pin while compressing the spring. Turn the tool halfway in either direction to align the slot in the hold-down spring washer to the slotted head of the hold-down pin and then release the tension on the tool. Repeat this procedure for the other shoe.
Remove the parking brake link and spring and then disconnect the parking brake cable end from its lever.
Remove the parking brake lever from the secondary shoe by removing the retaining clip and spring washer. Use the hammer and the screwdriver to force the clip off the retaining pin on the shoe plate and then reassemble the parking brake lever to the replacement secondary shoe plate pin (note that the friction material on the secondary shoes--outer shoe toward the rear of the truck--is longer than that of the primary shoes--inner shoe toward the front of the truck) and then secure it with the spring washer and retaining clip. Some sets of replacement shoes require you to insert the retaining pins into the predrilled holes on the secondary shoe plates. Use a hammer to punch the pin in, if necessary.
Spray the backing plate with a copious amount of brake/parts cleaner spray and allow it to dry. Clean the brake shoe plate contact points on the backing plate (three per shoe) with emery cloth and then apply an even coat of high-temp anti-seize compound to contact points.
Use the brake hardware and springs replacement set to insert the new hold-down pins, slotted washers and hold-down springs to retain the brake shoes to the backing plate. Use the hold-down spring tool to align the notch of the washer to the head of the pin and then compress the spring while holding the pin from the rear of the backing plate. Turn the tool a half-turn until the head of the pin sits in the groove of the washer. Do this for each shoe.
Replace the remaining hardware and parking brake cable assembly in the order it was removed. Refer to the assembled side if necessary for the correct installation of the remaining components. When you're through, leave the drum off for the newly installed shoes and hardware so you can use it for reference again, if necessary.
After both drums have been placed over the shoes and hardware assemblies, adjust the brakes through the porthole at the lower section of the backing plate using the screwdriver and adjusting spoon. Turn the star-wheel forward a few times until there is a slight drag on the drum when you rotate the drum by hand.
Replace the wheels and lug nuts and then tighten the lug nuts in a star or crisscross pattern with the tire iron until the nuts are holding the rim firmly to the hub.
Raise the jack on the rear differential high enough to remove the two jack stands and then slowly lower the jack to the ground.
Torque the lug nuts (again in a star or crisscross patten) using the torque ratchet set at 100 foot-pounds and a compatible socket.