Drum brakes work by pushing a pair of brake "shoes" against the inside of a round drum. This creates friction, slowing the car. Eventually, the shoes wear down and need to be replaced. The process is difficult, but with concentration anyone can pull it off. Expect your first wheel to take a few hours. Once you get the hang of it, a pair of shoes can be replaced in half an hour or less.
Loosen the lug nuts of the rear wheel with the lug wrench. Do not remove them entirely.
Place the jack in front of the wheel, lining the groove up with the bottom edge of the body panel. A small raised line is molded into the panel. It is safe to jack anywhere behind the line. See your Neon's owner manual for an illustration of the jack points.
Raise the jack until it lifts the tire from the ground. For added safety, place blocks in front of the front tires and lower the car onto a jack stand.
Remove the lug nuts and wheel.
Remove the brake drum. This is the large metal hub attached to the lugs, and often has a rusted outside edge. Simply slide the drum off.
If the drum will not slide off or turn, the shoes are stuck against it. Make sure that the parking brake is off. If the brake is off, the shoes can be retracted by adjusting a star screw. This is accessible through a rubber-plugged hole on the backside of the brake assembly. Insert a flathead screwdriver or brake adjustment tool into the hole and feel for a ridged nut. Rotate it by pushing on the ridges with the tool. It should only be able to rotate in one direction.
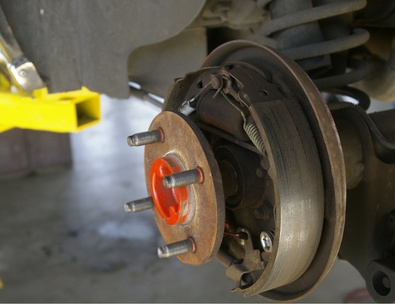
Remove the hub and bearing assembly. Pry off the center cap with a flathead screwdriver. Use a socket wrench to remove the nut under the cap, then slide out the entire assembly. Be sure to place it somewhere clean to prevent dust and grime from getting into your bearings.
Wash the brake assembly thoroughly by following the instructions on the can of spray.
Twist the retaining pins on the hold-down springs ninety degrees. The hold-down springs are thin rectangular pieces of a light-colored metal. There is one on each side of the assembly. Remove the hold-down springs once the pins are twisted out of the way.
Pull one brake shoe away from the cylinder to release some of the tension on the spring. The cylinder is at the top of the assembly.
Remove the self-adjuster spring using needle-nose pliers. The spring is small and runs vertically to a lever that reaches from the brake shoe to the star spring. Remove the self-adjuster lever.
Unhook the upper spring. Use the needle-nose pliers if necessary. This removes pressure from the top of the shoes, so you can remove the self-adjuster from between them.
Remove the lower spring.
Unhook the parking brake arm from the brake shoe. This is the lever attached to the brake shoe and the parking brake cable. A small E-clip holds it in place; remove it with a small flathead screwdriver.
Detach the parking brake cable by using the needle-nose pliers to relieve tension from the cable sleeve.
Remove both shoes from the brake assembly.
Attach the parking brake arm to the new shoe using the E-clip and place the shoe in place in the assembly.
Install the new hold-down spring and twist the pin 90 degrees to hold it in place. New hold-down springs should come with your brake shoes.
Connect the lower spring to both shoes, then move the second shoe approximately into place. Attach the upper spring and replace the self-adjuster and fine-tune the placement.
Confirm that both shoes press against the cylinder at the top of the assembly.
Attach the second hold-down spring and twist the pin 90 degrees. Reinstall the self-adjuster lever and spring.
Replace the hub and bearing assembly. Slide the hub and bearing into place, and coat the spindle with a small amount of wheel bearing grease. Attach and tighten the nut removed earlier. Snap the cover back into place.
Slide the drum and wheel onto the hub. Attach the lugnuts and lower the car. Tighten the lugnuts fully.
Pump the brakes several times, then make several forward and reverse stops. This will cause the self-adjuster to properly tune the brakes.