Many experienced off-roaders won't think twice about tearing down an axle to fix a broken axleshaft or even pulling down their rig's engine to change a worn-out timing chain or swap in a hottercam. But when it comes to the internals of transmissions and transfer cases, something about these mysterious black boxes sends the majority of them running for the hills, or at least to their local off-road shop where they'll shell out big bucks to fix a problem rather than crack open what seems like a Pandora's Box. But we're here to tell you it doesn't have to be that way.

Using ourselves as guinea pigs to prove our point, we tore down and rebuilt a T-90A three-speed transmission from a '47 Jeep CJ2-A using a master rebuild kit and some extra items sourced from Novak Conversions. While Editor Rick Pw and perhaps a few of our readers have been through hundreds of T-90s, it was the author's first time inside any manual transmission. As such, it was a lifesaver having Novak's extraordinarily detailed instructions on hand along with an exploded view of the tranny. Novak's master rebuild kit includes everything you need to do a quality job, and the instructions saved us from ourselves more than once. While the T-90 is one of the simplest trannies on the planet (no special tools are needed to do the job), its basic construction is a good primer for many other three- and four-speeds. What follows are the highlights of the rebuild process along with a few tips should you be brave enough to venture into the depths of your own gear jammer. In the end, we had all three forward gears (plus Reverse!), no extra parts, and a little extra money to spend on other upgrades.
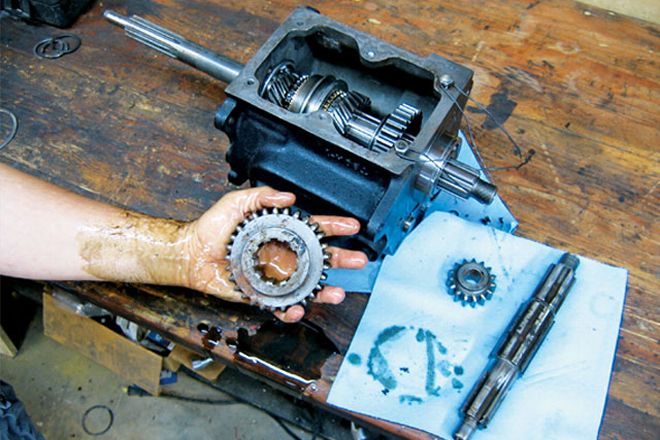
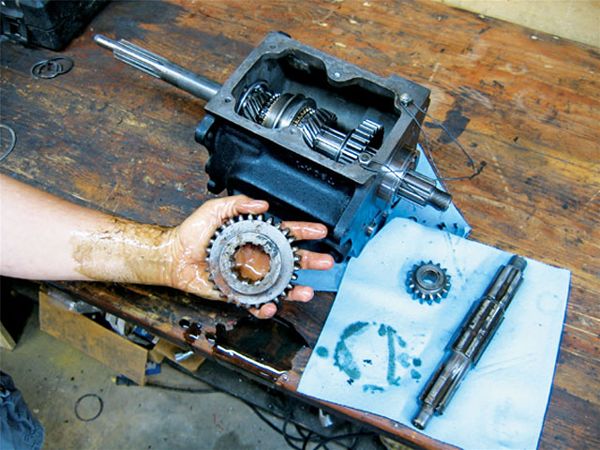
Novak's master rebuild kit is one of the most complete on the market and includes bearings, a new Second gear (not shown), a hardened cluster shaft, synchros, thrust washers, gaskets, and all the small parts you need to complete the rebuild. We popped the top on the tranny before calling Novak and noted the First-Reverse gear was hosed along with the Reverse idler, so Novak recommended replacing them along with the cluster gear (large gear in photo). The reason for this whole exercise was a wasted mainshaft, but we scored a serviceable used mainshaft from a buddy for a six-pack of Corona.
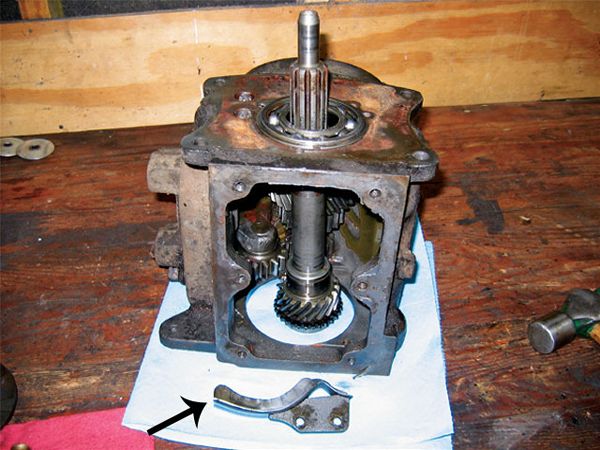
Start with a clean workbench and a T-90 that has been freed from the vehicle. In most applications you'll need to pull the top cover before dropping the tranny out of the vehicle. Separating the transfer case is a bit odd and is further complicated if it's equipped with an overdrive, so read the instructions first. Before beginning, take a good look at the internals to see if anything is obviously wrong. In this case, the First-Reverse gear was badly rusted and the Reverse idler gear had several chipped teeth. Also note the molasseslike sludge in the bottom of the case, indicating contaminated oil.
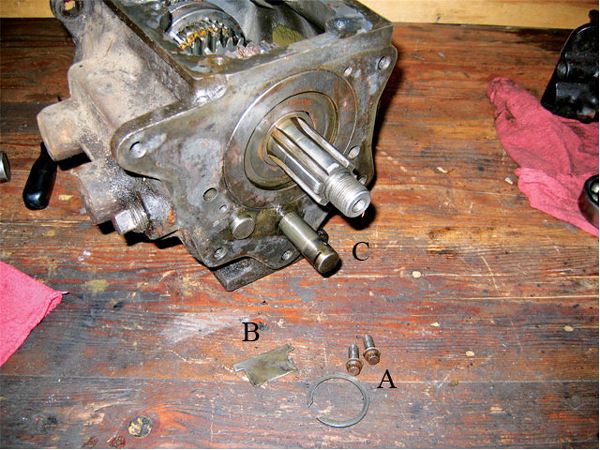
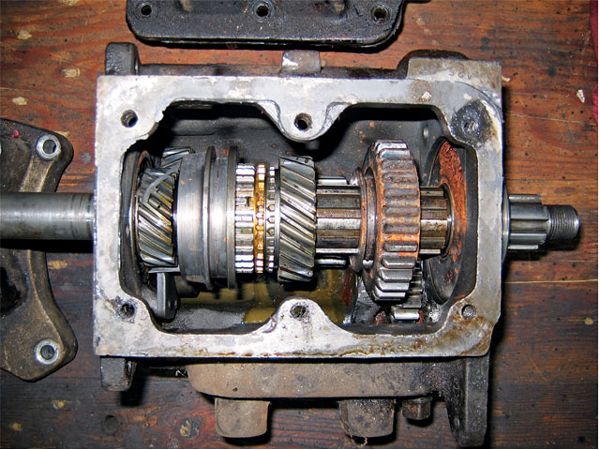
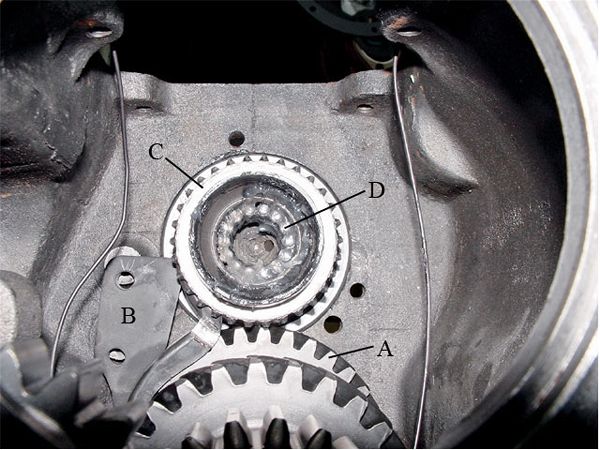
Remove the snap ring from the front bearing along with the two 12-point 5/16-inch bolts from the front of the case that hold an oil collector (A). Next, remove the retaining plate on the cluster and idler shafts (B) on the back of the case; don't worry if you mangle it, as a new one is provided. Next, drive the cluster shaft (C) rearward out of the case; don't drive it forward or it will damage the case. The cluster gear and all its needle bearings will drop to the bottom of the case. Leave them there for the time being.
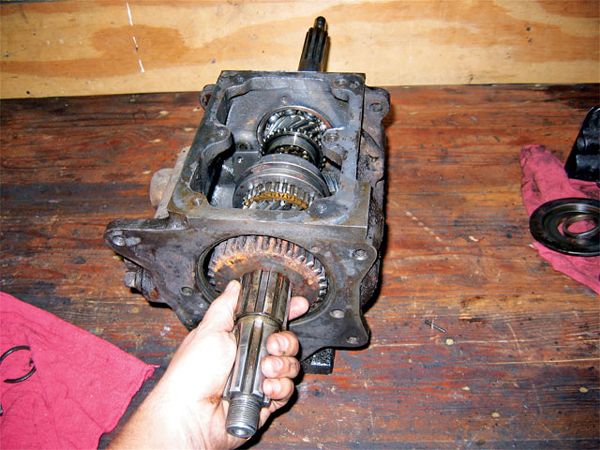
Remove the rear bearing, retaining plate, and spacer, then grab the mainshaft and pull it rearward out of the case. You will hear more needle bearings fall, but that's OK. The mainshaft, First-Reverse gear, Second gear, and synchro hub will all come out of the case together. Note that the shift fork groove in the First-Reverse gear faces the front of the case.
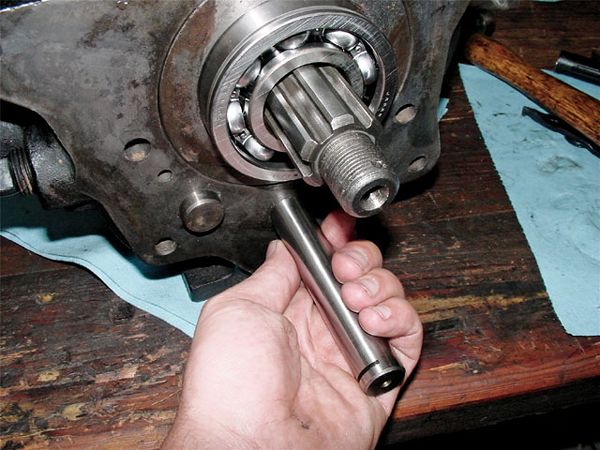
Since we didn't have a shop press on hand, we reinstalled the front bearing snap ring and used a brass drift to drive the input shaft inward, thus separating it from the front bearing (it only has a light press fit). Note that you'll need to fish out the oil collector (arrow) first to avoid damaging it. If a previous installer left this oil collector out, source a new one before putting the tranny back together as it plays an important part in oiling the front bearing. With the input shaft out, you can remove the cluster gear from the bottom of the case.
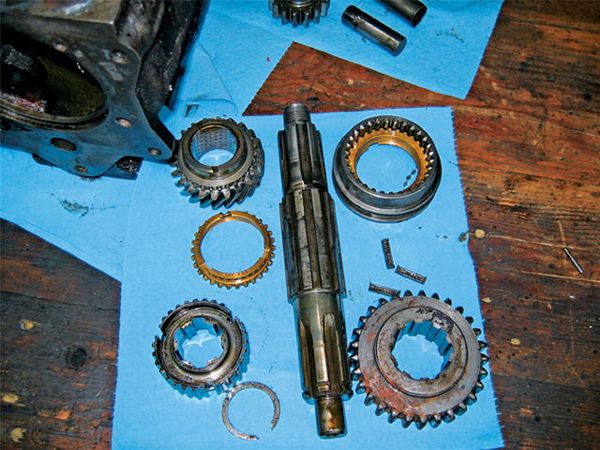
The last portion of the disassembly involves removing the synchro hub from the mainshaft by removing its snap ring. Take note of how the synchronizers, three shift pawls or "dogs," and springs all go together. Clean and thoroughly inspect the case and all of the components that will be reused. Check the case carefully for cracks. Any pitting, chipping, or galling on the gears, shafts, or case means it's time to order replacements.
While waiting for a coat of paint on the case to dry, we assembled the needle bearings in the new cluster gear. There are a total of 88 needle bearings, six small spacers, and one large split spacer that all must be stacked inside the cluster gear bore. If that sounds tedious, that's because it is. Avoid the urge to use wheel-bearing grease to hold the needles in place during assembly; Novak claims the grease can repel gear oil for quite some time and prevent the rollers from getting adequate lubrication. We used petroleum jelly instead and took another gem of Novak's advice by cutting a piece of 31/44-inch OD tubing (arrow) and inserting it in the cluster gear bore to help hold all those needles in place during assembly.
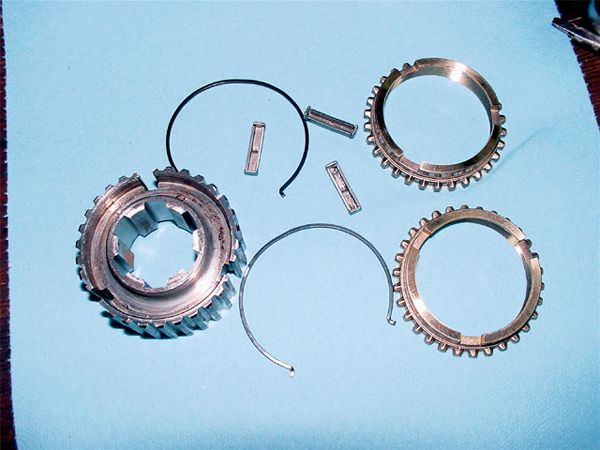
Aside from the needle bearings, the trickiest portion of the installation is assembling the synchronizer hub. The two small wire springs install in both sides of the hub and must engage the three synchronizer pawls (also commonly called shift dogs). Then, while holding all three plates with your fingers, slide the synchronizer sleeve (the part the shift fork engages) over the plates to retain them. When done correctly, it should look like what is shown. Also, the three recesses in the brass synchronizers must line up with the plates when installed. Now you can assemble the Second gear and synchronizer hub on the mainshaft.
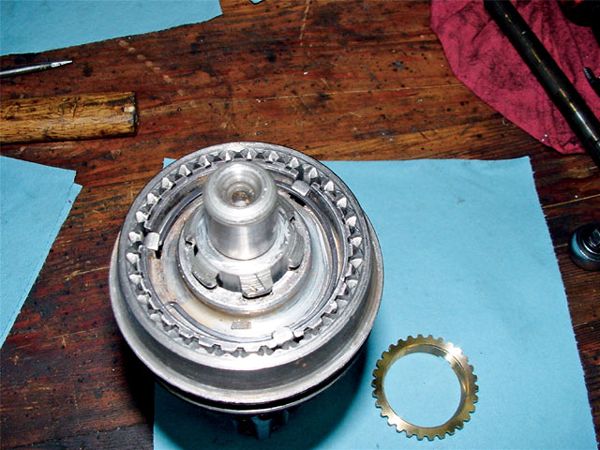
Carefully place the cluster gear (A) in the bottom of the case along with its outer thrust washers, and loop a piece of wire under it so that you'll be able to lift it when it's time to install the cluster shaft. Position the oil collector (B) in the case as well, but leave it loose for the time being. Press the new bearing on the input gear (C) and install it in the front of the case. Now you can stack the 14 supplied needle bearings (D) inside the input gear bore using petroleum jelly. Note that it's necessary to install the last bearing on end.
With everything ready to go, insert the mainshaft with the synchro hub, Second gear, and First-Reverse gear in the case from the rear and gently insert the nose of the mainshaft in the input gear bore. Be sure that the brass synchronizer that goes between the hub and the input gear is properly indexed and not bound on the input gear. While holding the assembly, install the rear bearing retainer, spacer sleeve, and rear bearing in the case.
Gently lift up the cluster gear and insert the cluster shaft through the back of the case. It should slide easily until the tip reaches the front of the case. Check the cluster gear bore frequently as you slide in the shaft; if one needle bearing gets dislodged, you'll have to start over. Tap the cluster shaft the remaining distance and install the retaining plate, then reinstall the bolts for the oil collector.
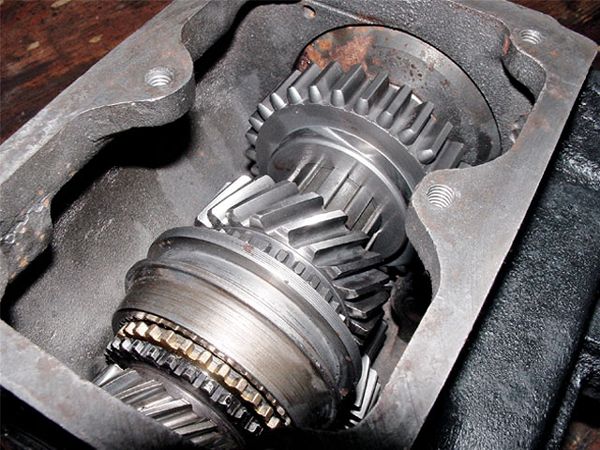
If all goes well the finished product should look like what is shown here. Double-check that there aren't any needle bearings in the bottom of the case, then check your work by manually shifting the tranny into each gear. Remember that you'll have to hold light pressure against the back of the mainshaft to keep the rear bearing seated as you test the gears, and it's a good idea to loop a piece of wire through the hole in the back of the mainshaft to keep it seated until you wrestle the tranny back into the Jeep. Though we probably won't be tearing into a late-model five-speed any time soon, we're no longer leery of what goes on inside this black box.
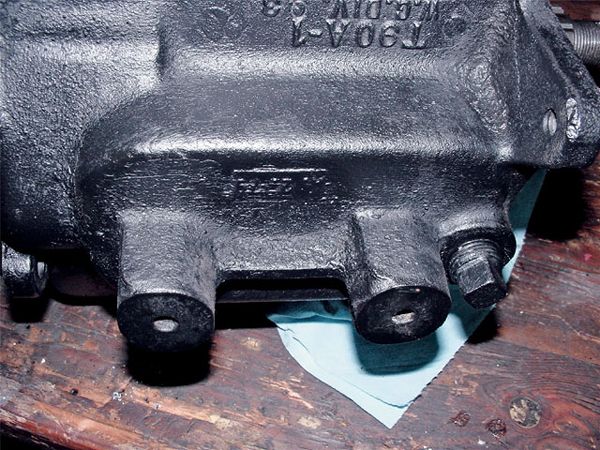
The T-90 was used by Jeep from '46-'71 and has a legendary reputation as a compact tranny (the case is only 9 inches long) capable of withstanding a lot of abuse behind V-8 power. It is an updated version of the T-84 used in WWII jeeps and has a synchronized Second and Third gear; First and Reverse are nonsynchronized spur gears. The tranny is best identified by a six-bolt top cover, the "T-90" cast in the iron case, and a prominent bulge on the driver side (these serve as the location for the actuators on column-shift models).
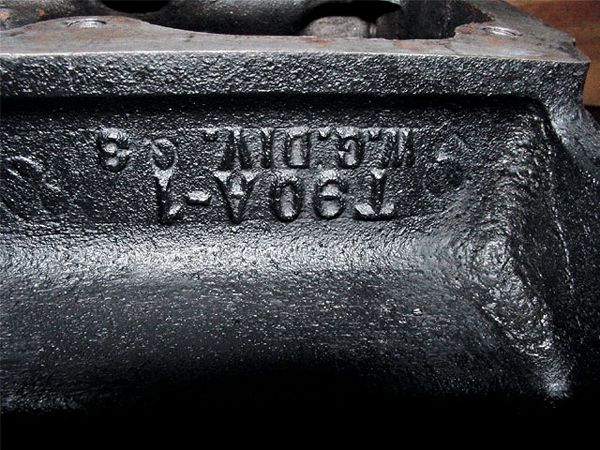
There were three main versions of the T-90; the T-90A1 was used behind L- and F-head four-cylinder engines from '46 to '62. The T-90C was used from '63 to '71 and uses an "A" case with a different input-gear length and tooth count. The T-90J was used from '52 to '65 behind six-cylinder truck engines and had a longer 11-inch input shaft with both column and top-shifting varieties.
It appears as though the transmission used in this article was original to the Jeep but had a later six-cylinder input shaft installed (a popular trick back in the day) as part of an ancient conversion to an early-bolt-pattern Ford 289. Though many parts are interchangeable among the three versions, there are differences. Bottom line: Even the newest T-90 is very old with a good chance that it's not original to the vehicle, so consult Novak's Web site for proper identification of your tranny before ordering your rebuild kit.