
Long-Arm Lowering Kit - Jp Magazine

Pete Trasborg Brand Manager, Jp

In the last issue we decided to lower our '01 Wrangler. With 41/2 inches of lift on a short-arm suspension running 35-inch Dick Cepek Crusher tires, it wasn't all that street-friendly. Not only that, but we felt that the Jeep performed better off-road when it was lower and on 32's because it felt more stable and climbed better. So, we set out to make the Jeep perform better on-road and climb better off-road without losing any of the off-road ability that it already had.
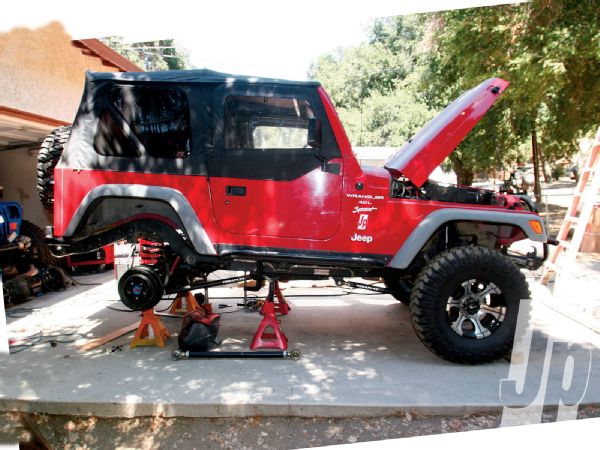
154 1011 Long Arm Lowering Kit jeep Wrangler Tj Side Shot On Jack Stands Photo 29262026

We do a lot of canyon carving and spirited off-pavement driving, so we turned to Teraflex for the company's LCG Pro kit. Last issue we showed you the install of the front half of the lift. For this issue, we buttoned up the install with a few twists and have supplied some feedback as to how it rides and drives now.

For the install itself, we opted to do it in our driveway-much like you might do if you were to try this at home, despite all the instructions suggesting a professional shop do it. No fancy plasma cutter here, we stuck strictly with the grinder and reciprocating saw for cutting. Sure, we had to fire up our Lincoln Electric welder again, but this kit wasn't designed to be bolt-on. We did everything from start to finish right in front of our house (our neighbors love us). So, without further ado and no more tomfoolery, here is how it all comes together.
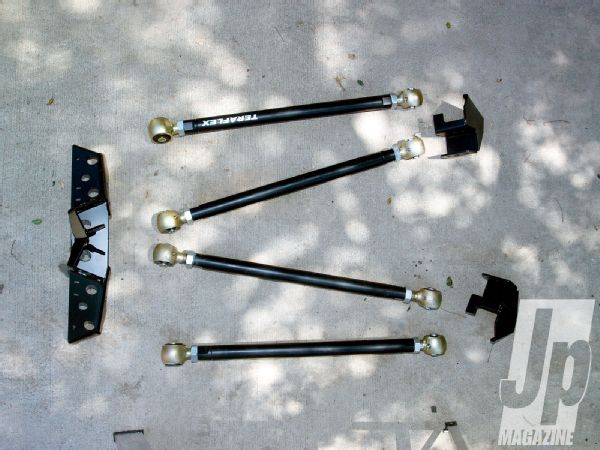
154 1011 Long Arm Lowering Kit links And Truss Photo 29261981 The rear eliminates the track bar through a double-triangulated setup. The upper and lower links are the same length 13/4-inch OD, 0.375-inch wall tube, and feature the same sized end links. The upper links get two flex joints while the lower gets a flex joint and a rubber joint to cut down on noise. The included truss is designed to work with a Dana 35 or Dana 44 axle. We had swapped in a Currie Enterprises F9 9-inch which caused a bit more work.

Driving Impressions
So how does it work already? Glad you asked. The Jeep handles much better on-road and off-road everywhere we've had it so far. The shocks are valved just right for the vehicle: none of that too-hard, too-soft junk. There are no noises coming out of the system, and the Jeep feels way more stable than it did. Bottom line is if you are patient, have the welding skills, and you want a double-triangulated four-link rear but don't want to mess with the calculations, this kit could be for you. And, it is possible to install it in your driveway if you have the time to spare. All told, we have about a week total of solid 8- to10-hour work days doing this install. Estimated time for a fully-equipped shop is two days.

PhotosView Slideshow The lower links had interference problems with the 3/16-inch-thick Currie lower control arm bracket. We solved it by grinding a curve into the bracket. This is what a full 10-hour-day's worth of work looks like. It took six cutting discs, a 3-foot long adjustable wrench, a 3-pound maul, and a reciprocating saw blade to get the two upper control arm and track-bar mounts off the axle. This is due to the thickness of the Currie brackets and the fastidiousness with which they are welded on. We then ground the remaining welds flush and did it with the axle still under the Jeep. The Teraflex truss relocates the upper control arm mounts. We had to modify the truss and attachment system to work with our axle. The bracket in-hand is designed to bolt to the truss and then bolt to the differential cover bolts of your Dana axle. With the F9 housing, the bolts are on the other side, so we cut some 1/4-inch-thick plate to fit and then burned the truss home. It was another half day to get the truss modified and the 1/4-inch plate cut and welded. Plan your time accordingly if you have a non-stock axle. With our soft top, no back seat, larger axletubes, and thicker axle-side spring mount, we ended up higher in the rear with the 3-inch springs than we had hoped. We got a pair of 2-inch springs and put them in, but the upper control arm truss ended up close enough to the body that we were sure it would hit. We put the 3-inch springs back in for the time being and are hoping they settle a little. The instructions state to remove the muffler and tailpipe in order to mount the rear upper arms. It was easier to just pull the remaining exhaust out. Due to the passenger-side upper arm going through the area previously occupied by the muffler changes needed to be made. We got a Flowmaster Hushpower muffler along with some straight and mandrel-bent tubing from Summit Racing. Using the company's tubing expander tool we cut and welded until we had an exhaust that cleared all the new suspension. As with the rest of the kit, the parts included for the rear are remarkably complete, bordering on overkill. We really appreciated the cast steel shock relocators. A TJ with larger-diameter aftermarket shocks will almost always have problems with the axletube interfering with the shock can. These cast relocators are way better than the formed steel we are used to, since they index off the stock shock mount and won't spin once installed. While the Cepek Crushers did awesome off-road, on-road they screamed like a drunken monkey. We swapped them out for a set of 33x12.50R15 Mickey Thompson MTZs wrapped around the newer Dick Cepek DC-2 aluminum rims. We ran the DC-1 rims for quite a while and really liked the look, but with as often as we swap tires, we stripped the bolt holes out quick. The DC-2 has a different center cap and no bolts around the perimeter of the rim. We dropped the Jeep about 1-inch and lost 1-inch of tire radius for a total drop of 2 inches. However, we gained about 2 inches of clearance in the middle of the Jeep thanks to the Teraflex BellyUp skidplate. Out back, we tossed our old and beat-up factory gas tank skid. In its place we put a 3/16-inch-thick 6061 aluminum skidplate from Savvy Off-Road. Born in the crucible of the Hammers, this skid will handle more abuse than the stock one, it's lighter, and it allowed us to raise the gas tank 1-inch higher than stock. Sure, overall we lost 1-inch of ground clearance out back, but the stronger skidplate should more than make up for it.
Usually more is better, but one problem we did come across was the sheer volume of instructions. The kit comes in 10 boxes strapped to a pallet and each box has its own directions. This is so that if a component of the kit is sold separately it has directions. The issue arose in that often one set of instructions would contradict another and made things confusing. Fortunately, you can download the most recent instructions from Teraflex's website.