The Miller Syncrowave welder is considered an "old standby" by many amateur and professional car builders. They have been in continuous production for decades and have earned a solid reputation as a nearly bulletproof, easy-to-use TIG welding machine with a very stable arc. Miller recently released an updated version of the Syncrowave machine, the 210 TIG/Stick Welder, and the big news is that it is now powered by inverter technology. Miller has used inverter technology in other lines for some time, so it's not surprising to see the venerable Syncrowave come on board, too.
I first saw the Syncrowave 210 machine at the SEMA show in November 2013, and I was intrigued. It's designed for serious amateur welders and light-industrial applications (like street rod shops). I was able to try out this machine and put it through its paces thoroughly, and my report follows.
So what is "inverter technology," and does it really aid the welding process? All electric welding machines take the power that comes from the wall and change it into a form that is suited for welding. One of the chief changes is lowering the voltage, typically 115 V or 230 V as supplied by your power company, which makes high-amperage welding possible. This is done with a transformer. In older welders, the transformers had many windings of fat wire over a gigantic core, which often weighed hundreds of pounds. While this got the job done, the old-style transformers were not very power efficient, plus they were bulky and required a large cabinet to house them. Many of you have seen older TIG machines nearly the size of a refrigerator; this is the signature of the old-style transformer machines.
Inverter welders have transformers too, but what makes them unique is the solid-state circuitry used to boost the alternating current from the 60 cycles per second (hertz, or Hz) that comes from your wall outlet up to 1,000 Hz or more. The transformers in an inverter design operated much more efficiently at these stratospheric frequencies, so they can be made much smaller, and they don't have the same internal losses, which make them considerably more efficient. Once the voltage is dropped, more solid-state magic brings the hertz back down to more appropriate levels, and other beneficial tweaks can be added, such as shaping the AC waveform, adding pulse capabilities, changing the power to direct current (used for welding steel, stainless, and chrome-moly) and more. (I'll cover these in detail shortly.)
A rule of thumb for TIG welding is that you need one amp for every 1,000th inch of metal thickness that you're welding. For example, 1/4-inch plate requires about 250 amps of welding current, and with a traditional machine this might require a supply circuit with a 70-amp breaker. Not many home shops can provide this kind of power, and it can be quite expensive to add a new circuit. An inverter machine can weld 1/4-inch material while drawing only 30 amps, and a lot of houses already have this type of wiring in place to handle heavy appliances like clothes dryers.
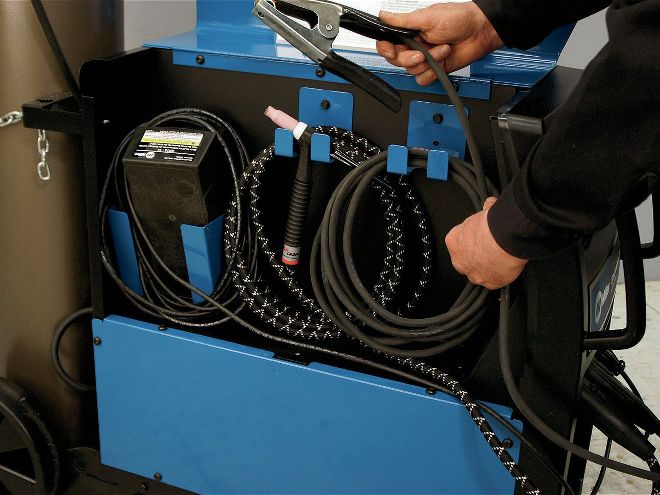
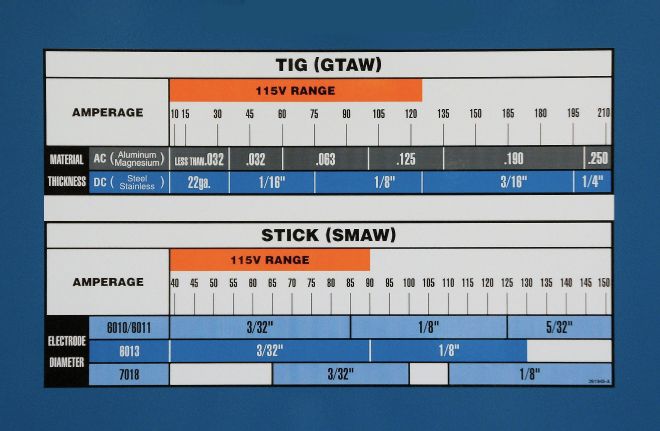
Let's take a close look at the improvements that have been made to the Syncrowave 210. The compact size and reduced weight is probably the first thing you'll notice when comparing the new machine with its predecessors. It comes standard with wheels attached, and incorporates a sturdy platform for holding the argon cylinder. It's easy to move this machine anywhere it's needed, and I really like the low platform for the cylinder, easing loading, and unloading. There's lots of storage space inside the cabinet, accessible through a large, top-hinged door. This provides a place for storing the TIG torch, the foot pedal, the work clamp, and their cables. There is also a handy chart inside this cover, listing typical setup parameters.
There is a smaller hinged storage compartment on the front of the machine for holding consumables, like ceramic cups and tungsten electrodes, as well as different size collets and back caps for the torch. It's great to have these at your fingertips and organized in discreet compartments.
The simplicity of the front panel really caught my attention. Many people are confused and intimidated by the array of knobs and switches most TIG welders have. Miller has provided a lot of adjustability with elegantly simple controls. There is an on-off switch, conveniently located on the front of the machine, and two digital displays that show the settings. There is one (process) knob that can be switched to three positions; AC TIG (for welding aluminum and magnesium), DC TIG (for welding most everything else), and DC Stick for doing traditional arc welding (which this machine is great at). There is a second knob, used for changing the welding parameters, and a push button used to cycle between the functions you're adjusting. That's it. Setup is extremely easy and this machine debuts the "Pro-Set" feature, which provides pre-programmed weld parameters that have been optimized by the welding engineers at Miller for most welding situations. Honestly, the default settings worked so well that I used them for several days before I experimented with the various adjustments available.
"Auto-Line" is another feature new to the Syncrowave 210. This automatically adjusts the machine to any incoming power between 115 and 230 V. The power cord has two interchangeable plugs, one for a standard 115V receptacle and one for 230V. No internal adjustments are necessary; the machine automatically accommodates whatever line voltage it's connected to. It's so convenient to be able to run this machine on 115V; although the maximum output power is somewhat limited, it allows you the versatility to weld in places that only have 115V service (like many home garages or even inside your bedroom).
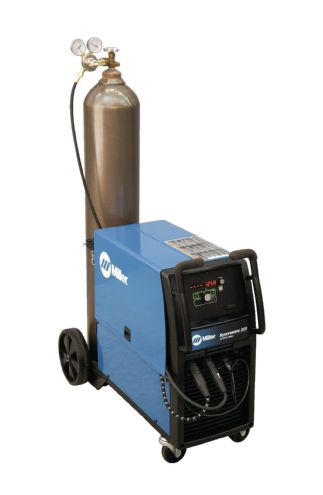
1. Here's the updated Syncrowave 210 welder, a 210-amp AC-DC Inverter TIG machine that's easy to use. It has excellent default settings and simplified but comprehensive adjustability.
2. Most automotive users weld steel sheetmetal more than anything else, and the default DC TIG settings do a beautiful job for repairs, patch panels, and body modifications.
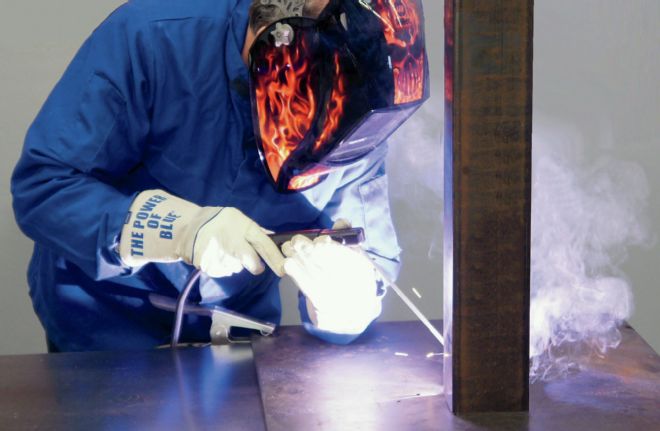
3. The Syncrowave 210 is ideal for structural welds, too. This is a long miter joint being welded on square tubing.
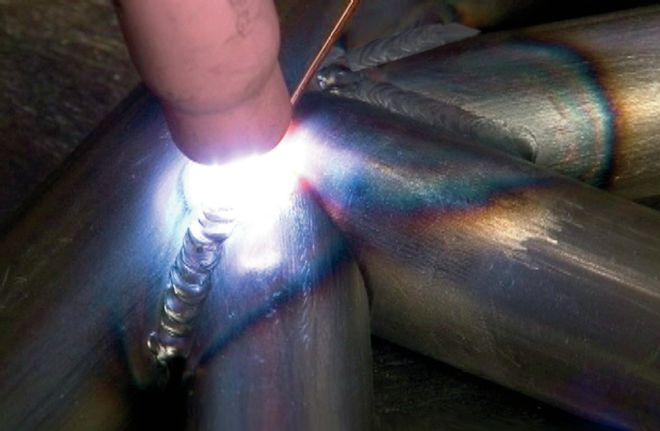
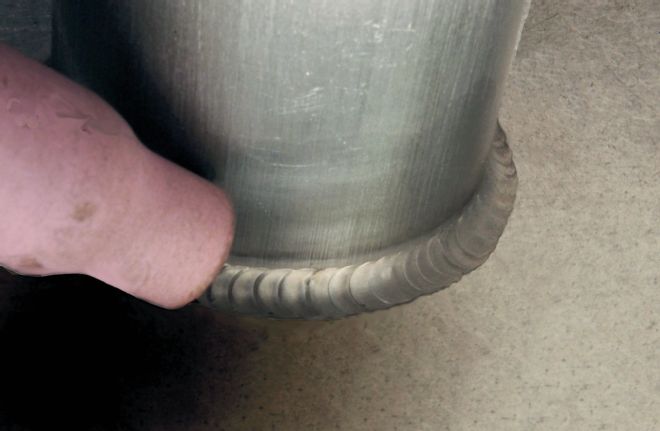
4. Round tubing requires more torch manipulation to navigate the joints, but with a little practice you can make strong, attractive weld beads with full penetration.
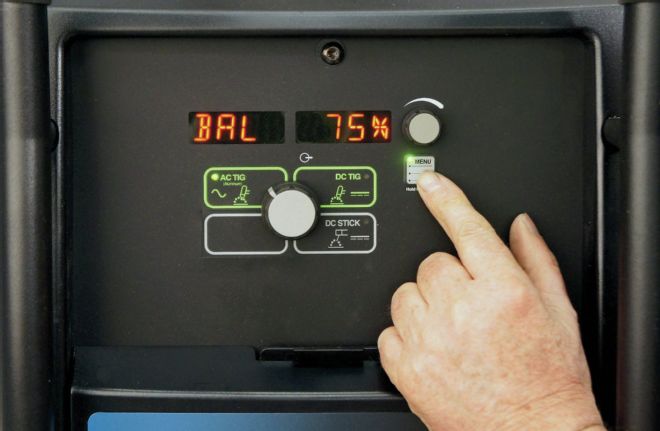
5. The control panel is extremely easy to use, with only two knobs and one push button. Once you select a process (AC TIG, DC TIG, or DC Stick) you can quickly set the parameters.
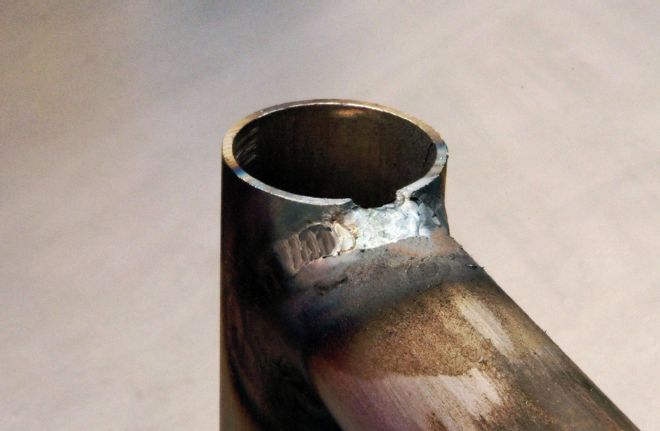
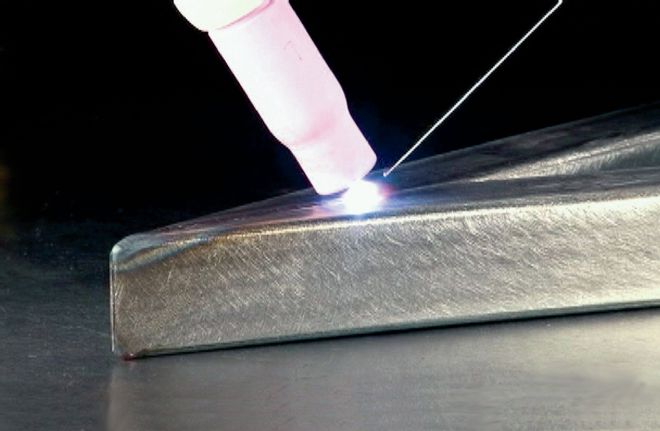
6. It's challenging to make a weld close to an edge. Here, the edge of the vertical tube has been melted by the nearby weld.
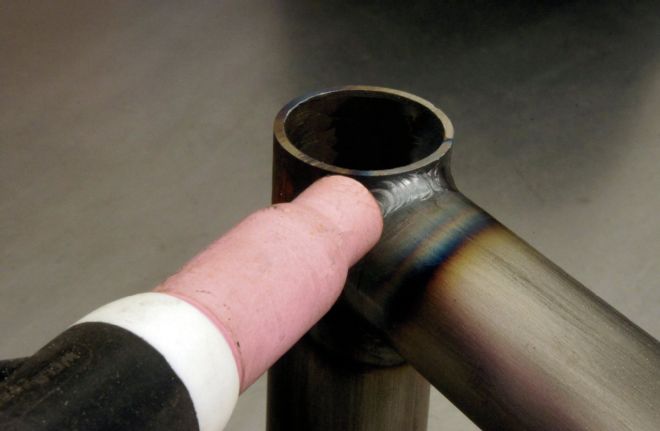
7. Pulsing makes it much easier to weld close to an edge without burning through.
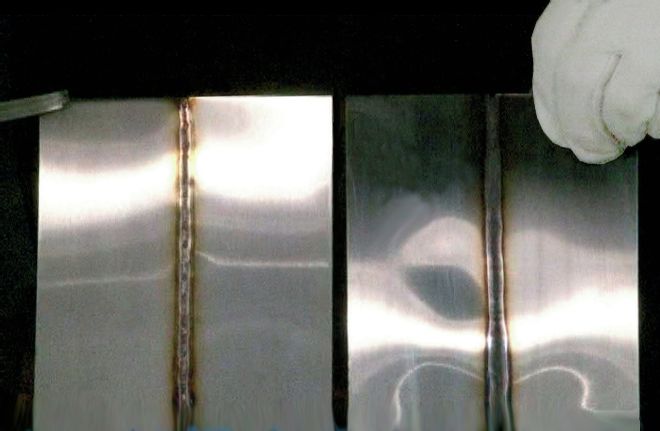
8. Pulsing is very beneficial when welding sheetmetal too. Notice how little distortion the pulsed sample on the left has. Pulsing makes a huge difference, especially on stainless parts like these.
My first welding job was joining some mild steel pieces. I turned the machine on, used the process knob to select "DC TIG," selected 100 amps with the other knob, and I was ready to go in seconds. The default settings worked perfectly, and I was laying down clean, controlled weld beads with no need to fool around with any other adjustments. I tried the machine on stainless and chrome-moly, and the default settings worked great with those, too. To weld aluminum, I switched the process knob to "AC," and again, the default settings gave me great results.
You may wonder why they even offer more adjustability if the machine works so well "out of the box." Well, there are certain situations where advanced controls are beneficial. Let's look at the "pulse" settings first. When the welder is in pulse mode, it automatically cycles between a high (peak) amperage, and a low (background) amperage. You set the peak with the parameter knob, and the background is automatically adjusted to 50 percent of the peak amperage.
Pulsing can be set from 0 to 50 pulses per second. The chief advantage is that you can make a good, full-penetration weld while lowering the total heat put into the metal, and this can result in less burn-through and distortion. If you do much work with sheetmetal, these benefits can be dramatic. Another place where pulsing is helpful is when welding close to an edge. It's very tricky to keep an edge from melting away when the puddle gets close, but pulsing keeps the total heat down, making it easier to approach edges without melting through.
One lovely characteristic of TIG welding is the "dime-on-dime" pattern in the weld bead when everything is done properly. Some people like to accentuate this pattern by choosing a very low pulse rate, perhaps one or two per second. Then the pulsing can be used like a metronome, so you add filler on the "hot" portion of the pulse, and advance the puddle on the cooler portion. With some practice, this can lead to beautiful results.
Another adjustment is the "balance" of the AC waveform. This controls the Electrode Negative (EN) portion of the arc, leaving the "balance" Electrode Positive (EP). The oxide removal, often referred to as the cleaning action of the arc, is crucial for aluminum welding, and only occurs in the EP portion of the cycle. In the EN portion of the cycle, most of the heat is concentrated in the work piece, which is key to maintaining tungsten geometry and improving weld quality. The Syncrowave 210 allows adjustments between 60 and 80 percent EN. It is sometimes beneficial to fine-tune the EN-EP balance for particular jobs. A great way to see the difference between these settings is to run two beads on an aluminum plate, one at 60 percent balance and one at 80 percent. You'll see the "frosted" area next to the weld bead (the area cleaned by the arc) will be noticeably wider in the 60 percent setting, while the penetration will be greater in the 80 percent setting. The accompanying photo shows this clearly.
You can also dial-in the diameter of your tungsten electrode to optimize arc starts, and manually set the duration of argon post-flow. There is an "auto" setting for post-flow, governed by the weld parameters you're using, and this worked so well I never saw a need to change it.
The default setting is for high-frequency arc initiation, so the arc can be started without touching the electrode to the base metal, but there is also a "lift-arc" mode, which can be beneficial in situations where high-frequency circuitry could cause interference with sensitive electronic devices. This utilizes a reduced sensing voltage rather than the "scratch-start" mode used by some other manufacturers, making electrode contamination virtually irrelevant.
While the Syncrowave 210 will be used as a TIG welder by most users, it is excellent for stick welding, too. When the process control is in the DC Stick position, you can adjust the "DIG" settings (controlling low-voltage properties) from 0 to 100 percent, and there are Pro-Set values for the common 6010 and 7018 electrodes. One advantage of arc welding is that no shielding gas is necessary, and the machine is much easier to transport if you don't need to haul a gas cylinder, too.
There is a slot on the front panel where you can plug in optional SD memory cards available from Miller, to add more capabilities through software upgrades. One of these cards allows you to increase the speed of pulsing up to 150 pulses per second, and another card allows you to adjust the AC frequency between 60 and 150 Hz. While these upgrades are not necessary for most hobby car builders, the enhanced capabilities extend the range of adjustability to rival industrial machines costing much more.
If you're in the market for a moderately priced TIG welder that's easy to use, has lots of adjustability, and is easily upgradable, take a look at the new Miller Syncrowave 210.
9. The pulse can be set slow to help you add filler rod in a rhythmic manner, leaving the dime-on-dime signature of a beautiful TIG weld.
10. The Syncrowave 210 is an excellent machine for arc welding, too, with lots of adjustability for different types of electrodes and various joint configurations.
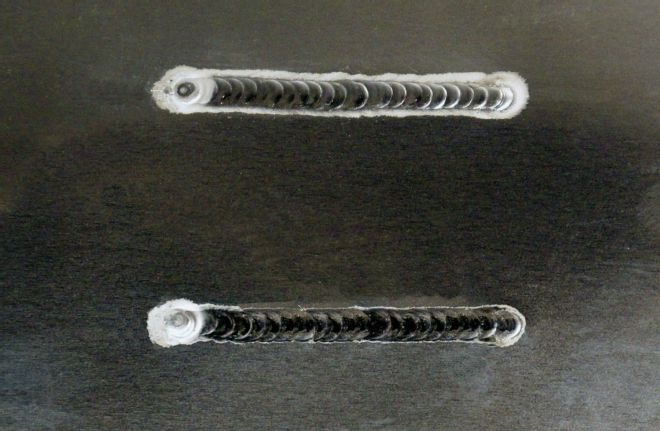
11. You can easily adjust AC Balance. The top bead was made at 60 percent Electrode Positive, giving better cleaning, and the lower bead is at 80 percent, which reduces the oxide removal.
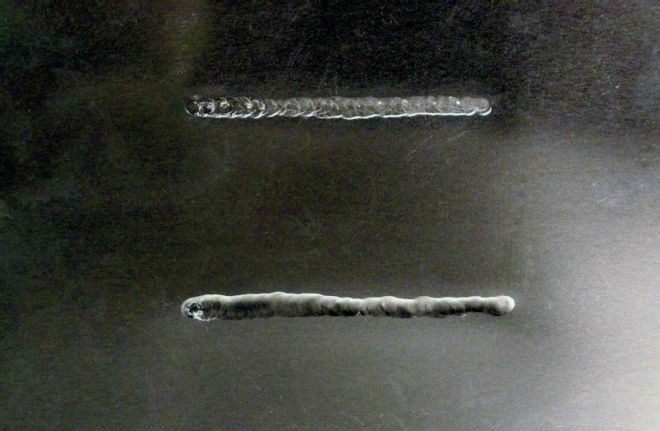
12. Looking at the back side of the same part, you can see the deeper penetration on the bottom, attained with the balance set to 80 percent EN.
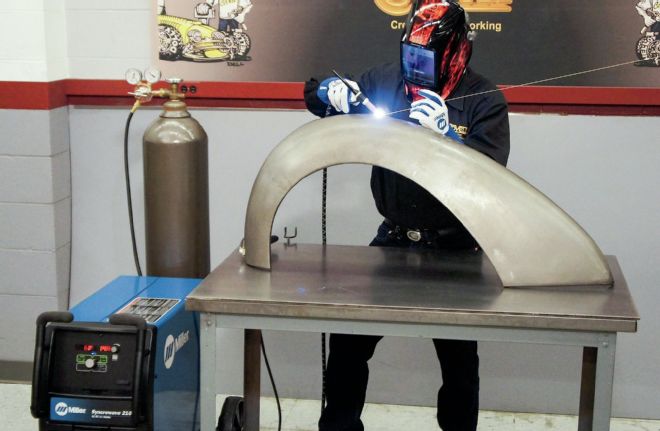
13. This machine has enough power to weld aluminum or steel up to 1/4-inch thickness. Castings can often be welded without pre-heating.
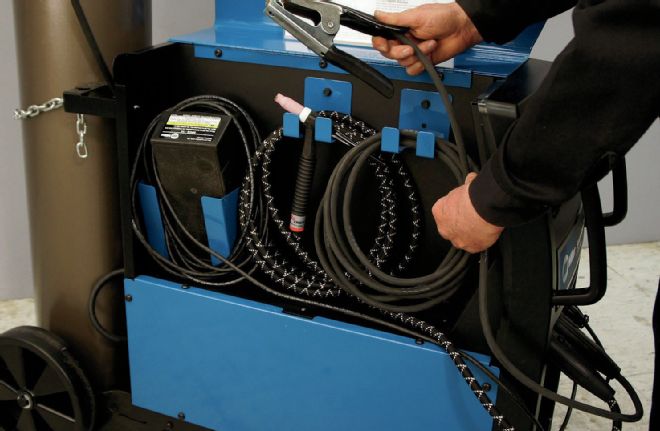
14. There's lots of storage inside the hinged cover, making it easy to organize your cables.
15. The machine comes with comprehensive setup instructions. This handy chart is right inside the hinged cover, providing clear instructions for common welding setups.
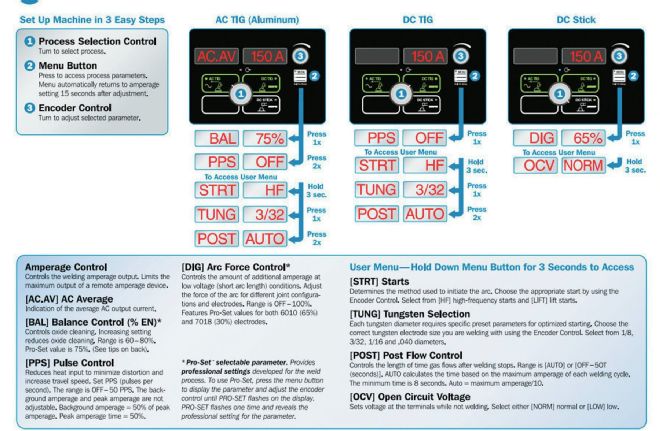
16. This chart gives detailed instructions on how to navigate the menus that control the advanced features.
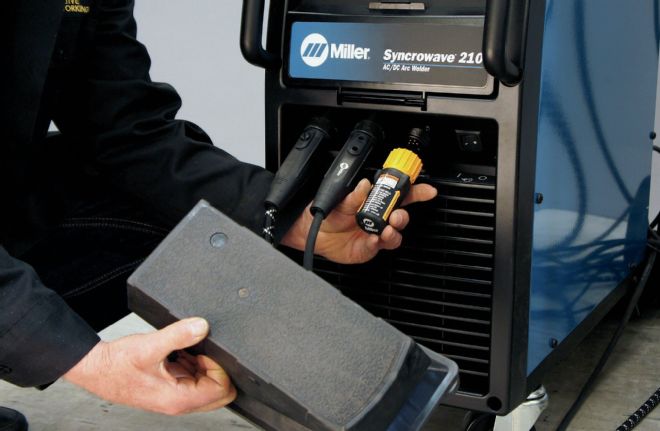
17. Many Miller accessories can be used with the Syncrowave 210. Their cordless foot pedal is a perfect fit.