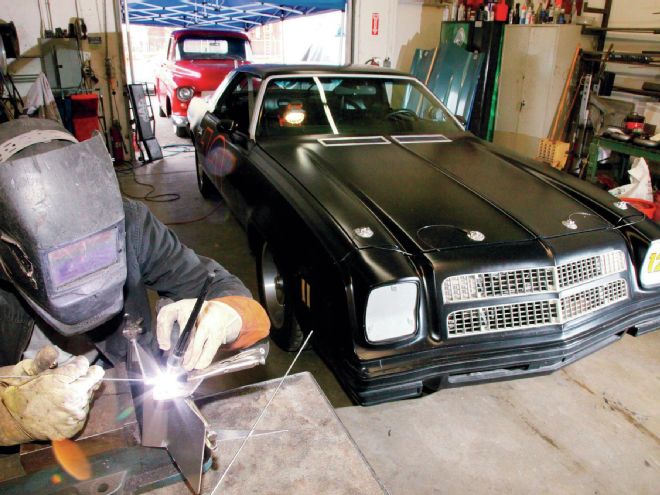
As we've shown before with our '75 Chevy Laguna, a few well-chosen, custom handcrafted pieces can set an otherwise ordinary hot rod apart from the crowd in a hurry and make any car one-of-a-kind. Those familiar with Project Laguna may remember the stories we ran on our custom aluminum spoilers (“Spoiling For Fun!” Apr. '09) and the sprinkle of aluminum exterior bits like hood vents, C-pillar covers, headlight covers, and rear window straps (“Makeover Magic,” Apr. '09). Those mods were done by Heath Elmer Restorations, and they were worth their weight in gold in the head-turning department.
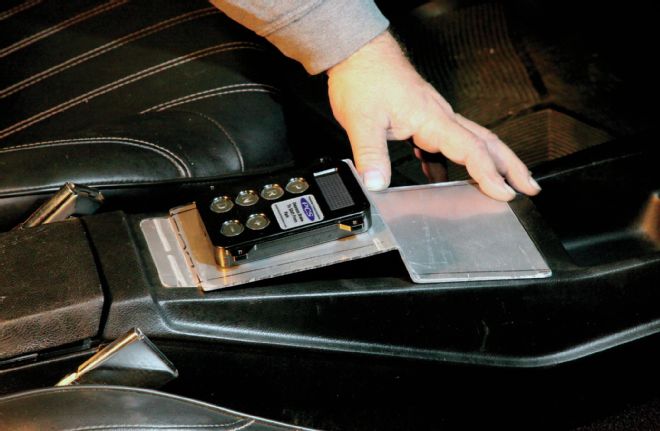
We recently needed another custom piece only this time around the need was born from necessity, not cosmetics. We had just converted our factory console shifter (connected to a strong Phoenix Transmission Products 700-R4 overdrive) to a push-button/paddle-shifted GSM-5000 shifter from Powertrain Control Solutions. (See “Add Paddle Shifters To Any Car!” Feb. '14.) This shifter does away with the shift lever and shifter mechanism, and uses a compact push-button keypad that electronically commands a computer-controlled, high-power stepper motor attached to a Morse cable. We now had a kickass set of remote-controlled steering-mounted paddle shifters and a smart-looking billet aluminum keypad—but the keypad was sliding around on top of our factory console inside a hollow channel where our factory console shifter plate used to be.
We looked into a few solutions, and considered everything from a quick hack job with plastic sheeting, all the way up to 3-D computer designing and high-tech 3-D printing, but in the case of the latter, we'd be bringing you a story on an absurdly expensive piece that you'd have no chance of duplicating at home. Our best solution ended up being the services of Bill Richman of RRC Fabrication & Speed (Upland, California). Richman is a veteran fabricator with one foot in the circle track racing world and the other in the hot rod fabrication world. He's been building race cars, street machines, and hot rods for over 25 years, and his unique blend of experience informs and infuses his process with both the practical and aesthetic qualities we were looking for in our NASCAR-themed Laguna. Best of all, we saw it as the perfect opportunity to get inside the mind of a top fabricator to see how he thinks. Richman works quickly, his mind racing ahead as his hands grab materials and tools. We had to keep slowing or stopping him to take pictures, shoot video, and quiz him on his thought process (sorry Bill!), but we were able to capture most of it.
Richman's shop is well stocked with fabrication tools like sheetmetal brakes and shears, but it isn't so elaborate that you couldn't do most (or even all) of this at home in a well-stocked garage. Virtually every tool used by Richman (including a TIG welder) can be picked up at Eastwood or your local Harbor Freight store. Our shifter console is just one idea you can make—there is a ton of other interior parts you could construct with the tools and techniques described here. Some other ideas might be an instrument cluster panel, gauge pod, electric window switch housing, a NAV screen frame, or HVAC control panel. It's our hope that you can use these techniques to build whatever you may need, but if you can't, we hope at least we've introduced you to the guy who can do it for you. What you're looking at here represents the fruits of about six hours of labor (not including our process of documenting everything), so a piece like this would run around $400 in a typical skilled hot rod shop. Here's how it went down!
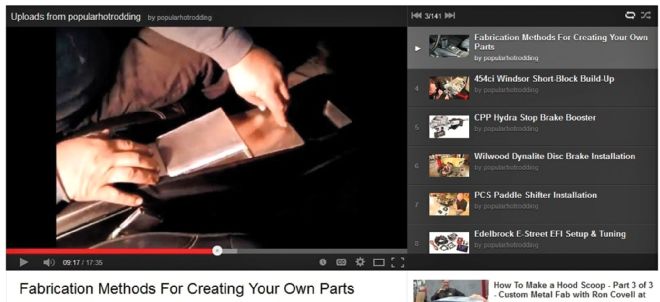
More Video Online!
Want to see more on how Bill Richman of RRC built our Laguna's shifter console piece? Go to www.YouTube.com/PopularHotRodding and check out the 17-minute video titled "Fabricating Methods For Creating Your Own Parts."
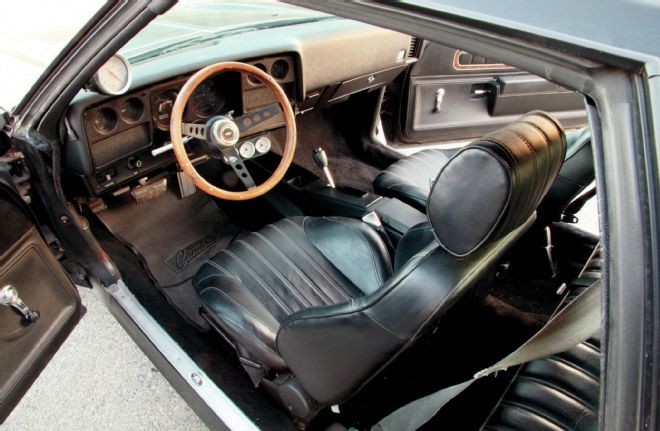
For reference, here's our Laguna interior long before the PCS paddle shifter. Note the stock console, shift lever, and run-of-the-mill steering wheel setup. Serviceable, but boring. Our biggest pet peeve was the trans shifting long before the fun was ready to start. Enter the PCS paddle shifter …
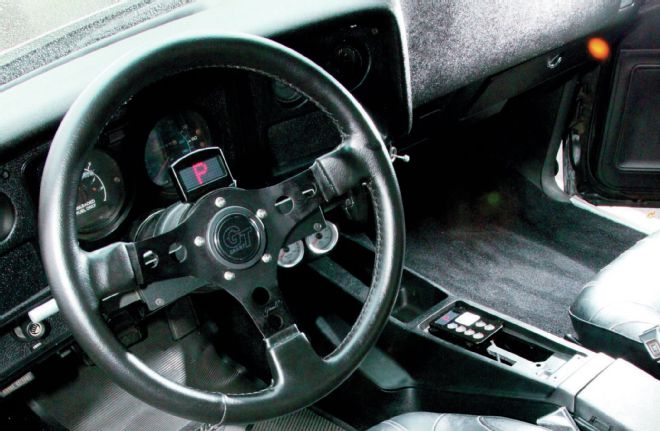
Our driving efforts became reinvigorated with the installation of our steering-mounted PCS shifter paddles. They work awesome, giving us complete control over the engine's powerband. But check out the push-button controller lying unrestrained in the open console …
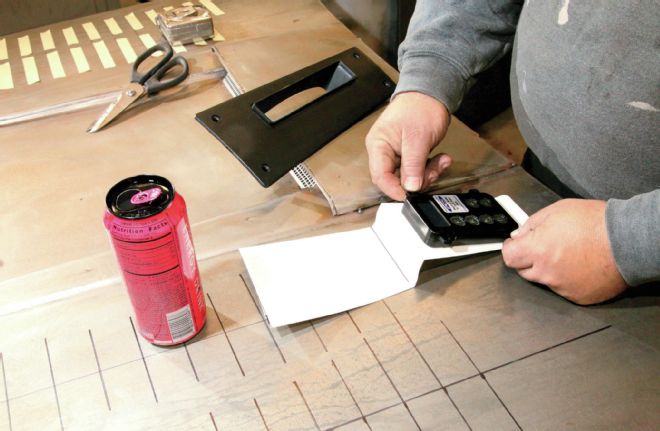
We turned to Bill Richman of RRC Fabrication & Speed in Upland, California, where he started our console plate project by taking measurements off the stock shifter plate (top) and PCS push-button shifter. Here, Richman is making a template (called a pattern) out of thick, flexible paperboard. The idea is to make it out of paper first, bend it around, and see if the idea is going to work.
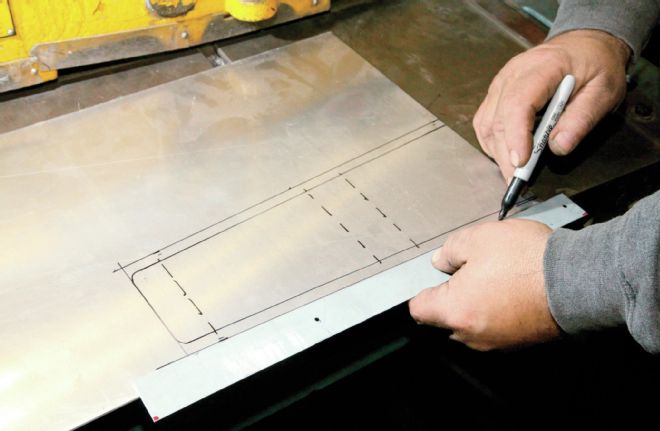
After trial fitting the cardboard pattern on the console several times, Richman arrived at a shape he was happy with. Here, Richman is transferring the pattern's shape and fold lines onto a sheet of .125-inch-thick aluminum—thick enough to provide strength and be TIG welded, but thin enough to be worked by a metal brake and shears.
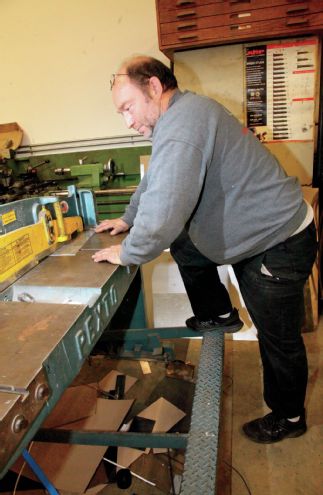
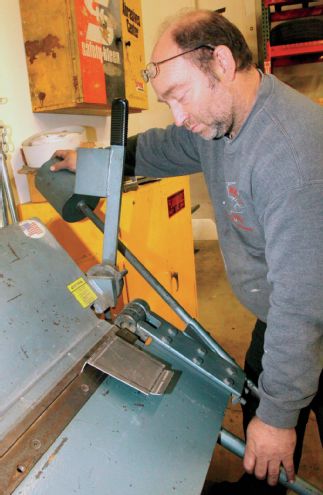
RRC's large Pexto metal shear can handle pieces several feet long, and is operated by a footstep. Here Richman trims the edges of the piece, leaving extra material on the sides for an extra margin of safety. A bench-mounted throat-less shear or a handheld electric or pneumatic shear from Eastwood would also do the trick. These tools start well under $100 if you're working in your home garage.
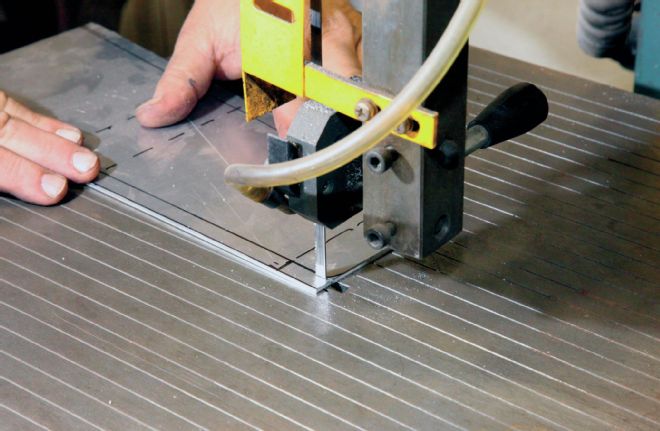
The purpose of this cut will reveal itself in a minute. For the time being, note that Richman is homing in on the final shape with a bandsaw prior to any bends or folds being made—it's easier that way. Note that the plate will step down into the console channel in some places, and cover it in others.
Remember those dashed lines Richman made on the pattern? They were transferred onto the piece and correspond to the bends he wants to make. Here Richman has positioned the work in his sheetmetal brake and is bending the piece on those lines. The bending process is an iterative one in which the work is repeatedly mocked up on the car, then brought back to the bender for more tweaking. Tabletop metal brakes large enough to handle a piece this size can be purchased from Eastwood for under $100.
Finally, all the corners, curves, and bends are tweaked to where the sides can be added. At this point, Richman is also beginning to think about how the PCS shifter will be mounted on the piece. Note the series of tight, tricky bends toward the back where the "tongue" recesses into the console. The rest of the work covers the channel in the console.
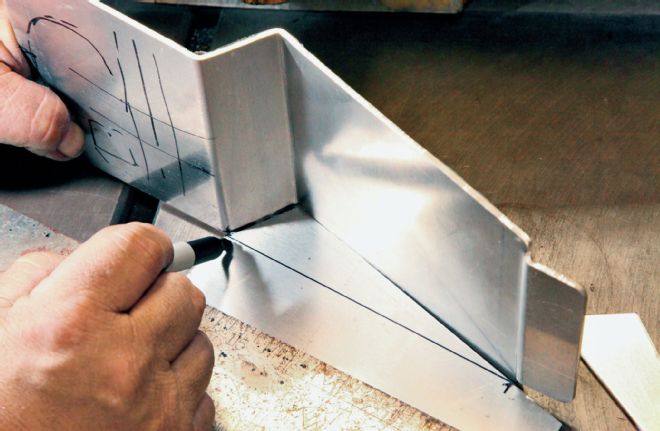
It's a relatively simple process to mark off and cut aluminum sidepieces to close out the cover. These will be cut once again in the foot-operated floor shear.
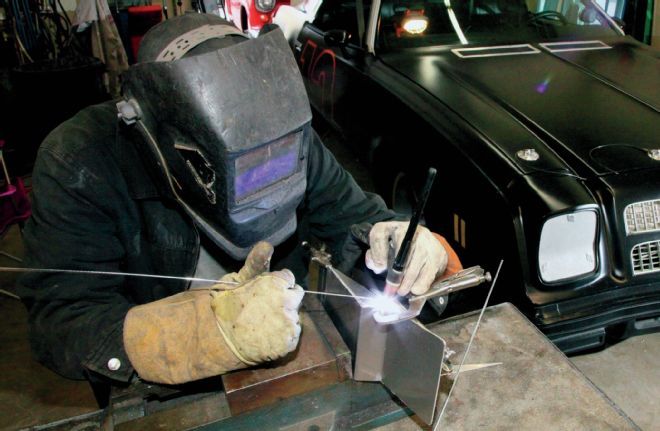
Scott Etheridge is RCC's resident TIG-welding expert, and here he mocks up and welds the side closeouts of our shifter housing. Welding aluminum may be easier with a spool gun attachment (if your MIG machine is so equipped), but a true artist will always use TIG for something like this. TIG welding is an artful balance of heating the weld area, dipping the filler in the molten pool, keeping the weld enveloped with shielding gas (while keeping the tungsten electrode at a safe distance!), advancing the weld pool with the electrode, and adjusting the current with the foot pedal. It is the hardest form of welding to learn, but is incredibly rewarding once mastered.
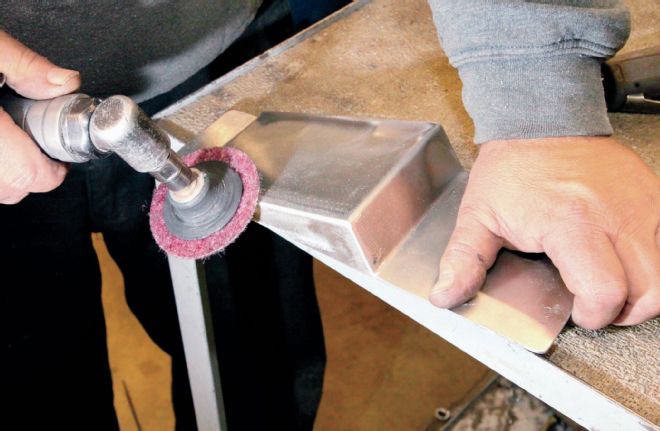
Once Scott finished the side panel welds (taking extra care to add fillet material on the inside corners), Richman ground the corners smooth with Scotch-Brite pads on a high-speed grinder.
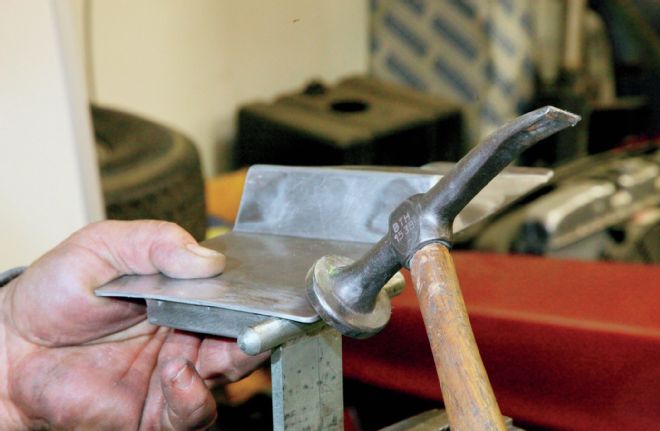
At this stage, Richman needed to tweak the forward portion of the plate with a hammer and T-dolly (mounted in a vice). The top of the console is curved slightly and the shape of the piece needs to mimic this. Note the piece TIG welded to the bottom; this piece acts as a standoff to keep the top level with the console. This extra piece has also been given a slight curve where it joins, helping Richman to further form the curvature of the top piece.
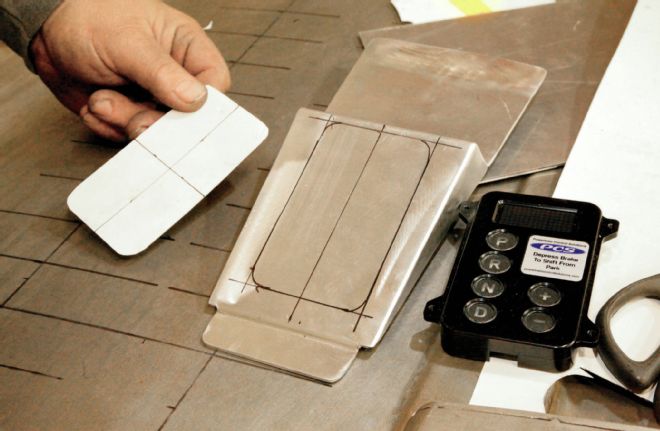
Another pattern was made to copy the shape of the PCS shifter. The centerline of both the pattern and the console plate was marked, then the pattern centerline was matched to the console centerline, and the pattern traced. Through the laws of Euclidean geometry, this guarantees that the square cutout will be centered on the piece.
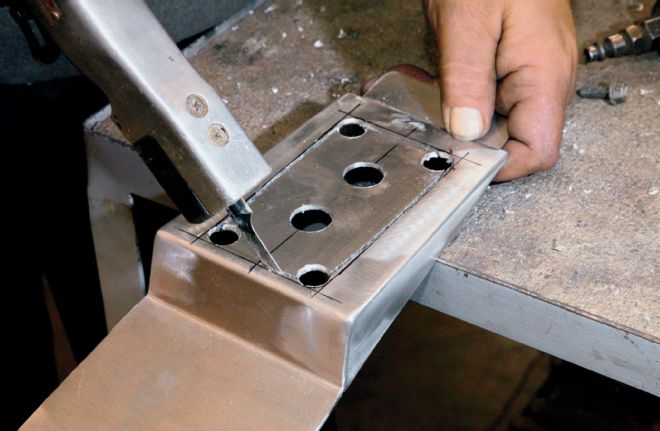
After drilling some holes in each corner, Richman cuts out the center with a jigsaw, connecting the holes as he goes.
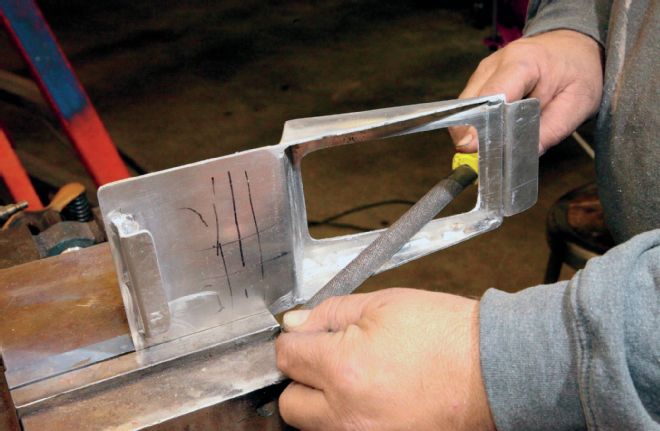
Working with a file, Richman smooths the edges of the cutout, bringing it ever closer to the scribed lines. Periodically, Richman attempted fitting the PCS shifter, never forcing it, filing away the edges of the console plate until it fit perfectly. This angle better shows the standoff piece at the front of the work that was TIG welded on earlier.
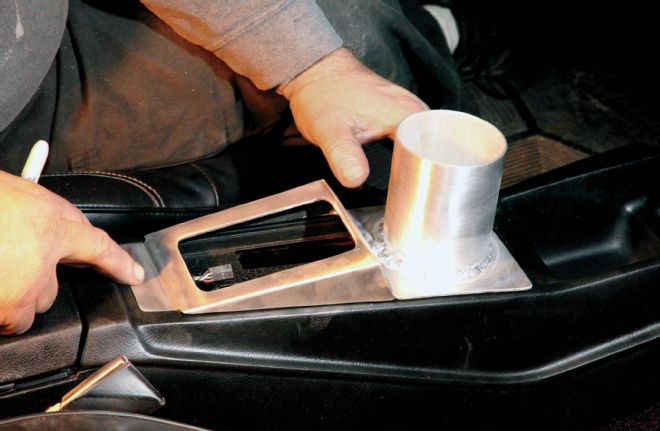
Trial fitting continues as Richman begins the process of identifying and marking the location of the mounting holes for both the plate, and the shifter. Note that Richman has added a section of aluminum pipe we swiped from an aftermarket cold-air induction for a Honda. This will make a nice cupholder or cellphone pocket. That electrical pigtail is the plug for the PCS shifter, which we relocated rearward to fit into the PCS unit.
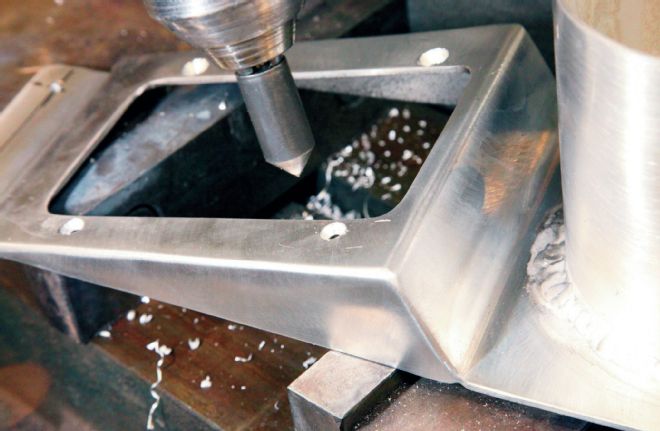
Richman marked the PCS shifter holes with a punch, drilled some pilot holes for some fine-thread 8-32 countersunk bolts, then used a countersink so the fasteners will mount flush. The same process was used to make the console plate holes; only the original factory fasteners (countersunk screws) were reused in the original console holes.
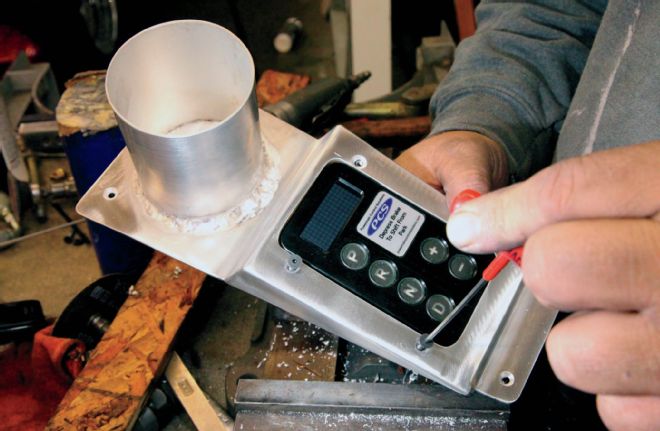
The mounting holes in the PCS shifter were drilled larger and tapped for the fine-thread 8-32 bolts—one final trial fit being performed here before the entire piece was painted with the same Dupli-Color interior paint we used a couple years ago to bomb the rest of the interior.
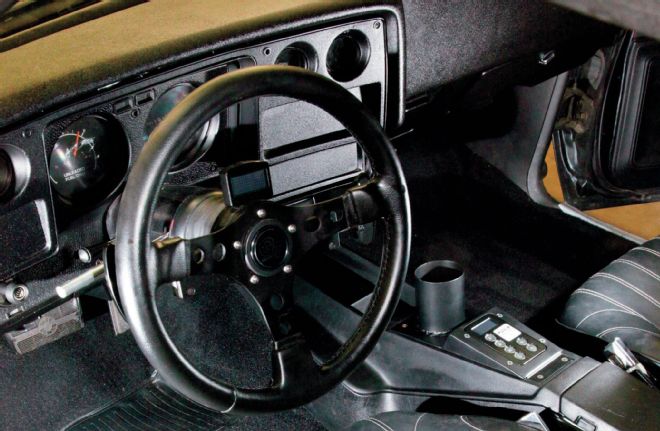
The finished console shifter plate looks industrial cool, matching the no-nonsense look of the mil-spec PCS shifter to a "T." We've also got a place to put that Big Gulp cup! The key to success with fabricating something like this is to picture the finished piece in your mind, follow that design to the end, make plenty of patterns, measure many times (cutting once!), and keep at it until it takes the shape you want!