Same is lame. At least that’s the vibe we get at muscle car gatherings from both big-name shops and at-home car builders alike. Retro ’60s sheetmetal might be enough to stand out from a horde of minivans and SUVs, but when your project car is surrounded by dozens of its contemporaries on cruise night or in the staging lanes, factory body lines just aren’t going to cut it. If you want to distance the caliber of your car from the average street machine, it takes some extra effort to be different. Few cars demonstrate this better than the Roadster Shop’s latest creation, the Innovator Nova. Both the quantity and quality of its custom touches are so diverse, that it would make a college admissions administrator proud. So much of the Innovator’s skin has been tweaked that a standard six-page feature story just isn’t enough space to cover it. As such, we’re taking a closer look at the key design and fabrication elements that went into this impressive machine.

Grille
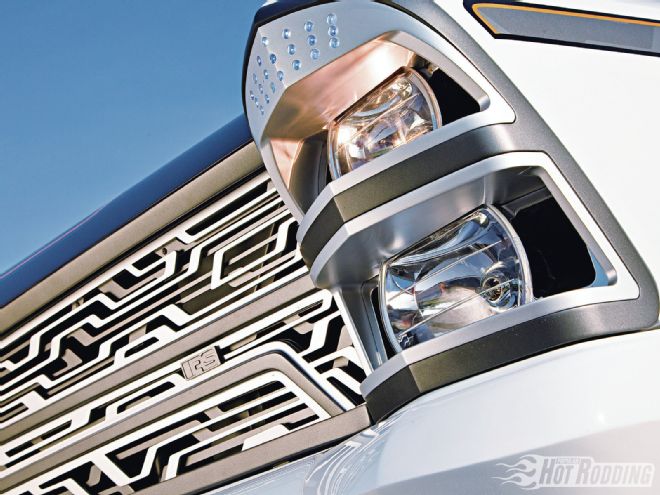
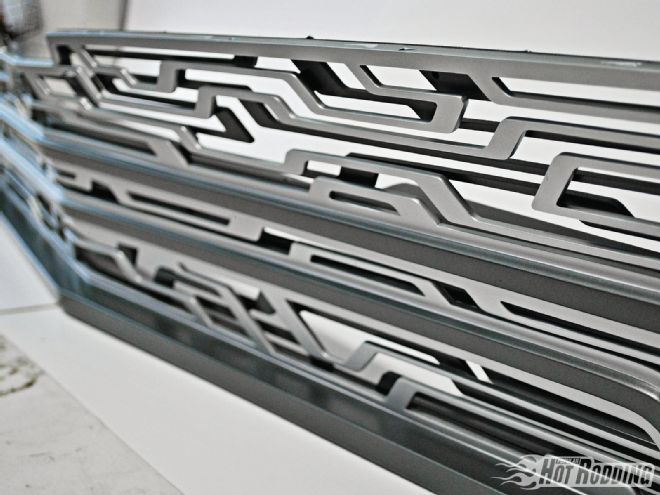
Professional car builders are a creative bunch, and often draw inspiration from unlikely places. To augment Innovator’s futuristic flavor, the car’s grille mimics the lines of a computer chip. The pattern was first designed in Photoshop to ensure the lines were completely asymmetrical. Then, the overall shape of the grille was designed using SolidWorks CAD software before being water jet cut out of aluminum stock. To add depth and lend a three-dimensional feel, two different layers of the grille pattern were cut and joined together by a spacer. Granted, most hot rodders don’t have access to CAD software and water jet cutters, the idea here is that using a grille that’s different from the standard wire mesh or honeycomb pattern found on many cars can dramatically change the look of your project car.
Headlights
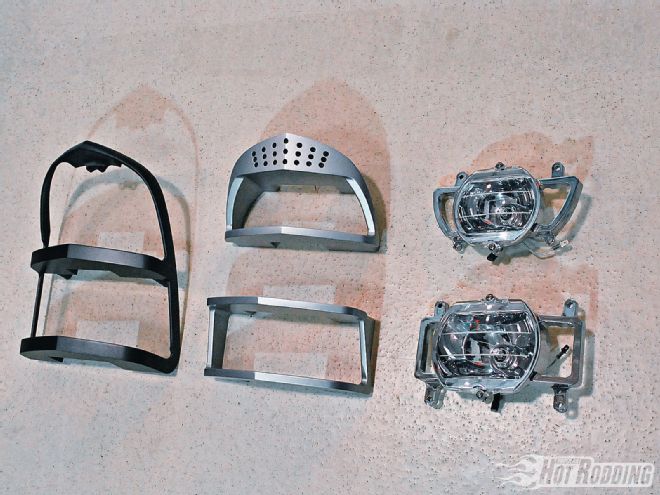
Whether you realize it or not, the first spot your eyes usually lock onto when looking at a car is its headlights. Some people think merely bolting on a set of diamond lamps is pretty trick, but the Roadster Shop wanted to do something that looked more modern than a standard round headlight assembly. Instead, it opted for projector-style bulbs laid out in a dual-stack arrangement. The trim rings are custom one-off items as well, CNC-cut from billet aluminum. Taking cues from upscale European sedans and exotics, the trim rings also house LED running lights. The concept carries over into the taillights as well, where three vertically stacked circular elements are surrounded by LEDs.
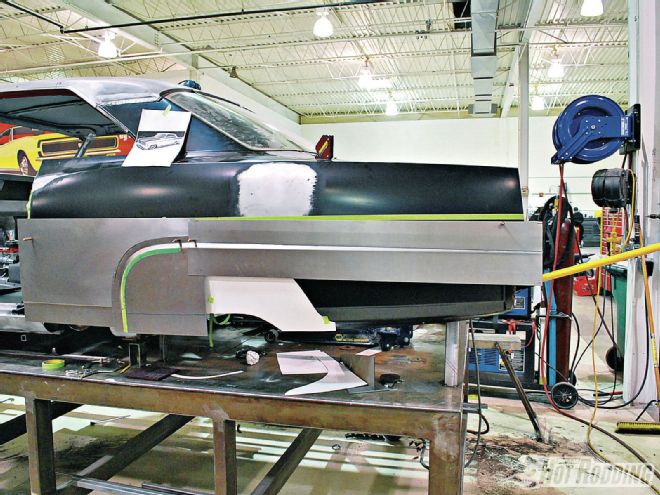
Body Line Delete
Sometimes factory body lines are so ugly, the only option is getting rid of them completely. At least that’s how the Roadster Shop felt about the big, bulky line that runs down the side of a stock Chevy II. To accomplish this, it cut off the bottom three-quarter portion of the fenders, doors, and quarter-panels. Next, the car was set at ride height, and several cardboard templates were made to establish the overall shape of the new panels. After fabricating the new bottom pieces of the fenders, doors, and quarter-panels, they were welded in place. The result is a much cleaner, slabbed appearance. During the process, the Roadster Shop also modified the wheel openings so that they fall off at a gentler angle behind the front wheel, and in front of the rear wheel. This gives the impression that the wheels are pushed outward toward the corners of the car.
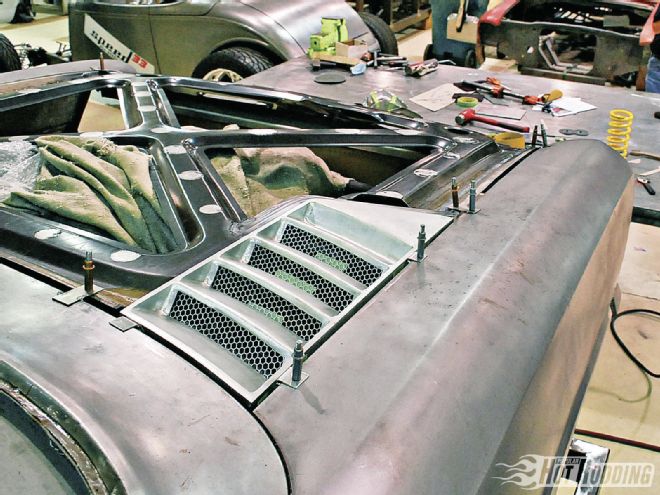
Vented Hood
In order to feed a steady supply of fresh air to the 454ci LS small-block without having to resort to a cowl-induction hood, the Roadster Shop pulled out all the stops. It first cut trapezoidal notches out of the rear corners of the hood. This required removing the outer skin of the hood, then cutting the inner bracing. To fill the void in the corners of the hood, custom airboxes were built that attach to the cowl and inner fender, then covered with stepped vents. Once completed, the airbox and vent assemblies are permanent structures attached to the car, and the hood opens and closes around them. Both airboxes feed induction tubing that runs along the inner fender and behind the radiator before meeting at a Y-junction in front of the throttle-body. Not only does the streamlined hood look cool, it’s 100 percent functional as well.
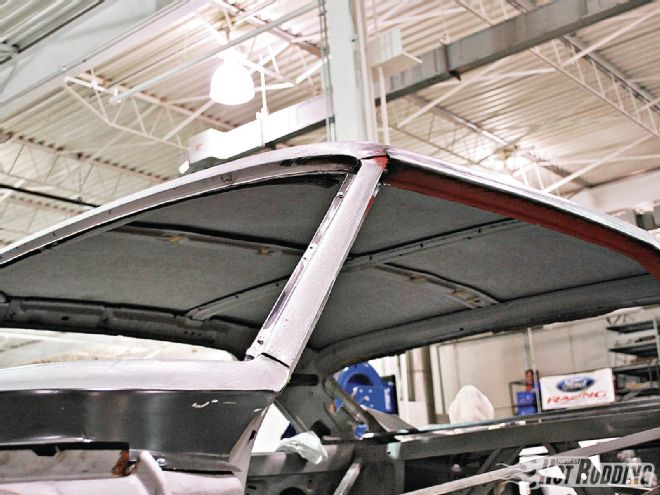
Greenhouse
It’s one thing to chop a top, but it’s something else entirely to change the greenhouse profile of a car. The Roadster Shop took a multi-pronged approach to create a sleeker, more wedge-shaped profile with Innovator. The first step was cutting ¾ inch out of the A-pillar, then pie-cutting ½ inch out of the rear sail panel. This allowed tilting the front of the roof downward. Likewise, the A-pillars were leaned back at a sharper angle for a far less upright and blocky appearance. Performing such body mods are far easier said than done, but the end product is a greenhouse profile that looks nothing like stock.
Engine Compartment
Late-model engine swaps are a mainstay of the Pro Touring creed, but unfortunately, exposed coil packs and miles of wiring mean they aren’t exactly pretty. To hide all the plumbing and wiring, the Roadster Shop fabricated a custom metal shroud that covers up the fuel rails and throttle body, then spills over into the radiator support. It boasts a mix of smooth curves and sharply angled polygons, and looks like something straight out of a concept car. The design theme carries over into the inner fenders and airboxes as well, where multiple sections and tiers add depth. The Roadster Shop’s Phil Gerber says that there’s no scientific way to emulate this type of setup. Cardboard can’t be used as a template because it won’t bend into complex angles and shapes. His advice is simple: Just start bending metal until it looks impressive.

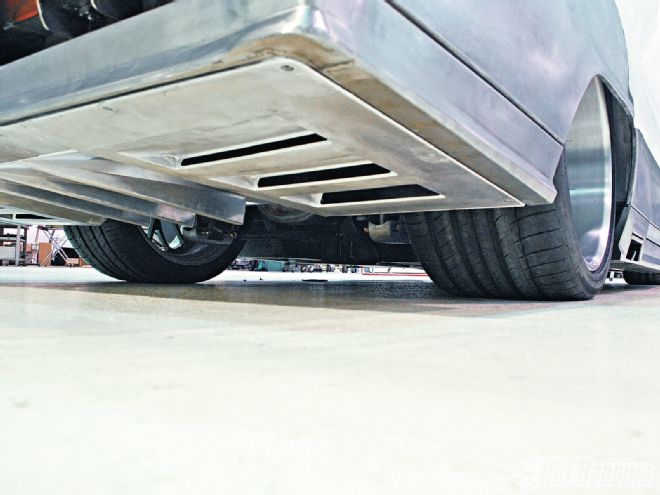
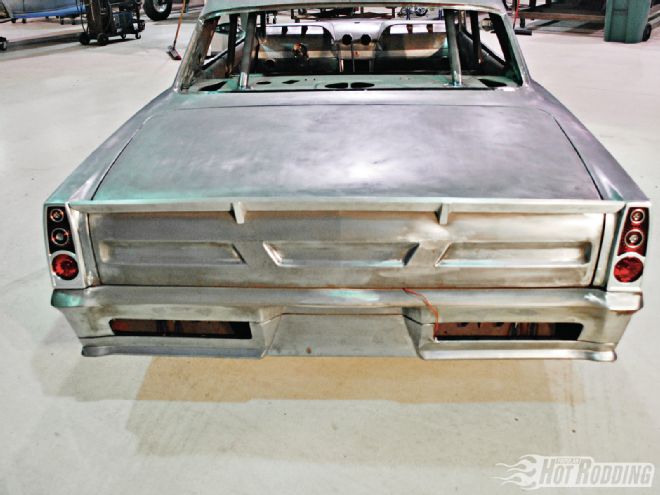
Rear Diffuser and Pan
From a functionality standpoint, Innovator’s rear underbody tray covers up the ugly stuff like the fuel pump and filters, and supplies fresh air to those components to keep them cool, however, from a design standpoint, it ties the rockers, quarter-panels, and rear lower valance all together for a clean and coherent look. A smooth, flat pan could have accomplished the same thing, but to kick things up a notch, the Roadster Shop added stepped side vents and a speared center diffuser. Visually, it complements the chiseled, angular body lines of the car very nicely and from the rear profile, the diffuser looks the part of a race car.
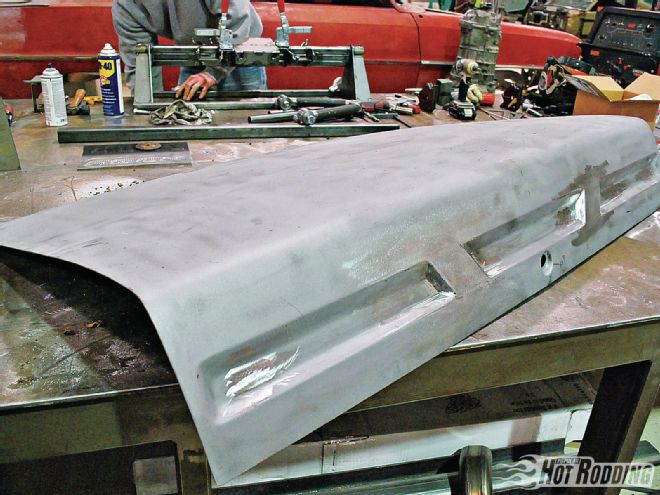
Deck Spoiler
No matter how hard you try to picture it in your head, a ’66-67 Chevy II is one of those cars that can’t possibly look good with a rear spoiler. Well it turns out the Roadster Shop has proven everyone wrong yet again. The key to pulling it off is in the subtlety. Innovator’s diminutive decklid spoiler flows neatly into the taillight structure, and does not exceed the height of the quarter-panels at any point. Not only does it play off of the car’s sharply chiseled panels, the spoiler also ties together the rounded portion of the trunk lid and the squared-off peaks of the quarter-panels. Two triangle-shaped supports hold the steel spoiler to the trunk, and add to the geometric theme.
Trunk Lid
Hot rodders tend to be opportunists, and when the Roadster Shop pulled off the factory molding that runs the entire width of the trunk lid, they found a big recess. Rather than smoothing it out, they split the long, rectangular recess into three different sections by simply welding in a few plates of metal. The end product is three trapezoid-shaped pockets, a theme that repeats in many parts of the car. A trick like this is easy enough that anyone with basic fabrication skills can pull it off. It sure looks more interesting than a flat, smooth trunk lid as well.
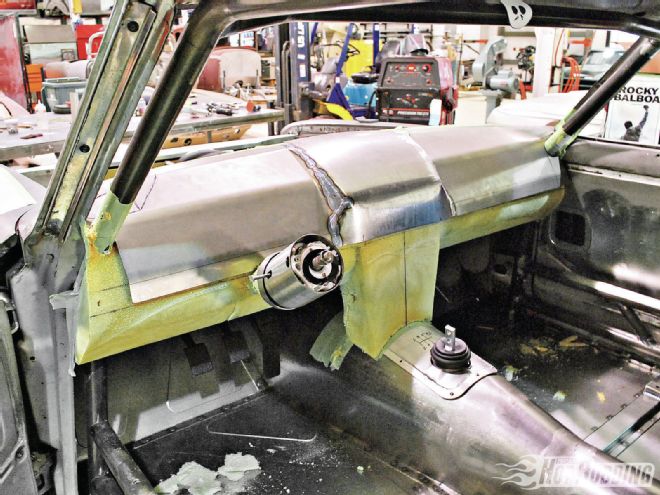
Dash
In contrast to the sharp, angular textures of the exterior, Innovator’s interior boasts a softer and more welcoming feel. Much of this is accomplished with a custom metal dash that has a mix of various smooth, rounded shapes. To establish the basic design of the dash, the Roadster Shop carved a piece of foam into shape. Using the foam as a template, pieces of sheetmetal were painstakingly formed to match. Two eyebrows were formed on the driver and passenger sides to clearly define the left and right sides of the car, and both transition into the custom center console. “There’s no scientific way to make a metal dash. You just have to spend a lot of time on the English wheel and with a planishing hammer,” Gerber says.
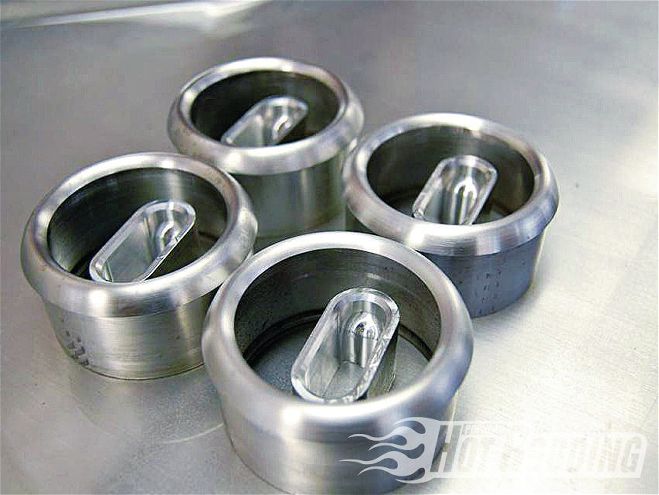
Billet Trim
Outside-the-box thinking can transform even the most ordinary and utilitarian parts of a car into eye candy. Few things are as boring as air vents and turn signal stalks, but the Roadster Shop managed to carve one-off pieces out of billet aluminum that really grab your attention. The air vents are an oval-within-a-circle design in which the centersection swivels and rotates 360 degrees for near limitless adjustment. Likewise, the oval design carries over into the turn signal and steering column adjustment stalks as well. Even if you don’t have a CNC machine, or have an aversion to all things billet, the point is that with a bit of effort, even the most ordinary trim bits can take center stage as works of art.
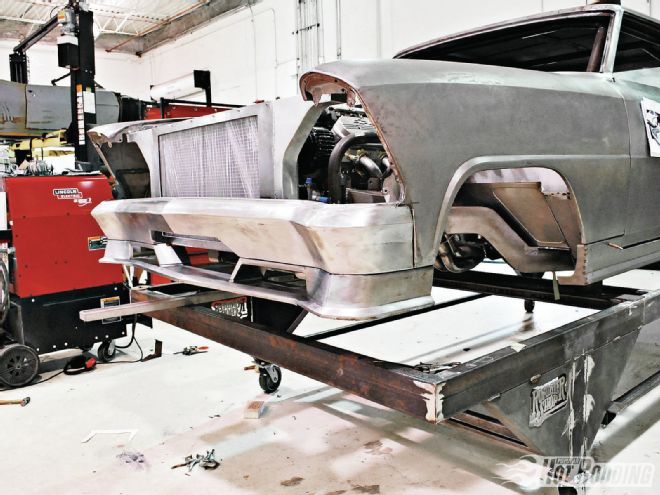
Bumpers
Flush-fitting bumpers is nothing new, but Innovator takes this concept to another level. The front bumper started out as a stock piece, but a 2-foot-wide section in the center is the only factory metal that remains. In addition to being narrowed and tucked more tightly to the body, the Roadster Shop had to completely redesign the contours of the bumper around the heavily modified headlight design. The fabrication of the rear bumper followed a similar process as well. To tie the bumpers into the rocker, a custom splitter was hand-fabbed from sheetmetal stock and attached to it. The splitter follows the contours of the bumper, and features a large center opening to feed air to the radiator. Adjacent to the center opening are two smaller vents that supply air to cool the brakes. The rear valence was hand-fabbed as well, and wraps into the rockers and diffuser under tray. Between the rear bumper and valence are two openings that feature double-layer inserts that match the front grille design.