In the midst of sweltering summer heat, more than a few heads and wallets turn toward the performance (or lack thereof) of their cooling system. How many people in today's world of monster SUVs outfitted with more TV screens than the occupants can watch really turn off their air conditioning when they tackle a steep grade to avoid overheating? How many people even read those or any other road signs anymore, for that matter? Granted, $40K-plus new vehicles can probably handle the abuse of their unaware pilots, but those of us with older, more delicate cooling systems need to make sure they're in tip-top shape.
There's another side to this story, a cold one. A cooling system's performance is just as crucial in the wintertime as it is in the summer, believe it or not. An engine that doesn't warm up all the way can't burn out all the sulfur and things in the exhaust gasses that can be harmful to its longevity. Also, if you've ever been in the Midwest in the middle of winter in 10 degrees below zero weather waiting, waiting, and waiting for your truck to heat up enough to blow lukewarm air out of the heater vents, you'll know why it's important to have an engine that warms up as well as it cools down.
Most cars and trucks have always had a mechanical cooling fan assembly that runs much of the time. This is good in the summertime, but in the colder months it prevents the coolant and, in turn, the heater from reaching a "normal" temperature. In addition, the mechanical cooling fan assembly puts extra wear and tear on the water pump and robs precious horsepower from the engine, which translates into a potential loss in mpg. So what's the alternative? Electric fans.
Electric cooling fans are becoming more popular in passenger cars and custom vehicles. One of the main reasons for that is their relatively small size and the fact that they're really easy to adapt to most applications, some of which don't have space for a mechanical fan. This has been great for the hot rod world and the cramped engine bays of new vehicles. There are numerous electric fans on the market; SPAL-USA (http://www.spal-usa.com) provides some nice, reasonably priced performance fans. After talking with SPAL, they told us a pair of their 14-inch performance fans would move more than enough air even under the worst, most blistering conditions. They also gave us a short list of things to keep in mind concerning your own cooling system:
Radiator core size (the size of the radiator inside the tanks where the cooling tubes and fins are located). This space determines the diameter of the fan or fans that can be used.
Depth required for a cooling fan. SPAL high- performance cooling fans require 3.5-4.5-inches in depth from the radiator core to the fan motor cap. This distance may be shorter if the cooling fan can be offset on the radiator to clear the water pump.
Radiator material and number of cores. An aluminum radiator is more efficient than a copper radiator since it dissipates heat quicker. More cores mean more coolant capacity and surface area for more cooling.
Shroud or no shroud? For the most efficient system, a shroud should be utilized. The shroud forces the fan to pull air across the entire radiator core area, opposed to a fan without a shroud that only pulls air across the fan's diameter.
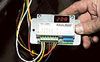
Once you figure out what fan setup will work, there needs to be a way to "tell" the fans when to come on and when to shut off. Without this, all the benefits of the electric fan would be a waste. To make all of this possible, the smart folks over at Dakota Digital developed a brain to control electric fans. Dakota Digital's PAC-2000 fan control system provides full user control over a single, two-speed, or dual fan operation with digital accuracy that costs way less than a blown head gasket or worse. The PAC-2000 has pre-programmed menu settings to work with most types of temperature sending units, and also has a "custom" setting that allows you to set up the fan controller with an OEM temperature sending unit using the existing temperature gauge information, which is handy.
With the parts in hand, it was time to begin the installation. The first thing we did is look at the fan placement. The majority of the fans can be mounted on the front or back of the radiator as either a "puller" or "pusher"-type setup. We decided to mount the fans on the back side and use the space where the original mechanical fan shroud was to eliminate any unnecessary additional work. The fans were ordered with mounts that could be easily used to mount to a full-size radiator.