'It's a tough call. If you only plan on ever building one or two engines in your life, it's difficult to justify spending big dollars on specialty engine tools like a micrometer and a dial-bore gauge. But the truth of the matter is that if you spend the coin on the right parts, it just isn't worth it to risk not accurately measuring clearances. Many car crafters still rely on the trusty old Plastigage to keep them out of trouble, but just how accurate is this simple little tool? We wanted to find out.
The test couldn't have been any simpler. We were working on a 489ci stroker big-block Chevy at Jim Grubbs Motorsports in Valencia, California, with our buddy Ryan Peart, so we had a perfect guinea pig. We wanted to test both the rods and mains, but the main bearing housings were so distorted we had to rely on just a connecting rod. Bearing clearance is merely the difference in dimensions between the outside diameter of the crank journal and the inside diameter of the connecting-rod or main-bearing housing. While the diameter of the crank journal is variable, what most car crafters often overlook are the changes in housing-bore diameter. Assuming your crank journal is within spec, changes in the housing bore are what affect the crush of the bearing. If the housing is too big, the inside diameter of the bearing will be loose, while a too tight housing bore will create a pinched bearing clearance.
As we found on our Rat motor, the main-bearing housing bores measured on the loose side of the spec, while our crank was ground slightly undersize. This produced as much as 0.004 inch of main-bearing clearance-far more than the preferable 0.0025 inch to 0.0028 inch. This will require milling the main caps and align-honing the mains to bring them back into spec. The same is true with connecting-rod big ends. Let's go through the specifics to see how to measure this clearance and to see how Plastigage measures up to a micrometer and dial-bore gauge.
Tech Tip: Be sure to always use the inch side of the Plastigage package. The reverse side is scaled in millimeters, and it's easy to make a mistake.
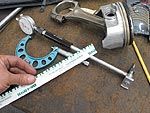
Using The Micrometer
Our crank had just come back from the machine shop where it was ground 0.010-under on both the rods and mains. Most good micrometers will measure down to 0.0001 inch (one ten-thousandths of an inch), which is plenty accurate. Our mic and dial-bore gauges came from Powerhouse. Always remember to check your tools against a standard to ensure your micrometer is as accurate as you think it is. Also remember to always measure parts at room temperature, around 68 to 70 degrees. Hot parts and/or mics will produce inaccurate measurements.
Another trick is to use the same mic that measures the crank to set up the dial-bore gauge. This will reduce tolerance stack-up and inaccuracies. If you set the dial-bore gauge to the crank-journal diameter, the difference between the inside diameter of the bearing and the crank journal will be the oil clearance.
Plastigage
The reason many backyard engine builders like to use Plastigage is that they don't need expensive specialty tools like a mic or a dial-bore gauge. As long as the bearing surfaces on the rod and crank are clean, merely lay down a short strip of that green string and torque the bolts down to the factory spec. The wider the string, the less clearance there is between the bearing and the crank. Plastigage comes in three different configurations: Green (PN SPG-1) for 0.001-0.003-inch, red (PN SPR-1) for 0.002-0.006, and blue (PN SPB-1) for 0.004-0.009-inch clearances.