In Part 1 we covered building the basic frame of a budget race car trailer. It was fitted with 6,000-pound mobile home axles. They are plentiful throughout most of the country, some to the point of being free if you want to crawl under a mobile home to get them. Our trailer has runners rather than a solid floor, which makes changing oil on the car easy. The target was $300 for the basics. I went $6 over budget on the steel, and I was given the mobile home axles. This month I’ll finish the details and add some nice touches such as a winch. So let’s finish it up.
Building the Fenders
Before rolling down the road, your trailer needs fenders. Arguing with the gorilla in the car behind you about a rock mark in his windshield is seldom any fun. You can buy a pair of fenders for about $75 to $100. However, I made mine from a section of leftover purling. My fenders cover behind and over the tires but not in front. The front is the part of the fender that always seems to bend back into the tire anyway.
Cut the blanks 74 inches long. Notch out 5-½ inches by the width of the flange in each side flange. This allows a smooth bend. Center these notches 16 inches from the rear of the blank. After bending, trim a piece of scrap to fit the curve and weld in place. The Millermatic 185 wire-feed machine welds the thin parts just like it does the thicker ones—easily. Use a piece of 1-½-inch angle to cap off the front. Double this and you have a nice pair of fenders. It only cost a little work. One-inch square tubing is used for mounting. This spaces the fender out properly from the frame.
The Tire Rack
Tire racks vary according to need. On this trailer, the side frames are built from 11-gauge 1-½-inch square tubing. It was going to be made from one-inch material but the steel company shipped more 1-½-inch and less of the one-inch. The crossbars are one-inch square. The larger size for the sides makes it more stable for only a slight cost difference, and I recommend this configuration. The height of the side frames is 72 inches off the trailer surface. The front side tube is vertical. The rear downtube is angled back. The width at the top is 18 inches while at the bottom the spacing is 32 inches. Bars across the top provide a base for a deck. A length of purling was added across this area for the seat. This is a good place to watch the races.
The taper of the sides lets you cut side covers from a single sheet of 4x8-foot material. I have used Coroplast material for this purpose before. This is a plastic that appears not unlike corrugated cardboard when viewed from the edge. It is light, strong and cheap. It trims to shape with a knife. Best of all, a four- by eight-foot sheet is less than $10 at plastic and sign supply shops. Attach it with self-drilling, self-tapping screws. Be sure to use washers. This panel makes a good place to display sponsor names and car numbers. The crossbars for holding the tires are 28 inches below the top crossbars. This should let you put in any size you might ever need—except some Sprint car tires—so check your tires for fit. The mounts for holding the holding rod are welded in to match the tire sizes used. It is best to put a tire in the rack and check for position before welding it.
Tie It Down
It seems silly to have to say tie it down, yet there have been more than a few Street Stocks driven on the trailer, put in park and towed home. This is not a good practice.
Virgil Brown at M&R Products is a source of constant education. In the past, I have tied a car down at the front and rear, thinking that was OK. Brown pointed out that a four-point tie-down system should be employed. According to Brown, if the trailer jackknifes or is involved in some emergency maneuver, one corner of the car can rise up when only two points are used. With this weight shift, the trailer will dip and something bad is going to happen. You may not have a choice as to what it might be.
With that knowledge in mind, I selected four six-foot axle tie-downs from the M&R catalog. The front two will go over the lower A-frames. Four D-rings are needed to attach these tie-downs. M&R also offers wheel bonnets, which are a good option, because they don’t require reaching so far under the car to attach.
Ramps
At the end of the trailer are two ramps for loading made from leftover purling. Each ramp is made as follows: Cut two pieces of purling at 33 inches and weld together like the trailer runners. On one end, weld a piece of 1-½-inch angle. This one is attached with the point out, somewhat like a very dull axe.
At the trailer end of the ramp, weld a piece of the same angle with the flange out and on top. Drill or torch two holes in this. Lay the ramp in place and drill corresponding holes in the channel, only larger. The slack is necessary due to the variable down-angle of the ramp. Weld ½x1-½-inch bolts into the ramp holes. These are the hooks that keep the ramp in place.
There is an alternative way to mount the ramps. On this trailer, they swing out and stay attached to the trailer. First, drill the outer hole all the way through both flanges of the channel. Now a seven-inch piece of all-thread rod can be put through the ramp and the channel. Presto, the ramp is permanently attached to the trailer. Lift the ramp and swing it in. Swing it out and it drops in place. When both ramps are in, a short chain holds the ramps together at the center. Notice in the photos there is a T-shaped bar at the center rear of the trailer. This is a rest for the ramps when tucked.
A Good Winch for a Long Pull
The money saved on the trailer was enough to afford one item I decided I couldn’t live without: a winch. Yes, this is an extra, but too many times there has been extra damage done to either the trailer or the car when a wrecker driver has to hurry to get the car loaded. Tiny clutches don’t like trailer loading either.
I selected a Superwinch Model S3500. It is not the largest winch they make, but it isn’t the smallest, either. If your winch is too small, it can give you a false sense of security. It can load the car when all four tires are round and black. For those times when one wheel points somewhat south of the direction of travel, you need a real winch.
According to Scott Davis of Superwinch, each layer of cable on the winch spool decreases the power by 10 percent. Use only as much cable as you need. Cut off and save the rest to replace a worn and frayed cable later. A nice touch is the 30-foot cable on the control switch. I can winch the car on and steer it at the same time, all by myself.
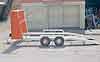
My new trailer will have to spend many of its nights outside. Since the Superwinch could be surreptitiously removed in the dark, thought was given to protecting it. A tube matching that of a trailer hitch receiver mount was welded to the trailer and a Superwinch receiver-mount kit was employed. The winch bolts to a plate attached to a tube. This, in turn, slides into a receiver-type trailer hitch. This type of mount will fit receiver-hitch mountings on many vehicles. Removing a pin allows easy detachment of the Superwinch, so it can be stored inside and even used elsewhere.
Lights and Wiring
As stated in Part 1, high, forward-mounted lights are my preference. They are mounted near the top of the tire rack. A simple light kit from the local auto supply does the job. But there is more wiring to be done.
The electric brakes need a wire, as does the winch. To operate the electric trailer brakes, it will be necessary to buy a controller. The hand-operated style will be cheaper. One that hooks into the tow vehicle’s hydraulic brakes is automatic and convenient, but more expensive. The choice of how much to spend is up to you.
I welded in a battery box at the front of the trailer. Since a wire must be run for the brakes, you might as well run two. One of these will attach to the positive battery post of the tow vehicle. It will then attach to the positive post of the trailer battery. This way the trailer battery will always be charged. The winch, of course, runs off the trailer battery even if the trailer is not attached to a vehicle. This battery can run the winch or be a spare for the race car.
The battery box was fabricated from a 10-inch piece of purling and some 1-½-inch angle. It was welded toward the front and low enough so as not to stick up above the trailer runners.
Wrapping Up
Having finished this project and used the Millermatic 185 for every part of it, I am impressed. In view of the price not being that much more than my old 110-volt unit and the aggravation associated with having a small welder, this should be part of every racer’s garage equipment. The Millermatic cable with the welding gun is long enough to reach to the other side of the trailer while building it, which means no more moving the welder from side to side when working on a bulky project. Millermatic recently replaced the 185 with the Millermatic 210, a 200-amp model. The pricing is about the same with even better performance.
Virgil Brown’s sage advice to tie the car down at all four corners was great. I have used M&R Products belts and nets in our race cars for years and have been very pleased with its intelligent service. The Superwinch is just that. Its portability makes it useable in so many ways and places. It is a first-class piece.
When loading your trailer make sure the car is placed so the tongue weight is at least 400 or more pounds. More is better if it doesn’t make your headlights aim for oncoming eyeballs. Two bathroom scales can be used for weighing the tongue. Lay a 2x4 board across them to spread the load, then add the two together.
It is never a bad idea to weld an identification number somewhere out of sight. In the past, this practice aided in the return of a “borrowed” trailer. Good luck with your project. I hope this helps you save a few dollars that you can spend on your race car.
E-mail Sleepy at: sleepy.gomez@prodigy.net