

Last month we explained how we corrected a goof. If you haven’t read the story, someone along the order chain assumed that all ’39 Chevrolets rode on the same front suspensions. They don’t, and as luck would have it the wrong crossmember showed up at Thun Field Rod & Custom. It turned out a blessing in disguise, for Marshall Woolery took what would’ve amounted to a repeat of the installation instructions and transformed it into an exercise in creative problem solving. He also revealed a few solid measuring and installation techniques along the way.
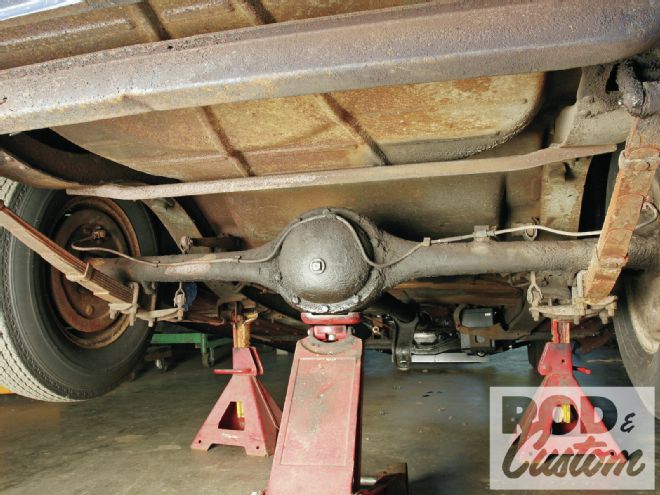 Chevrolet’s rear suspension looks like a more modern parallel leaf design, but looks can be deceiving. Oddly enough it costs less to simply change the entire design than to modify it.
Though the rear suspension was indeed correct for the car and installed per the instructions, we still weren’t deprived of the opportunity to exercise our problem-solving skills. The rear wheels sat too far forward in the wheel openings. Naturally we rushed to blame the kit, but a review of the photos of the car before we touched it revealed that Total Cost Involved had actually moved the wheels back by a bit.
We initially wondered why the company didn’t go all the way but concluded that Total Cost Involved may have been shrewd not to do so. I mean we’re assuming that our car wasn’t a total freak. Remember, manufacturing tolerances then weren’t as tight as they are now and axle locations were probably all over the board. In the kit’s case a little bit probably works best for the majority of installations. Ours just needed a little more.
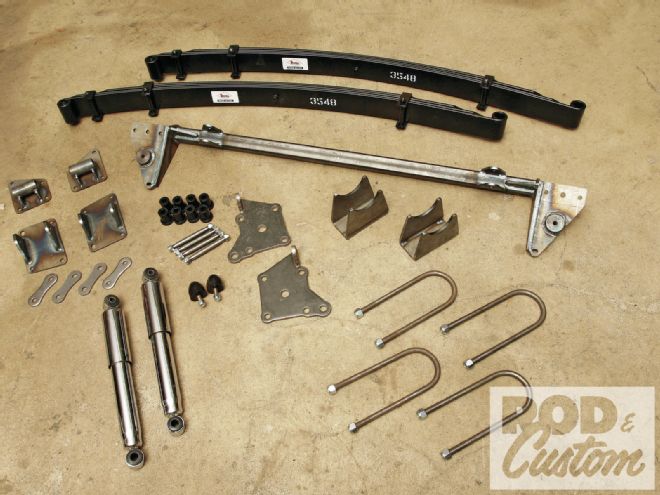 The Total Cost Involved kit includes wider springs that lower the car approximately 2 inches more than it would with fresh stock springs. Also included are new shocks, brackets, shackles, bushings, and snubbers.
The solution was indeed simple, but it didn’t go unquestioned. In fact after seeing what we put ourselves through, one person asked why we didn’t just modify the stock suspension to suit our needs. It’s a relevant question to ask about like-for-like conversions as these, but we had our reasons to switch rather than fight.
While the parallel leaf rear suspension Chevrolet employed on these cars largely resembles the designs on later cars, it isn’t without its peculiarities. For starters, their axles mount differently.
Most axles align directly over their spring’s center bolts. Not so with the torque-tube era Chevrolets. Their axles mount just behind the center bolts, a consequence of a hinge that prevents the axle and spring from binding. A conventional axle centered on those bolts will sit too far forward. Naturally, an axle’s mounting pads can be re-drilled to relocate the axle, but that doesn’t address the glaring shortcoming for our purposes: stance.
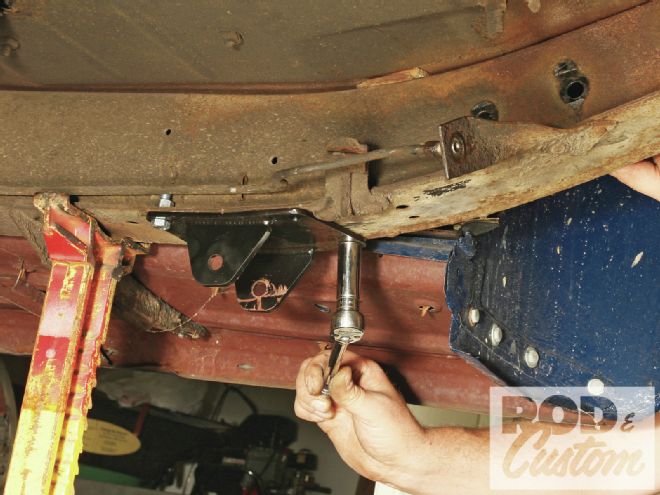 The brackets reference existing chassis holes for a straightforward installation. As with the front suspension, the rear chassis components make the most of the frame’s top-hat frame design by bolting to it.
These cars stood proud, a consequence of road conditions when FDR was in office. A pair of lowering blocks would correct the stance but that’s not without consequences either. By making the driveshaft control the rear axle’s torque reaction, Chevrolet could—and did—use narrower rear springs. The springs may prevent an open-driveline axle from deflecting under stock power, but modern power may be another story. Spacing the axle farther from the spring centerline with blocks only increases the leverage and as a consequence the deflection issue. That’s a lot to ask of a 70-plus-year-old spring. They fatigue over time, you know.
Custom-height springs solve the stance, bolt location, and age issues. And while they may control axle deflection during acceleration there remains one very big issue: cost. One-off springs aren’t cheap. In fact, springs alone are likely to cost more than the entire Total Cost Involved kit, an assembly that also provides modern tubular dampers, replaceable bushings, and all-new hardware. Despite having to center the wheels in the openings by a fraction of an inch we were still days and dollars ahead by using the kit rather than having springs made to fit the stock brackets.
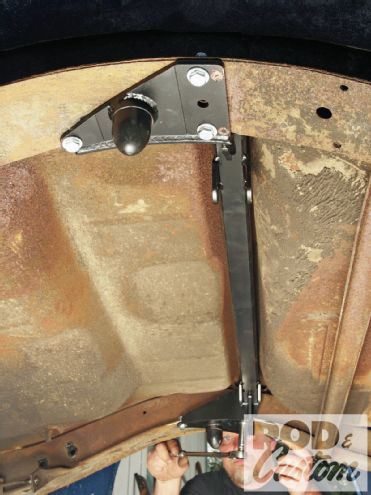 So too does the upper damper crossmember bolt in place. It is, however, a potential obstacle as the crossmember fits in a rather tight gap. Luckily the dampers still fit and the snubbers hit the axle close to centerline, despite the amount we moved the axle.
The kit revealed another benefit: time. Despite yik-yakking, futzing about with camera gear, installation, removal, modification, and installation a second time, the car rolled out of the shop—or at least it could have—by day’s end.
Every parallel leaf kit installation I’ve witnessed has surprised me in one way or another. This one did too, only it was a pleasant surprise: this kit not just lowers the car (not all kits follow through on that promise), it lowers the car to the point that the wheel radius matches the fender radius. Sure, we needed to reposition the axle to center the wheels in their houses but that proved pretty straightforward—certainly a lot more straightforward than trying to get the right stance with expensive custom springs.