In the world of functional components, there are a few classic designs that seem to take forever to outlive their usefulness. In April 1952, Boeing first flew the Stratofortress that would soon be best known by its service designation-the B-52. Now nearly six decades later, the bomber is still in service and flown by USAF pilots who are younger than the planes themselves, the last of which rolled off the assembly line in 1962.
In the world that revolves around GM, there is a similar-sounding disc brake system used from 1968 well into the '90s called the D52, which is the FMSI designation for its brake pad style. The caliper's large, single-piston, floating design qualifies it as perhaps the single most commonly used front brake caliper in GM history.
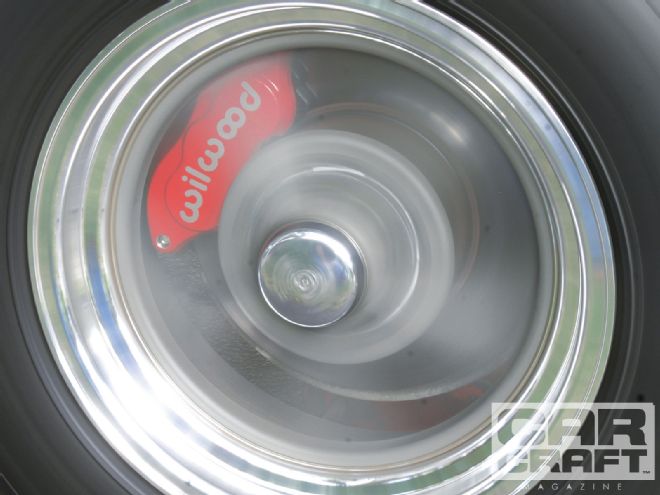
The D52 universal use also makes it a popular choice for early GM muscle car cultists as an inexpensive disc brake swap, since the parts can probably be found in Nigeria if necessary. But it is also this caliper's popularity that forces many car crafters to choose something a little different. That's why Wilwood designed the new aluminum D52 aluminum caliper. Intended as a simple bolt-on upgrade, the Wilwood caliper differs from the original design by packaging two, smaller, stainless steel pistons that generate the same overall piston area as the single piston. The advantage is that the pair of pistons offers a wider apply surface to the back of the pad (4.240 inches versus 2.850 inches), creating a more stable load on the pads. The new Wilwood caliper operates in a similar fashion as the original design by floating the caliper on two pins that pull the outside pad into the rotor with a near-similar load as the inboard pad. The load applied to both pads is improved with the superior rigidity of the forged (not cast) aluminum body. While all this should improve the overall feel and performance of this caliper conversion, it doesn't hurt that these calipers also look cool. We decided to try a set of red-powdercoated D52 calipers on our 455-powered '64 Olds F-85 that had previously been treated to an Original Parts Group, factory-style, '70 Chevelle disc brake conversion. Check out how this all went down.
The B-52's nickname is the BUFF: Big-Ugly Fat Fellow. There's a more colorful variation for the last F, but hey, there are children present.
The Bolt-On
The installation on our street-driven Olds F-85 couldn't have been easier. A couple of years ago, we bolted on an OPG disc brake conversion kit to which we had converted to a set of Performance Friction pads that definitely improved pedal feel and stopping distance as well. Bolting on these new Wilwood calipers is pretty simple.
Tech tip: Never return the utensils to the kitchen after you use them in the shop. Deny everything.
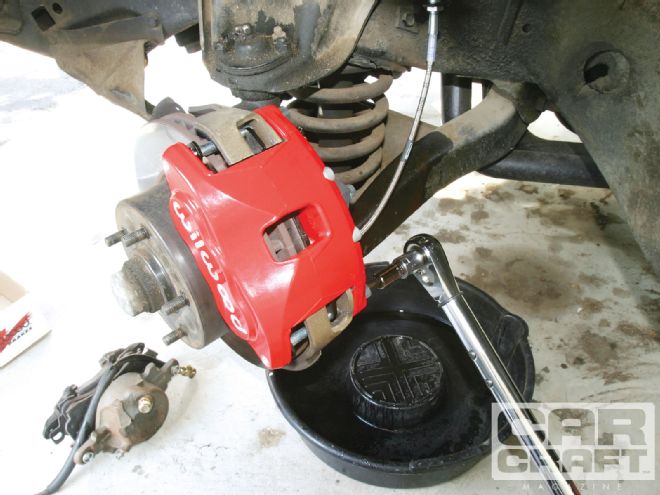 If the brakes have been on the vehicle for some time, this would be a great time to replace or machine the rotors and then repack the front wheel bearings. Our brakes had barely 5,000 miles on the conversion, so it wasn't necessary. We degreased the rotors with brake cleaner, popped the new pads in, dropped the assembly over the rotor, and torqued the caliper bolts to 35 ft-lb.
Bedding Pads
Few magazine stories on installing high-performance brake systems ever mention that new pads must be bedded properly beforehand to achieve maximum performance. Even normal driving may not achieve sufficient temperature to properly bed the pads. The procedure accomplishes this final heat cycle for the brake material. This is important for race cars, but track time is expensive, so Wilwood offers a service that will bed a set of pads. For street cars, however, this isn't necessary, as Wilwood publishes a very specific bedding process that we've included in the accompanying chart. What you do not want to do is bolt on a new set of pads and then immediately abuse the brakes in a competition situation such as a road course track day. Excessive heat applied too quickly can cause the pad material to crack or glaze, neither of which will produce optimal pad performance. This bedding process also allows the pads to transfer a small amount of material onto the rotor surface, which optimizes the coefficient of friction to the rotor. Allow 20 to 30 seconds between each step to stabilize the brake temperature.
Proportioning Valve Tuning
Whether you're adding disc bakes to a drum brake car or converting original discs to a larger or more modern front disc system, this changes the original factory balance between the front and rear brake systems. The change in brake balance is the main reason for always using an adjustable brake proportioning valve for the system. The most common type of brake proportioning (prop) valve for street cars is located in line with the rear brake hydraulic line. The valve is used to adjust the amount of hydraulic pressure applied to the rear brakes.
The goal for adjusting the prop valve is to achieve the most rear brake pressure that still prevents the rear brakes from locking up before the front brakes. This involves some amount of field testing, which must be done in a safe place away from all other traffic and large objects such as trees and guardrails so you can perform multiple and somewhat aggressive braking maneuvers with plenty of runoff space. Configure your car with at least half a tank of fuel and with the tires up to their rated pressures. The first step is to adjust the valve (usually counterclockwise but check with the manufacturer) to minimize the rear pressure. This may be more than necessary, but we need to achieve a safe starting point. Perform a mild braking test from 30 or 40 mph with sufficient brake effort to achieve impending front-brake lockup. The rear brakes should not have locked prematurely-before the front brakes. Turn in the valve two turns and perform the braking test again. Repeat the tests while increasing the rear brake pressure until the rear brakes lock up before the front brakes. At this point, return the adjustment to where the brakes did not lock up before the fronts. You will want to give the brakes a rest between these tests so as not to cook the pads or the fluid. As a final test, increase the speed to 60 mph and carefully perform a similar braking test. If the rear brakes lock before the fronts, immediately lift off the brake pedal. Adjust the prop valve to reduce the rear brake pressure.
Keep in mind that any drastic changes to the vehicle's weight distribution, tire diameters, brake rotor diameter, or tire quality will affect the brake balance. Even the difference of a half a tank to a near-empty tank of fuel can make the difference between premature rear lockup and optimum performance. It's worth the effort to perform this test carefully to get maximum performance out of your brake system.
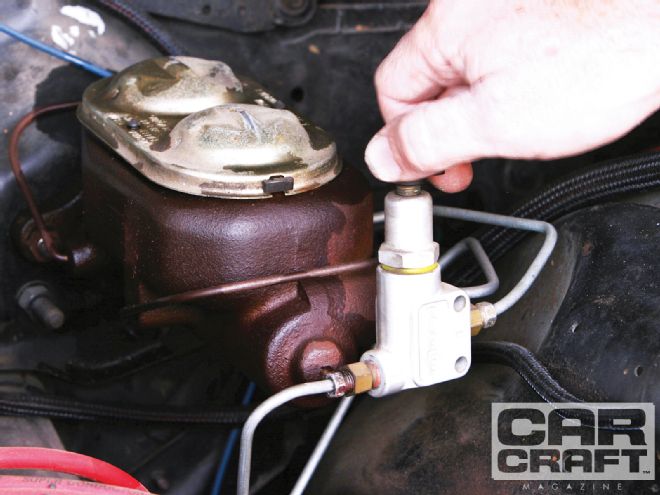 We mounted the prop valve next to the master cylinder, but we've also seen it located along the outside of the framerail directly below the driver's door to make minor changes easy -if you're into that kind of stuff.
Wilwood bedding procedure:
1) 8-10 stops from 30 mph to 15 mph
2) 8-10 stops from 45 mph to 30 mph
3) 8-10 stops from 55 mph to 25 mph
4) Moderate cruise rpm with minimal brake use
5) Park car until brake cools to ambient temperature
DESCRIPTION PN SOURCE PRICE Amsoil DOT 3 , 12 ounces BF3 Amsoil $6.40 Front disc conversion CH24821 OPG 529.95 Dorman brake hose H73242 Rock Auto 7.54 each Raybestos brake rotor 5100R Rock Auto 49.79 each Wilwood D52CB caliper 120-10937-RD Summit Racing 164.99 each Wilwood BP-10, D52 pads 150-8939K Summit Racing 52.94 Wilwood master cylinder, 7/8-inch 260-9439 Summit Racing 199.95 Wilwood prop valve 260-8419 Summit Racing 41.94 Wilwood DOT 3, 12 ounces 290-0632 Summit Racing 9.95 Russell flexible brake lines 692080 Summit Racing 64.88 Dorman 7/16x20 banjo bolt 13935 Summit Racing 5.99 each