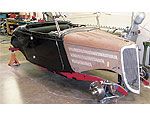
Although street rods are often an expression of the owner/builder's individuality, the fact is many are based on a similar formula when it comes to the chassis. Take the '34 Ford roadster shown here as an example. It's based on a stock frame with a Total Cost Involved independent suspension up front. In the rear are standard issue components, one Currie 9-inch with Ford Explorer disc brakes, two coilovers, and four-bars. If not revolutionary, it's certainly a tried and true combination.
Normally with the previously described rear suspension arrangement there would be one more piece of linkage. While four-bars locate the rearend housing fore and aft, unless the triangulated style is used, they do nothing to control side-to-side movement. In most cases, a device called a Panhard bar connects to the chassis on one end and the axlehousing on the other. Simple and effective, a Panhard bar keeps the chassis centered over the rearend--sort of. The sort of comes from the fact that, as the suspension compresses and rebounds, the end of the Panhard bar moves in a slight arc, which means the back of the car has a minor wiggle as it works up and down. In most cases, the small amount of movement isn't objectionable, but there is a way to eliminate it completely with something called a Watt's linkage.
A Watt's linkage uses a rocker attached to the axlehousing with a pair of bars, one that attaches to each framerail. As the axlehousing moves up and down, the rocker pivots to compensate for the arc the bars travel in. The end result is the rearend stays centered as it moves up and down. A Watt's linkage is relatively easy to build: a pair of urethane bushed links, a rocker, and some brackets and you're in business. There are also several aftermarket companies building Watt's linkage kits for performance cars, notably 5.0 Mustangs, which could be adapted. Then there's the example shown here; it came off an Australian Falcon. During a trip Down Under, we spotted one in use on a chassis being built by Larry O'Toole (editor/publisher of Australian Street Rodder). We picked up a pair at an Aussie wrecking yard for $30, and while it did take some explanation to the customs inspectors, they came home in our luggage.
To bring our '34 to a stop, we opted for Explorer disc brakes on a Currie 9-inch. Affordable and effective, the Explorer package is an option on Currie rearends. We like these brakes for a number of reasons, chief among them is the fact that they use all OEM parts, which means rebuild kits, pads, rotors, and so on are readily available at most parts houses and dealerships. The built-in parking brakes are a plus, and these brakes practically bolt on. The key word is practically.
As supplied by Currie, the Explorer brake kits feature all new parts, including 11-inch solid rotors (with wheel bolt patterns up to 6 on 5 1/2-inch bolt circles), single-piston calipers with pads, and backing plate/caliper mounting bracket plates with the drum-style parking brake assembly installed. And the amazing part is the whole deal retails for under $400.
While the Explorer brakes are a great buy, there are some limitations to their use. These brakes were never used on 9-inch rearends and, although they will bolt onto some housings, there are other issues. This kit will only fit properly on rearends equipped with late-model Torino-style large bearing housing ends and aftermarket axles with a 2.500-inch brake space offset (the distance between the mounting flange on housing and the axle flange). It's important to note that this combination of housing ends and brake spacing was never used by Ford so custom components are required. The simple solution for us was to order a rearend from Currie with the correct housing ends and axles, but we still ran into a snag with our particular installation. With the wheel and tire combination we opted for, coupled with the low stance we were after, clearance problems cropped up. The calipers hit the frame on full suspension compression, but fortunately the solution was simple.
In the original configuration, the calipers are positioned slightly above the centerline of the axle. We found that by swapping the mounting plates side for side, the calipers were lowered enough to provide plenty of frame clearance. True, the emergency brake assemblies are now upside down, but they don't know the difference (and it actually makes hooking up the cables easier). From an operational standpoint, there isn't any impact with the calipers mounted low, particularly since the bleeder screws are above the brake line inlets so evacuating the air from the system won't be a problem. (We ran all this by race car brake expert extraordinaire Warren Gilliland, aka the Brake Man, and received his blessing.) Best of all, it meant we didn't have to notch or modify the framerails.
What we've done here isn't all that unique or complicated; it's just part of building a street rod our way. We elected to use a Watt's linkage just because it seemed like a good idea and we'd never done it before. We moved the brake calipers because it was easier than modifying the framerails and it allowed us to set the ride height where we wanted it and still have plenty of suspension travel. Sometimes doing things differently is better, other times it's necessary--and occasionally it's both.