
Ignition problems can be infuriating. They always seem to pop up at the worst time and because they are hard to visually spot they can be difficult to find the source and correct. Adding to the problem is the fact that high compression, high revving racing engines require a strong, hot spark to reliably combust the air/fuel charge and any weaknesses in your ignition system can easily result in a misfire.
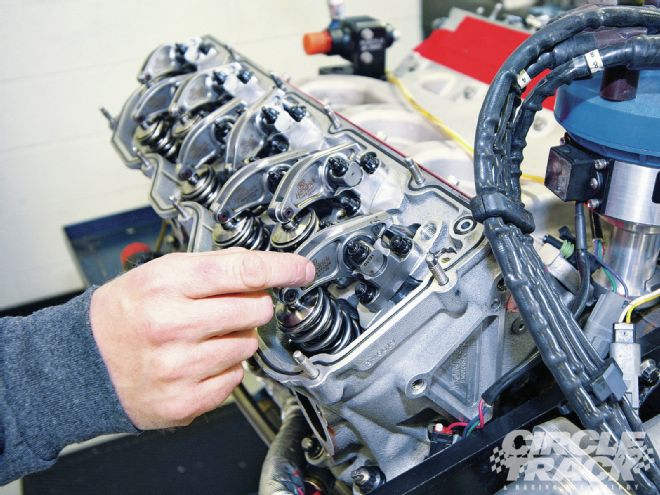 When setting up your distributor before firing the engine the first time, you have to make sure the cylinder you are timing off of is on its compression stroke. It can be easy to confuse it for the induction stroke, but that mistake throws the timing way off. One way to check is to pull the valvecover and check that there is lash on both the intake and exhaust valves. If you are on the induction stroke the intake will either be open or not have any lash.
There is more to a properly set up ignition system than dropping in the distributor and snapping on the plug wires. This month we'll take a look at special precautions and steps you can take to ensure your distributor and ignition system are performing at peak efficiency.
Gear Engagement
The first step is to get the distributor properly installed, but first make sure you have the correct distributor gear to go with the camshaft you are using. If you're using a cast camshaft, a cast-iron distributor gear will work well. A brass gear will also do fine. But a cast distributor gear with a steel camshaft—like you will often use in aggressive roller cam applications—will lead to excessive wear. Any time you are running a steel camshaft, it's always a good idea to make sure the distributor is equipped with either a brass gear or the less common composite gear.
In a properly built race engine, a brass distributor gear should last at least a full season of racing. It may last even longer; just make sure to check it whenever you are rebuilding or refreshing the engine. Although it may not be obvious at first, in a wet sump engine a thicker oil will often cause the gear to wear more quickly than a thinner motor oil. This isn't because of the oil's ability to lubricate the gear as the teeth mesh with the cam gear, but because the thicker oil causes more resistance for the oil pump. Because the end of the distributor shaft engages with the oil pump to power it, this extra resistance can cause extra wear on the gear teeth.
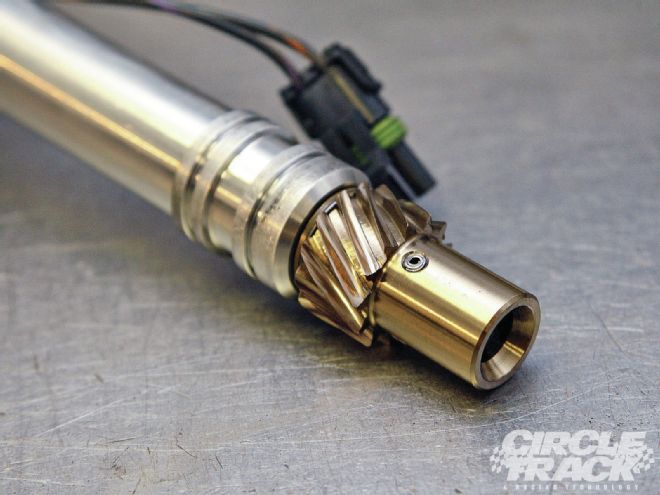
 Many high end distributors, such as this unit from MSD, feature a moveable collar which helps you dial in the correct engagement between the distributor gear and the drive gear on the camshaft. This is an extreme example, but a good one nevertheless. Notice how worn the brass distributor gear is on this unit. Although it’s way past time that this gear should be swapped out, it still did its job. The brass gear is designed to sacrifice itself instead of wearing the drive gear on the camshaft. This brass gear can be swapped out quickly and without much cost, meanwhile the drive gear on the much more expensive steel camshaft is still in good shape.
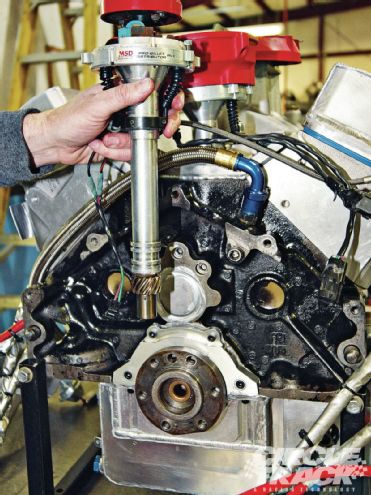
When installing the distributor in the engine, you should also make sure the gear properly engages with the cam gear. There must be a small amount of play between the distributor and cam gears. To test this, once the distributor is in place, with the cap removed, place your hand on the rotor and see if you can move the entire distributor shaft up and down just a bit. If it doesn't move, that means the distributor shaft is likely bottomed out on either the cam gear or the oil pump driveshaft. You can adjust this by using spacers between the distributor collar and the mounting flange on the engine. Some distributors can also be ordered with a moveable collar that's adjustable for height.
Right Way Wiring
MSD ignition systems have been one of the most popular in racing for years because they work well and provide multiple sparks each firing cycle to make sure the air/fuel charge ignites. MSD's ubiquitous 6AL ignition box is practically an icon among circle track racers, but there is a common problem among racers that attempt to modify the system.
With a stock MSD ignition system using a 6AL box, the plugs connecting the distributor to the ignition box can't be plugged in backwards. Many racers, however, replace the standard plug between the distributor and the 6AL box with a waterproof Weather Pack-style plug which is more protective from both water and track dirt. Unfortunately, the wiring is easily confused and it's actually quite easy to get them reversed when re-wiring to the Weather Pack connectors.
There are two black wires extending from the distributor; one with an orange stripe and one with a purple stripe. They connect to the two wires that lead to the ignition box, but they aren't marked the same way. Instead, these are green and violet. (It just looks like a slightly different shade of purple.) When connected correctly, the orange-striped wire connects to the violet wire and the purple-striped wire connects to the green wire. As you can guess, if you aren't paying attention when clipping the wires from the stock connectors, it can be easy to mistakenly think that the wire with the purple stripe connects to the "purple" wire on the other ends.
 Many high end distributors, such as this unit from MSD, feature a moveable collar which helps you dial in the correct engagement between the distributor gear and the drive gear on the camshaft. This is an extreme example, but a good one nevertheless. Notice how worn the brass distributor gear is on this unit. Although it’s way past time that this gear should be swapped out, it still did its job. The brass gear is designed to sacrifice itself instead of wearing the drive gear on the camshaft. This brass gear can be swapped out quickly and without much cost, meanwhile the drive gear on the much more expensive steel camshaft is still in good shape.
But if this happens it causes problems with the system, actually advancing the proper timing by 30 degrees or more. Normally, the ignition doesn't send power to the spark plug until the trailing edge of the reluctor in the distributor cap leaves the sensor. When the wires are hooked up backwards, the system fires the spark plug when the leading edge of the reluctor reaches the sensor. The difference in width from the rear of the reluctor to the leading edge is about 15 degrees at the distributor.
That may not sound bad, but remember, because the distributor spins half as fast as the crankshaft the actual advance in timing is around 30 degrees. When the combustion process is kicked off by the spark plug firing so early you wind up with a huge spike in cylinder pressure while the piston is still trying to move up the cylinder bore. It results in big-time detonation and if it isn't caught quickly it almost always ends up with engine damage.
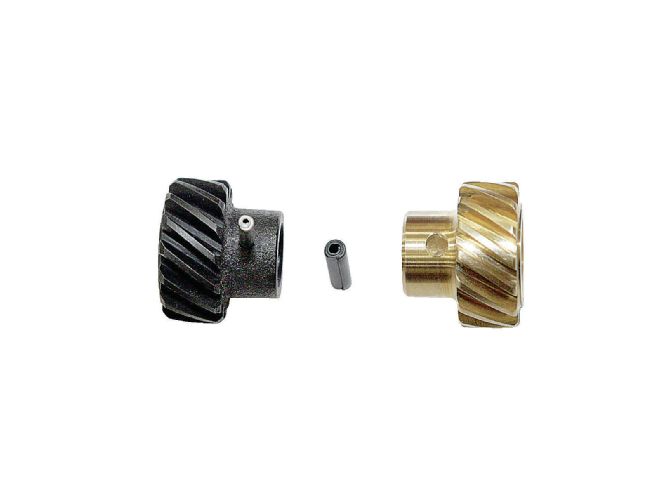 The cast distributor gear on the left is good when used with cast camshafts (normally found in flat tappet, low lift valvetrains). But if you’re using a steel camshaft, you will need to swap it out for a brass gear like you see on the right to prevent premature wear. These also happen to be for a Ford distributor which uses a small roll pin to hold the gear to the distributor shaft. While swapping them out, it’s also a good idea to drill out the hole in the distributor shaft to take a beefier roll pin (center) which is used in Chevrolet distributors. This reduces the chances of the roll pin shearing off and leaving you without spark (or a functioning oil pump).
When the wires are reversed it's possible to retard the timing through the distributor enough to get it back where it was originally supposed to be, but it still won't be as good as if everything is wired correctly. By retarding the timing manually by turning the distributor housing everything will look OK with the timing light, but the rotor phasing will still be off. The reluctor is still firing the ignition when the leading edge reaches the sensor. This creates a larger gap that the spark has to cross and you wind up with less power reaching the spark plug—and it normally shows up as a mysterious high-speed miss that gets blamed on the engine builder.
What About HEI?
While a capacitive ignition system like the MSD with a 6AL box is popular in high end racing classes, many Street Stock-level classes require a stock-style ignition system. In almost every case, this means an HEI ignition where the coil and "brains" are all contained within the distributor. Stock HEIs can rarely handle the stresses of racing, but companies such as Performance Distributors have produced racing-specific HEI ignitions that use an upgraded coil and module capable of powering a racing engine to 8,500 rpm and beyond.
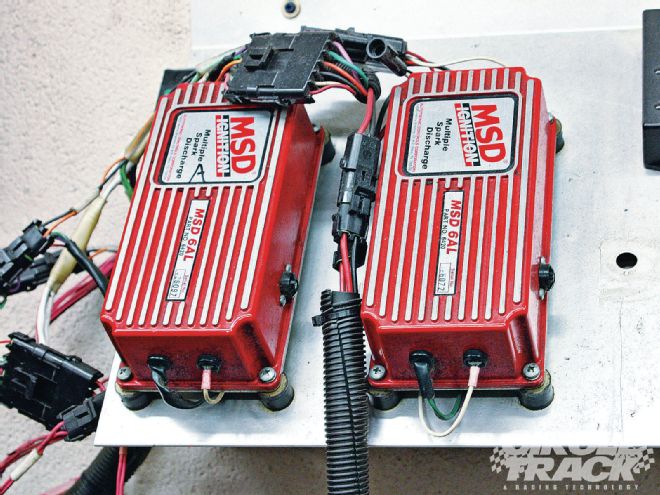 These MSD 6AL boxes are mounted to the wall in an engine dyno cell, but the same concept holds true in your race car. MSD’s “brain boxes” have been known to work flawlessly for years without problems, but it is always a good idea to isolate them from the vibrations your race car produces by using the rubber mounting pads.
An HEI is an inductive discharge system, which means the coil is the sole source of energy storage until the energy is released to fire the spark plug. A performance coil, such as the one Performance Distributors uses in its high-performance DUI line of ignitions, features updated materials and windings that offer less resistance to the electrical charge. This means the coil charges faster and transfers more of that energy to the spark plugs. More energy at the plugs means you can open up the spark plug gaps to help with power production in high-compression, high-rpm race motors.
Fire it Up
Once the distributor gear and all the wiring is checked, actually installing the distributor and setting the timing is the easiest part of the deal. First, spin the engine until the No. 1 cylinder is at approximately your timing mark on the compression stroke. If you don't know where your optimum timing should be for maximum power, a good rule of thumb is 30 to 32 degrees advanced for Ford N-style heads (N351 is a popular head for Late Model Stock classes) and 38 to 39 degrees advanced for Chevy 23-degree heads. As a rule, the more efficient the combustion chamber design, the less timing you need.
There are two easy ways to make sure the cylinder you are checking is on the compression stroke. You can pull the valve cover and see if you can wiggle both the intake and exhaust rocker arms. This means there is no pressure on the rocker arms and the valves are closed. An even easier method is to pull the spark plug for that cylinder and plug the hole with your finger. Don't stick your finger all the way into the combustion chamber, especially if you are bumping the starter to turn the engine over! As you turn over the engine and the piston comes up, you should be able to feel pressure building against your finger.
 This is the stock connector for an MSD ignition between the distributor and the 6AL box. Notice that the black-and-purple wire connects to the green wire and not the purple (technically “violet”) wire as you might expect. This isn’t a problem if you never change the connectors as they won’t allow you to plug them together backwards, but if you swap these connectors for Weather Packs make sure that you get this right. Reversing the wires will advance your timing up to 30 degrees or more, causing detonation.
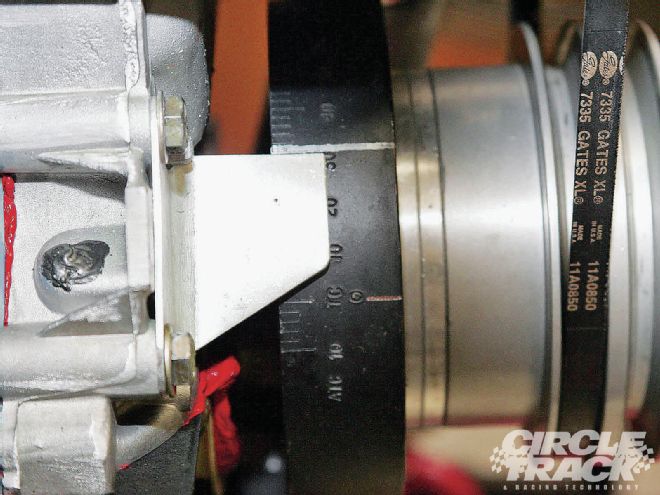
Once you know you're on the compression stroke, remember to set the timing mark where you want the plug to fire, not at cylinder TDC. Check your timing with the pointer against the timing scale on the harmonic balancer. It only needs to be close right now; you can fine-tune it with the timing light later.
Next, you're ready to prime the oil pump. There are special shafts available that allow you to spin up the oil pump with an electric drill. Remember, Fords and Chevys spin the distributor in opposite directions. If you're priming a Ford motor the drill needs to spin counter-clockwise. On a Chevy it needs to spin clockwise. Don't depend on the assembly lube your engine builder used to protect the bearings and valvetrain on initial start-up. If you don't prime the oiling system, it can take several seconds or sometimes up to a minute for the oil pump to fully pressurize the engine all the way up to the cylinder heads. In that time a lot of damage can be done. Spin the pump until the oil pressure gauge begins registering pressure and then keep going for five full minutes. It may seem like a long time but this is one of those cases when it definitely is better to be safe than sorry.
Now you're ready to install the distributor. Grease the gear with a high-pressure lubricant or lithium grease. Install the distributor in place with the rotor pointed in the spot you want the No. 1 terminal to be (generally, that's as close as you can get it to the plug). Now, install the cap and wires, and remember which terminal the rotor is pointing to. Know your firing order; the distributor fires sequentially (counter-clockwise for Ford, clockwise for Chevy) but you have to know in what order the cylinders fire. With that done, you are ready to fire the engine.
 A rookie mistake when cranking the engine for the first time is to mistakenly set the ignition to fire at TDC, or zero degrees advance. Instead, set your timing pointer for the amount of advance you expect the engine to run (30 is usually a good safe number if you are looking for a starting point) and then install your distributor.
If the engine is running smoothly, that's a good sign you have all the plugs firing in the correct order and you can move on to fine-tuning the timing. Plug in your timing light and make sure it's connected to the No. 1 plug wire. By shining the light on the timing pointer and reading the scale on the side of the harmonic balancer, you can tell exactly where your timing is. Advance or retard the timing by turning the distributor housing. Once you have it where you want it, tighten down the hold-down clip. If you're running an advance mechanism, make sure you check the timing with the engine rpm at a level where the timing is fully advanced.
Now you're set. If your engine is on a dyno, you can make several pulls with different amounts of timing to determine what your engine likes best. If the engine is already in your race car, you can do the same thing at the track with your stopwatch. Just remember not to advance the timing so much that the engine starts detonating.