
At Circle Track, we're all about doing it yourself when it comes to working on your race car. You can save a buck, it's fun, and hopefully, when done right, doing your own work and knowing its done right can give you a leg up on the competition.
 When bolting together a Street Stock engine, or even performing a rebuild, there's a lot to think about. Here are a few tips to avoid mistakes that inexperienced builders can easily make.
Lots of racers have the fabrication skills to make practically anything when it comes to the chassis, body, and suspension, but few are comfortable tearing into their race engines. It's true that some aspects of race engine building that require specialized tools are best left to the professionals. But there's a lot that you can do yourself, especially if you are running a Street Stock-level class that requires stock, or stock replacement, components.
Even if building your own Street Stock engine from a bare block-including all the machining processes-is beyond your capabilities, a rebuild probably isn't. With a rebuild, you already have your parts recipe, including the critical cam grind, so that isn't an issue. You may also need to take the block and heads to a machinist to be checked out. But putting everything back together isn't that big of a deal. You may also be upgrading a stock engine with rotating assembly package-crank, rods, pistons, bearings, and rings-from a speed shop like many of the advertisers in this magazine.
This topic came up recently in a bench racing session with brothers Ken and Kevin Troutman of KT Engine Development. As professional engine builders, they've seen it all. And to help you out, they've come up with a handful of useful tips that we think can be helpful when building-or rebuilding-your own race engine.
 This is a brand-new rod, and the housing bore measured perfectly round right out of the box. All that's been done to it so far is to unbolt and remove the cap, and then bolt it back up (to de-stress it). The dial indicator has already been zeroed out to the correct bore size, and it is dead on measuring along the axis of the rod beam. But, as you can see, it's 0.0004 tight along the parting line.
Obviously, this isn't everything you need to know to hang out a shingle and open your own engine-building business. In fact, this isn't even the basics. Instead, we've tried to offer some advice to help you avoid the pitfalls that most often trap beginning engine builders. Race engine building is all about minding the details, because more often than not it's the missed details that require expensive repairs. So here are a few details that can help you avoid the dreaded phrase, "I don't know what happened, the engine just died."
1. De-Stress Your Connecting Rods
Lots of racers who have never even built an engine know that one of the most important aspects of the process is getting the right clearance between the rod and main journals and the bearings. But a large component of that, when it comes to fitting the rod bearings, is making sure the housing bore on the big end of the rod is sized correctly.
This can be a bit tricky, because most rod manufacturers will send you a set of rods that measure up correctly. For example, for a standard Chevy small-block, the rod journal on the crank is 2.100 inches. For that journal, the correct size of the rod's housing bore (this is the diameter of the big end of the rod without the bearing installed) is 2.225 inches. You may measure the housing bore diameter of a new set of rods, get the correct size and think they are ready to go into your engine-but there is a catch.
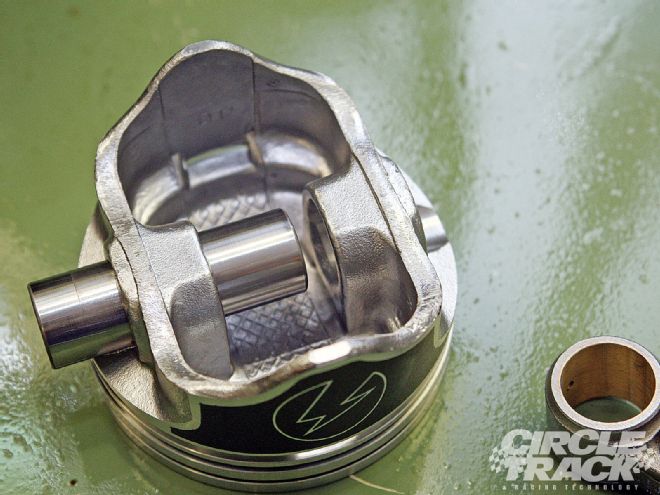 Sometimes you will notice the wristpin inserts into the first of the piston's pin towers easily but catches before going into the other side. This is a sign that the pin bores in the piston's pin towers may not be perfectly aligned.
Honing the rods to size causes a lot of stress on the rod material. A lot of this stress can be relieved by unbolting the rod cap, removing it and then bolting it back up, but some connecting rod manufacturers do not do this step. So the very first step you should take after unboxing a new set of connecting rods is to unbolt and remove the caps and then reinstall them to the proper torque spec (or stretching the rod bolts to approximately 0.0055-inch).
Now measure them again. If the rods haven't been stress relieved during the honing process from the factory, they will sometimes pull tighter along the parting lines when bolted back together. This means the diameter of the housing bore will be smaller by as much as 0.0005 along the line where the rod and the cap connect. It doesn't sound like much, but that will in turn squeeze the bearing just a little tighter along the parting line and increase your chances of getting a spun bearing.
 This is a quick and easy test to see if your rod bearing may contact the crank fillet. Notice how the cheek of the rod hits the side of the crank before the bearing begins riding up on the fillet (the rounded portion at the edge of the journal). It's close here, but technically OK.
If this is the case, you will need to have your engine machinist re-hone the rods. Most engine builders do this as a matter of course with every new set of rods, so it's always a good thing to at least check.
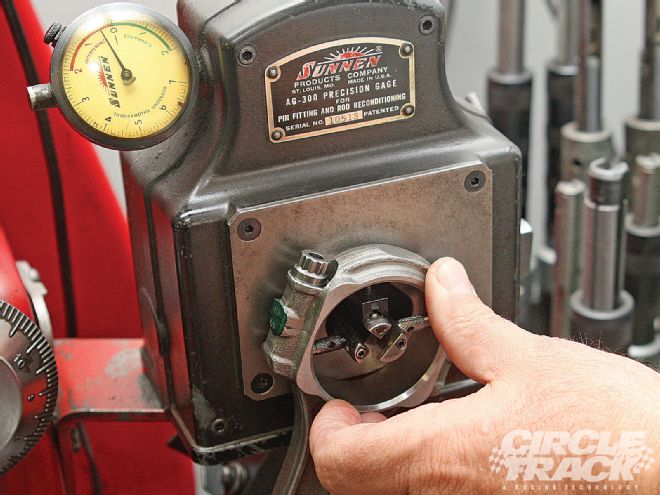
2. Size the Pins
Like checking the housing bore size on the connecting rods, this tip will likely require a little help from your friendly neighborhood machinist, but you can at least do the measurements yourself with a micrometer and dial bore gauge to check if any machining will be necessary.
There is no bearing between the wristpin and either the pin bore in the rod or the piston, so the bore in both the rod and piston must be a perfect fit. Piston and rod manufacturers often leave the pin bores a little tight because engine builders almost always want to ensure the tolerances are correct by honing them themselves.
Most aftermarket connecting rods and pistons are designed to use a Chevy-sized 0.927-inch wristpin. Clearance between the wristpin o.d. and both the piston and rod i.d. should be between 0.001- and 0.0015-inch. Measure to make sure this is right or else send your components to a machinist for honing.
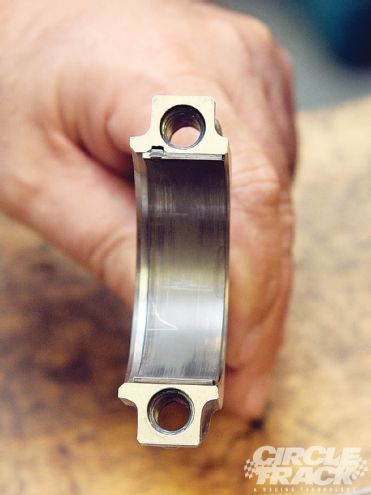 This is a high-end competition rod bearing. It is narrower from the factory in order to work with cranks that have more fillet area. Notice how it is pulled back from the edge (the left side) of the rod.
Also, even if the bores in the piston's pin towers measure out right, never assume they are straight. The test for this is relatively straightforward. Insert the wristpin in the bore in one pin tower and see how easily it spins. Now slide the pin so that it extends into both pin towers. Sometimes, you can feel the wristpin catch as it enters the second pin tower. Also, if it's more difficult to spin when it's in both towers versus a single tower, that's a good sign the pin bores aren't correctly aligned and additional honing might be required.
3. Check Rod Bearing Width
Lots of performance crankshafts are made with a larger radius fillet at the edges of the journals. A larger fillet puts just a little more material between the journal and the arm of the crank, which helps strengthen the crank. This usually isn't a problem if you are using higher-quality rod bearings because they are normally cut narrower for just this reason. But cheaper rebuild kits often include stock bearings that are wider.
You can normally spot a stock-spec rod bearing because it is made from aluminum and has no babbitt, giving it a silver finish on the face. This wider bearing is more likely to ride up on the radius of the crank journal and damage both the crank and the bearing.
To check for this, install two rods-with bearings-on a rod journal and check the side clearance using a feeler gauge. You should have between 0.008 and 0.015 clearance, but when checking your side clearance check to see what's actually making contact with the side of the crank. Ideally, the cheek of the rod should hit the crank first. You won't be able to see if the bearing is riding up on the crank fillet, but you will know it if you push the rod up against the side of the crank journal and it stops before the cheek of the rod contacts anything.
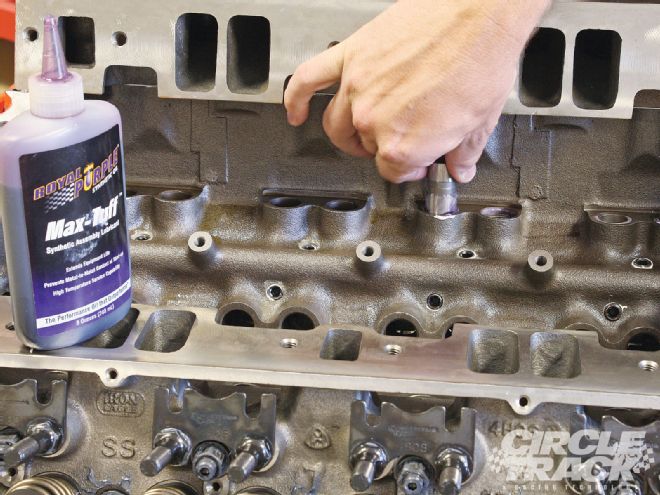 Take a moment to measure all of your lifter diameters with a micrometer before installing them in your engine. A lifter that is only 0.0005-inch too large can cause major damage.
If you realize you have an issue with the rod bearings contacting the crank fillet, you have two options. The first is to purchase a narrower set of rod bearings. Look for a set of high-grade performance bearings. Or, if you want to keep the set of bearings you have, you can use a bearing scraper to cut a chamfer into the outside edges.
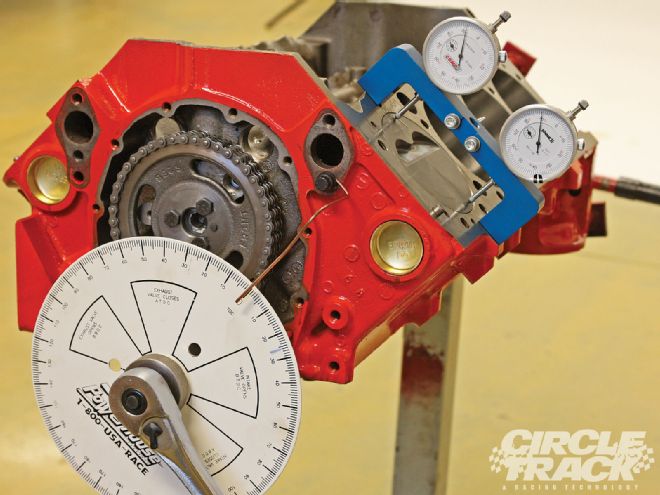
4. Check for Valve Control
If you are performing an engine rebuild and your engine is equipped with roller-tipped rocker arms, there is an easy check to make sure your valvetrain is staying under control. Unlike flat tappet lifters which are designed to spin, valves should not. If the valves are spinning, that's a sign that they are bouncing off the seat instead of closing securely on the valve seat. Valve bounce will not only damage both the valve and the seat, but it also kills power by bleeding off compression.
When rebuilding your motor, check the valve stem tips for signs of valve bounce. If the valve is staying under control, it won't spin so the rocker tip will leave a mark in a straight line across the top. If the valve is bouncing on the seat, the spinning motion that it creates will cause the rocker tip to leave a star pattern on the tip of the stem.
If you notice a star pattern on the end of the valve stem, you will know you've got valvetrain issues. At minimum, check the valve and seats in the cylinder heads for damage. You probably will also need to go with stiffer springs, reduce your rocker ratio, switch to a milder cam or do something else to protect your valves the next time around.
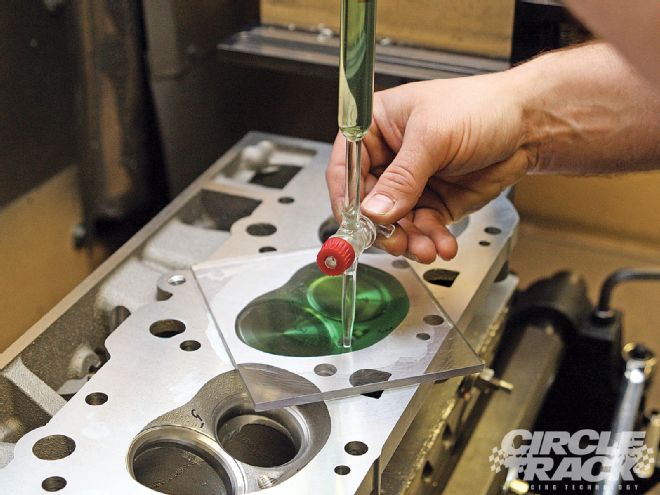 Ensuring you have the correct combustion chamber volume is a critical step in any race engine build. You can have your engine machinist do this for you, but the ability to do it yourself will definitely come in handy as you continue to work on engines.
5. Avoid Sticky Lifters
It's a fact of life that more and more engine components are being produced offshore. It would be nice to buy all American, but sometimes budgets just don't allow it. You can save some money by using foreign-made engine components, but you also have to be aware that the quality often isn't to the same standard.
Lifters are one component you might think you can take out of the box, wash off and throw into the engine, but they too require a more thorough check than that-especially if you are trying to save some money with a cheaper brand. A Chevy small-block lifter is 0.842-inch in diameter and requires between 0.0018 and 0.0022 clearance inside the bore. If you happen to get one "rogue" lifter that's too large it can stick in the bore, and that's never a good thing.
A lifter is most likely to stick if the engine is brought up to temp before hitting the track, but it can happen no matter how many precautions you take if there isn't enough clearance between the lifter and the lifter bore in the block. If the lifter sticks in the bottom of the bore, it will tear up the corresponding camshaft lobe and send shards of metal through the engine. If it sticks in the top of the bore, it will force the valve open and the next time the piston approaches the top of the bore the valve and piston will be introduced in a manner that was never intended. If you are lucky, it will just bend the valve before you shut down the engine. But if the head of the valve breaks off you can have some serious damage before the driver is able to hit the kill switch.
6. Check Your Volumes
If you are running a set of old heads-which lots of Pure Stock racers are forced to do-you have to make sure you know whether they've been modified. Your engine machinist can do this for you, but if you can invest in the equipment, it's a great idea to do yourself. After all, if you find yourself and your car in the tech shed, you are the one responsible for everything the inspector finds.
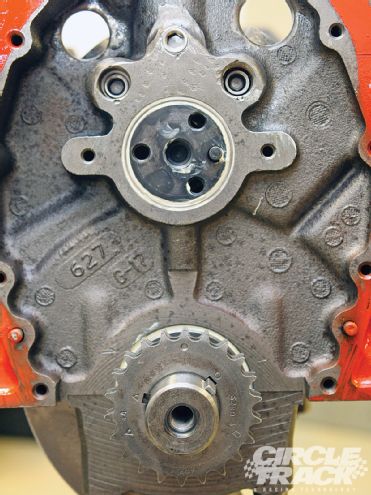 Clearancing your stock Chevy block for a double-row timing chain requires removing only a little material around the oil gallery plug bosses.
Checking the combustion chamber volume in your cylinder heads will allow you to dial in the exact compression ratio you want for your engine. Also, if your track has a compression rule, or a minimum chamber size rule, your ability to accurately measure chamber volumes can help you get right up to the line for maximum power without breaking the rules.
A kit for checking chamber volumes is available from Powerhouse Tools as well as lots of other sources. Hobby level kits are inexpensive, easy to use, and accurate. And they can help you get a leg up on the competition.
7. Timing Chain Clearance
This one is Chevy-specific, but since the vast majority of racers in the Street Stock levels are running Chevy small-blocks, we decided to go with it. Stock engines use a single-width timing chain, but for improved durability and timing stability most racers prefer to use a double timing chain setup (the chain is two links wide). This upgrade is so valuable in terms of helping engines stay together and endure the abuse of racing that double-row timing chain sets are legal almost everywhere.
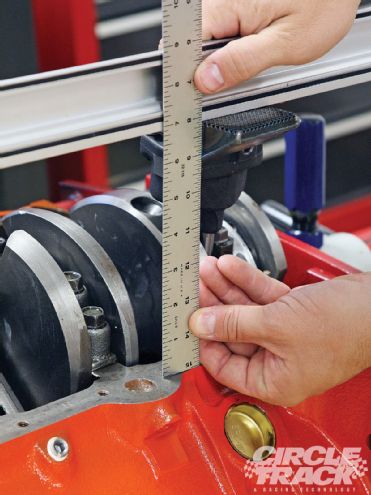 Measuring the height from the oil pan rail on the block to the bottom of the oil-pump pickup is easy with a straightedge and ruler.
The problem that comes into play is that stock Chevy blocks don't have the clearance for such a setup. It's close, but if a double-row chain setup is installed in a stock block, you can almost guarantee the back of the chain will rub on the block, which drastically increases the chance of breakage.
The solution is simple: get a die grinder and slowly cut away the material (mostly the top edge of the boss for the upper oil gallery) until your double-row timing chain will fit in place without contacting the block. Obviously, it's best to do this step before you are at final assembly in order to keep metal shavings out of your engine.
8. Watch the Pickup
In most cases, whenever you purchase a racing oil pan, the manufacturer also offers a pickup designed expressly to work with it.
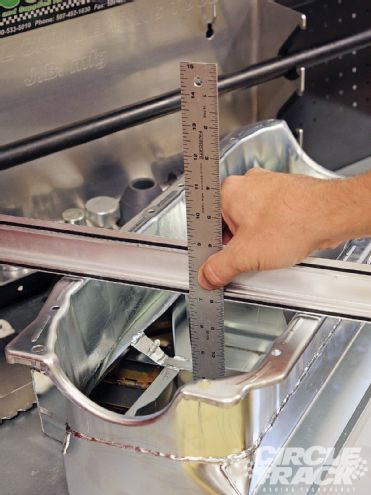 You can use the same method to determine the distance to the bottom of the sump. This distance should be 1/4- to 1/8-inch longer than the distance between the pan rail and the oil-pump pickup to ensure proper clearance.
But just because you can get an oil-pump pickup that's made for your oil pan, that doesn't mean you can just bolt it up and go. In order to work correctly, the bottom of the oil-pump pickup (the oil inlet) should be between 1/4- to 3/8-inch off the floor of the oil pan. Any less clearance and you run the risk of the pan pulling up and blocking off the inlet, any more and you can potentially have oil slosh away from the pickup and introduce air into the system-definitely a bearing destroyer.
You can check the distance by installing the pickup into the oil pump and the oil pump on the block. Lay a straightedge level across the bottom of the pickup and measure from the straightedge to the oil pan rail on the block in a line perpendicular to the oil pan rail. Now lay the same straightedge across the oil pan in the area where the pickup will be and measure from the edge of the straightedge straight down to the bottom of the sump of the oil pan. Add 1/8-inch for the oil pan gasket to this measurement.
If the measurement to the bottom of the oil pan is between 1/4- to 1/8-inch greater than your measurement between the pickup and the oil pan rail, you are good to go. If not, you will need to adjust the pickup location and try again until you get the clearance you are looking for.
Well, there you have it-eight engine rebuild tips for the DIY racer.