Our plan this month was to build a reliable pump gas street/strip motor centered on the new Enginequest EQ 23 50cc iron heads. These heads target "claimer" race classes that must use as-cast iron heads, but in doing so, Enginequest has provided an unmitigated horsepower windfall for budget-oriented street guys. In this case, the "as-cast" tag is almost a misnomer. The cast finish is so smooth that it emulates the surface finish of an 80-grit emery roll. Translation: The EQ 23 is cast at the factory into a hand-ported shape. With the promise of strong output and low cost (under $250 each, bare), a truly budget bolt-together 350 becomes a reality.
As far an engine building expertise goes, this build was done by UNCC student Dusty Kennet, and it's his fourth engine build, so other than attention to detail, you could duplicate this in your own garage. You'll need some tools, but a little innovation on your part will keep that to a minimum. Chances are you'll be able to come in under our costs by more than $400 because we elected to upgrade the pistons, but that's one of the choices you'll need to make. As a point of reference, we built a similar engine using Enginequest's iron Vortec heads last November. We called that mill the Budget Sledgehammer, and it produced 447 hp for a total outlay of $3,464. In that same vein, we proceed with Son of Sledgehammer, and it's even more potent-and cost effective-than before!
The Game PlanStarting with a pair of EQ 23 heads, we needed to acquire a late-model 350 roller cam Chevy short-block. These are stout cores, so rebuilding one with a bigger hydraulic roller cam looked to be the way to go. For an intake, a race-style single-plane was in the picture, and topping this off would be one of Barry Grant's cost-effective Speed Demon 750 carbs. To light the mix, a PerTronix HEI distributor was used.
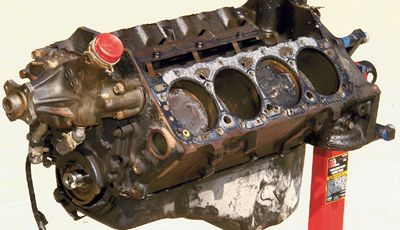
Short-Block And TearDownEnginequest is not only in the cylinder head business, but it's also into engine salvage, so we asked the team to locate a late-model 350 short-block for us. To get our block, we logged on to www.aamidwest.com, and put in a request. A few days later, we received a reply, and a price for the style of short-block we were looking for. Yes, it can be that simple.
For teardown, the pan was drained and the oil filter was removed. The engine was taken to a car wash and, along with a bristle brush and a couple of cans of Gunk, pressure washed. Before taking our block to the machine shop, it was given an extensive clean with an electric drill and wire brushes. Time consuming, yes, but this engine will look good when it's done. With the block cleaned, it was taken to KT Engines in Concord, North Carolina.
Block, Crank, Rods, And PistonsPart of the reason for going with a late-model roller block is that it is fuel injected. As such, it has near zero cold-start fuel wash on the bores. This normally means that the bores have little to no wear, and will clean up with just a few passes with the hone. Just to be safe, we bored the block, and scored some new pistons that incurred an expense totaling $437. Like we said before, you'll probably be OK to skip this step.
The stock forged piston with its K-wall narrow ring, and a dish of 12 cc is an excellent package. With a 50cc chamber volume, these stock pistons would've delivered an 11:1 compression ratio with .015-inch thick steel shim gaskets, or 10.4:1 with regular composition-style gaskets .042-inch thick.
But since we opted for an oversized piston, it became necessary to search for something cost-effective that would get us at least 10.2:1, but no more than 11:1. We headed straight to the KB Pistons Web site and found a KB hypereutectic piston (PN 142) would get the job done. At a street price of $237, it would also not break the bank. Part of the reason we went with these pistons is that they utilize 5/64-inch compression rings, which for some reason are much cheaper than 1/16-inch rings. The downside is that performance-wise, such a ring pack is less desirable than the stock one, but in all other respects, it will get the job done. We chose a set of budget Sealed Power rings. As for compression ratio, the KBs, with their 18cc chamber, delivered a 10.35:1 compression ratio.
A couple of points concerning honing if you duplicate this build. If you end up reusing the stock pistons, be aware that the best piston-skirt-to-cylinder-wall clearance for power is about .004 inch. The stock clearances are usually a couple of thousandths tighter than this, so there is usually a good cleanup margin. Also, most replacement rings are made to suit bores up to .005 bigger than whatever is printed on the box. This means a good hone job and some precision ring gapping will get the piston and bore situation right where it needs to be for a minimal outlay. As for the crank, this was in near-perfect condition. KT gave it a finish polish, and it was then ready to go back into service.
Bottom End AssemblyOther than to make sure all our fits and clearances were on the money, little else was done. The first parts to go together were the rods and pistons. The KB pistons come with Spirolocks for pin retention, so you can either go with the stock press fit, or you can have the rods honed for .001 clearance and have a steel-on-steel floating fit. The steel-on-steel floating pin was at one time considered a race-only deal as life was limited, but these days modern oils have changed that. There is little cost difference between getting the rods honed, and having the machine shop do the press work for a press-fit pin. The advantage of a floating setup is that it is easier to replace pistons should this need to be done at a later date. We went the floating-pin route.
The next step in the assembly procedure is to gap the rings. The end gap for hypereutectic pistons is different than for forged pistons, and the appropriate gap needs to be determined from the piston or ring manufacturer's instructions.
The first components to go into the block are the main bearings and crank. As is often the case, novice engine builders just assemble these parts and assume that the clearances will be what they are supposed to be, and that's a bad move. The reality is that most bearings produce a satisfactory clearance for typical street use, but it is common to have a combination of off-the-shelf bearings and main bearing housings that produce clearances on the tight side. This is not good if you intend to run up to 6,000-plus rpm. This means checking the bearing clearances to make sure they are right. For the mains, we wanted to see a minimum of .002, and preferably .0025 inch.
With the crank in the block, the rods and pistons were installed. Next, the piston-crown-to-block deck height was checked, so we could make a decision on the head gasket thickness for a power-oriented head gasket choice. If all the factory dimensions are spot on, the piston in a small-block Chevy will be .025 down the bore. This, plus a regular .043-inch gasket thickness, will result in a net piston-to-head clearance of .068 inch. This is way too much for optimal quench. The normal procedure when doing a serious build is to deck the block by as much as .030 for the pistons to be .005 out, but decking costs money. About the tightest you can go with stock-type components is .030. We can cut the clearance considerably by using a thinner steel shim gasket (which works very well with iron heads and block). Fel-Pro has these at .015-inch thick. Our piston-to-deck height averaged .024, so with a .015 gasket we cut the net clearance from an unsatisfactory .068 to .039, and at the same time bumped the compression by 0.6 of a ratio. So what's all this fuss over something as simple as gasket thickness worth? About 9 lbs-ft and 9 hp on a build such as this.
Cam Install And Timing
The cam for our engine was based on the numbers produced by a one-of-a-kind computer program available to professionals within the industry. With the flow characteristics of the EQ 23 heads plugged in, this program called for a 108-degree LCA. Should you find that our duration is a little on the big side for your own version, be aware that best results (with the same heads, compression, and displacement) will be had with a 108 LCA. Our cam was a custom single-pattern COMP Xtreme Energy hydraulic roller grind. The profile used was No. 3316 on both the intake and exhaust. This is being used with 1.6 rockers across the board. This combo provides a seat duration of 288 degrees, with a .050 duration of 236. The net valve lift is .555. Our thought on this cam is that it is about as big as can be used in a 350 before becoming too impractical for street use. If you want to go a little smaller, use a No. 3315 profile. Either way, if you're building a 350 with about the same compression and the same valve sizes, either of these cams will produce good results.
Next, the front cover, oil pump, and pan were installed. For the pan, we used Fel-Pro's top-of-the-line one-piece gasket. They certainly were not the cheapest, but they are reusable, and seal up first time every time. The oil pump was left stock. All we did was strip it, and check that it had not worn. Ours was in perfect working order.
The plastic adapter that couples the pump to the distributor driveshaft needed replacing, and these are usually found in a bottom-end gasket kit. With the pan in place, the short-block was complete. Now we can turn our attention to our star player, the EQ heads.
EQ Cylinder Heads
A major reason for using the new EQ 23 heads is our previous test on the Enginequest Vortec heads in the November 2006 issue (see "Budget Sledgehammer"). Once we heard that EQ had produced a 50cc chamber head, we were immediately interested. A major reason for this is that when chamber volumes this small are produced in a 23-degree head, there are some difficult intake valve shrouding issues to deal with. It is only by virtue of a very considered chamber design that a significantly positive result can be extracted from such a small chamber. The chamber design in the EQ 23 looks like it may trade a little high-end flow for a shape that burns more effectively. But high-end flow appears to not have been a big priority for this design, as most of the intended applications were for valvetrains using no more than .550-inch lift. Many oval track race classes call for .450 or .500-inch valve lift, with similar figures being common for budget performance street use. Based on the intended use, any loss of high-lift flow should be more than compensated for by a decent compression ratio that doesn't have a flame-impeding dome intruding into the chamber. To get an idea of where things stand in terms of compression, this 50cc head (with a flat-top piston having a net .030-inch piston-to-head clearance) will deliver a 12.7:1 compression ratio on a 350. As you might expect, we gave them the once-over on our bench:
The numbers were interesting in that they fitted the format exactly as expected; the chamber and intake port size (180 cc) appeared to be ideally suited to the intended application.
These heads are only sold bare from EQ, so it was necessary to build up ours. Some 2.02/1.6-inch valves were sourced from one of the bigger catalog companies for the sum of $136, and they were not the cheapest. The rest of the valvetrain hardware came from COMP. This included some No. 987 springs, and the appropriate retainers and keepers. The spring heights were measured, and shimmed to give the seat load suggested by COMP. At this point, we were in a position to save some cash because we had a ton of old head bolts in our scrap bin. If you only get a short-block, you'll need to get a set of ARP head bolts. The cheaper six-points are more than up to the job here. If you have enough used ones, be sure to wire brush the threads until they are smooth, so that tightening torque is translated into clamping torque. This is really important with steel-shim head gaskets. If there is any doubt about the threads, use new bolts.
Valvetrain
With the heads on, the next job is to mock-up the valvetrain for one cylinder, and determine the proper pushrod length. Using an adjustable pushrod length checker, the goal is to optimize the pushrod length such that there is an even sweep of the rocker across the center of the valve tip. We then ordered the proper length in COMP's Magnum series pushrod line. For valve lash, you need to consider what hydraulic roller lifters are being used, as the lash procedure could vary according to type. We reused the stock lifters because they were in perfect order, so the lash was done a quarter turn into the lifter travel. If you buy lifters, then COMP's Magnum lifters are designed to act more like a solid, and need to be lashed at zero to .002 inch.
Intake And Carb
The guys at Enginequest told us that these heads work well with an Edelbrock Super Victor, but a certain amount of port matching would be needed. In practice, we found that the Super Victor's ports were bigger than those in the EQ heads, so some epoxy had to be used to make things line up. Once the port matching was done, the intake was bolted up and the carb mounted via a 1-inch spacer. Our carb was a Barry Grant 750 Speed Demon. It should be noted that BG carbs are rated on wet flow, where Holley rates its carbs dry. This means the BG carb actually flows more on a dry rating. On this carb size, the dry rating is typically 25 to 50 cfm more.
Ignition
It's hard to beat an HEI for simplicity and outright spark generating capability. With the right module and coil, these units will service the ignition requirements of any race small-block that even remotely falls into the budget category. One of the best deals that can be had is PerTronix. Our billet body HEI with a performance coil, wires, and module was good to over 7,500 rpm, and cost only $262. It came with a pack of advance springs, so we could trim the advance curve to suit our relatively big cam. Also, our distributor was ordered with the vacuum advance. Because most race engines don't use vacuum advance, why are we? This is a street/strip engine, and we don't want to give away any fuel economy.
On The Dyno
With the BG carb optimally jetted, and the timing set to 34 degrees total, the engine pulled a solid 444 lb-ft and a shade more than 470 hp, and was most certainly still streetable. No doubt those 180cc port EQ 23 heads had something to do with this. Check out the graph for the total power/torque curves.
All this came for a total cost of $3,075, and considering the many new parts used, it is a heck of a good price for the output. We could've cut costs further by spending more time on the Internet looking for better deals, but the key component is the EQ 23 head, which puts you way ahead in the hp-per-dollar game.
EQ 23 FLOW TEST LIFT INT. EXH. EXH./INT. CFM CFM PERCENT .50 35 28 {{{80}}}.0 .{{{100}}} 67 56 83.6 .150 102 83 81.4 .{{{200}}} 134 110 82.1 .250 162 124 76.5 .{{{300}}} 185 140 75.7 .350 202 158 78.2 .400 216 175 81.0 .500 237 188 79.3 .{{{600}}} 244 190 77.9 .700 247 192 77.7As these figures show, the intake flow is strong in the low- and mid-lift range, but levels out somewhat at .550-inch lift. This indicates the 180cc port is being well utilized in terms of port velocity and the chamber form is ideally suited to valve lift up to about .550.
WHERE THE MONEY WENT Short-block core $300 Freeze plug kit: $10 KB pistons: $237 Rings: $25 Bearings: ${{{62}}} Gasket set: $45 Cam: $255 Timing set: $51 Pushrods: $87 EQ 23 heads (bare): $478 Valves: $136 Valve stem seals: $25 Valvesprings: $87 Retainers: $41 Rocker arms: $200 Intake manifold: $130 Carb: $300 Carb spacer: $25 Distributor: $220 Plug wires: $42 Spark plugs: $24 Used valve covers: $30 Misc. supplies: $45 Machine shop labor: Bore & hone: $150 Cam bearings: $50 Polish crank: $20 Total: $3,075