Welcome back! Today we'll tackle something most automotive hobbyists don't spend much time on. Radiator sizing and placement along with cooling fans, hoses, and other cooling equipment are usually quite adequate from the factory. When building a car from scratch, it's another thing that must be figured out correctly.
My planning considerations focused on keeping 500 horses happy and cool even when pushed hard during California summer track time. The final goal is to create a well-designed cooling system to avoid overheating issues with the supercharged LS1 that powers my handcrafted Ferrari 250 GTO-like creation. The combination of extra radiators for the supercharger intercooler and the air conditioning makes it important to have an efficient and properly sized radiator for engine cooling. In addition, the long-nosed Ferrari-styled body positions the radiator far enough away from the engine that precludes using rubber radiator hoses.
First off, let's talk about the radiator. I have a somewhat unusual design constraint in that the GTO body has a special door opening in the nose for coolant-filling access. Feeling compelled to include the door for originality purposes, it would be silly not to make it functional. For this, I need to use a down-flow radiator with a fill cap in the middle of the radiator's top. I contacted Griffin Thermal Products in South Carolina to see what the company recommended.
Griffin said it could fabricate a custom radiator to fit my specifications at almost the same cost of an off-the-shelf product. They recommended an aluminum unit with two rows of 1 1/4-inch tube giving a 2 3/4-inch core. Due to the confined space from low hood height, the radiator is mounted at a 45-degree angle allowing space for a 21-inch-tall by 31 1/2-inch-wide radiator. They faxed me a radiator engineering template, so I could provide them with my specifications, including things like pipe connection sizes, and mounting the fill hole at a 45-degree angle to enable easier filling through the small hood opening. They informed me a Griffin radiator configured to my requirements is rated to safely cool an 800-horsepower engine. It should be safe on those hot days!
The next step was to make sure plenty of air would pass through the radiator for efficient operation. An electric fan is the best means to achieve this. I elected to use a puller-style fan due to the fact that it's easier to suck air through a radiator than it is to blow it through. I chose a 15-inch fan rated at 2,800 cfm with integral mount points for the job. By chassis-mounting the fan, I could also avoid the possibility of heat transference by not installing the fan directly to the aluminum radiator. After mocking it up several different ways, I found a good location for the upper mount by adding two tabs on a frame tube, and a couple L brackets to hold the bottom.
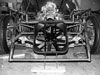
Next, I had to create an optimally flowing coolant between the radiator and the engine. Given the dual show and spirited driving objectives for the car, something that looked nice and was also durable under hard driving was ideal. Stainless steel tubing with flexible hose connections to the engine and radiator best fit these goals. I googled it on the Internet and found Stainless Works as a supplier of stainless tubing bends. The company assured me that the 304 stainless tubing could be polished to a nice mirror-like finish
I found that a Sawzall with a long 24-point bimetal blade does a nice job of cutting stainless tubing, even for those tricky corner cuts. An angle grinder with 40-grit sandpaper does a nice job when you need to square an end or make small adjustments to the cut angle. Using a clever technique I found on the Internet, I used a hose clamp with a small window cut in the teeth to hold tubing pieces together in order to ensure a nice straight alignment during initial welding. The small window allows for initial tack welds to be completed with the clamp in place. This technique is especially useful when working with stainless, since magnetic clamps are useless.
A TIG welder was used to butt-weld tubing joints. A bench grinder was then used to grind welds near flat, and then a set of hand files were used to finish flattening the welded surface. Next, we had to remove all the surface scratches left over from filing, as well as the bending, shaping, and handling of these tube sections. I used flap sanding wheels, starting with 60-grit, working down to 120-grit, and then 320 wet/dry hand sanding from there. Once all the surface imperfections are sanded out, buffing to a high polish takes only a relatively short time. My goal is to have these tubes look like chrome; that goal is well within reach.
The last step was a water pump alteration to move the coolant inlet to a new location. It's complicated to explain exactly why this was needed, but it's done in order to provide clearance for the new serpentine belt routing so it could power the supercharger. The water pump casting already had a boss cast in it at a better location. It was a matter of drilling a 1 1/2-inch hole in it and mounting a piece of aluminum tubing for a hose hookup. I have to admit my machining approach for this operation is a bit crude, but a hole saw was sufficient for the job given the needed tolerances.
Once the water pump was mounted back in place and coolant pipework laid out, I noticed one last issue lurking. The coolant inlet pipe has a small section positioned higher than the radiator fill cap. This would leave an air bubble that most likely wouldn't flush out of the system without further intervention. I used a stainless bung made for mounting O2 sensors in exhaust along with a stainless plug. The bung was welded in the elevated pipe section, so the final coolant filling can be done there to rid the system of air.
I now feel good about the layout and appearance for the basic cooling system. The real test will occur when the ignition key is turned and the supercharged V-8 starts producing heat. There are still some large projects like wiring and exhaust that need to be done before then, so that's a story for another day.