If you mess around with cars, sooner or later you're going to find yourself in the position of needing to freshen an engine. It doesn't matter what kind of car it is, or how old it is, because if you're reading this magazine, chances are good that you run the equipment a little on the aggressive side. This increases the likelihood that your engine will, at some point during your ownership, be left with its tongue hanging out.
When that day comes, you'll be faced with the decision to replace or rebuild. Replacing the tired engine with a brand-new one might be the simplest solution, but also the most costly. Swapping in a used unit is a popular choice, as it's usually the most economical alternative and the simplest to accomplish, but you're rolling the dice and hoping that you're not picking up where the last guy left off-a few beatings shy of your previous engine. That leaves rebuilding, which to rookie car crafters can be a daunting proposition.
There's no shame in it. Everyone has to have a first time, and you're wise to approach an engine rebuild with caution. An uninformed foray into the precision-machined world of internal combustion engines can quickly result in an expensive lesson-and a pile of worthless scrap metal. We were there once too, and we're going to give you some pointers, like a dopey older brother, in the hopes that your first engine build goes more smoothly and successfully than some of our early efforts did. In fact, while preparing this story, we reconditioned an engine of our own and used it as an example of a typical basic performance build. If you're already a seasoned wrench, some of this information will seem elementary, but those preparing for their first venture into engine building should find it helpful.
Research is Key
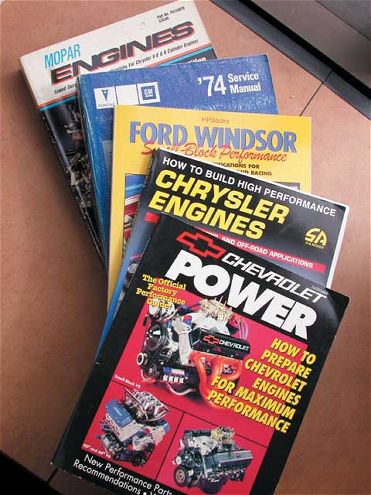
We hate to make this sound like homework, but you'd be wise to hit the books before spinning the first wrench. You may already know your way around a toolbox and an engine bay, but even though you may have been tinkering with your car for some time, there are many small details involved in the complete teardown and assembly of any specific engine that you may not be aware of. Research the motor beyond its manufacturer and engine family, down to the model, year, displacement, power rating, and any other specifics particular to that engine. Don't rely solely on a generalized repair manual for all of the information. Even an engine as common, popular, and seemingly simple as the small-block Chevy holds a few trade secrets that could drive you nuts if overlooked. Trust us, you don't want to pull the engine back out of the car and tear it apart just because you left out one 25-cent oil plug.
These days, even obscure engines have volumes of published data readily available, and finding it is a lot easier now that the Internet exists. Make an attempt to find a factory manual-many are reprinted or can be photocopied at large libraries-and follow it up with a good performance-building guide, if one is available.
Core Selection
Before the rebuilding process can begin, you need something to rebuild. This might simply be the engine that came in your car, though if it experienced some sort of catastrophic failure, all its critical parts and pieces should be checked by a competent machine shop before you proceed (more on that later). Damage isn't always detectable with the naked eye, so these determinations should ultimately be made by the machine shop.
If you find any faulty core parts, what to do about them depends on the extent of the damage and the rarity of your engine. Many major maladies can be repaired-for a price. Damaged cylinder bores can be sleeved, casting cracks can be welded or drilled and pinned, stripped threads can be re-tapped or repaired with inserts, main saddles can be resized, cam bores can be sleeved, and so on. The important point here is that although each of these conditions can be cured, the cost of repair might outweigh that of replacement, depending on the type of engine in question.
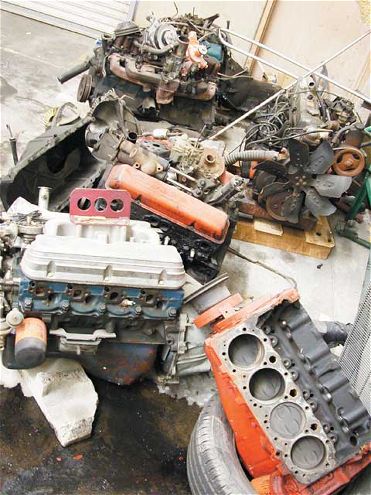
If a new core is needed, you'll once again need to arm yourself with knowledge. Interchangeability is obviously crucial, but not always apparent. Know what fits and what doesn't, and how to identify the good stuff on the fly (i.e., at the junkyard or swap meet). Also, familiarize yourself with your particular engine's critical dimensions and consider investing in a basic measuring caliper that can determine the diameters of cylinder bores and crank journals. Knowing what oversize pistons and bearings are available for your engine and how far the block can safely be overbored will be very helpful. A Chevy 400 small-block that's already 0.030-over might be worthless, as 0.060-over is generally considered too far, but if you know that 0.040-over slugs are available, you could save it. It's best to know this before investing.
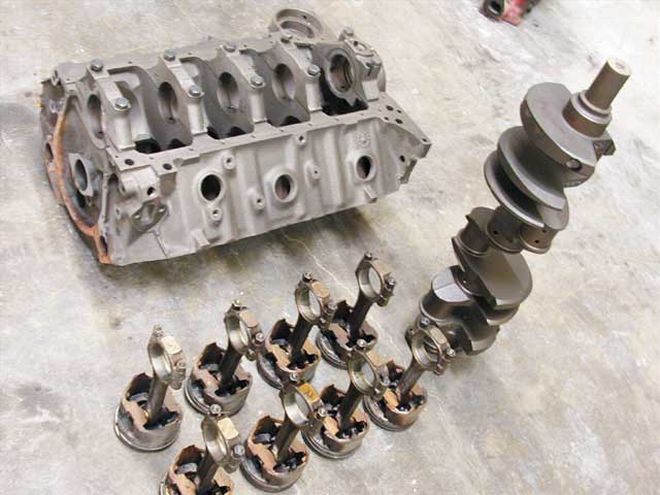
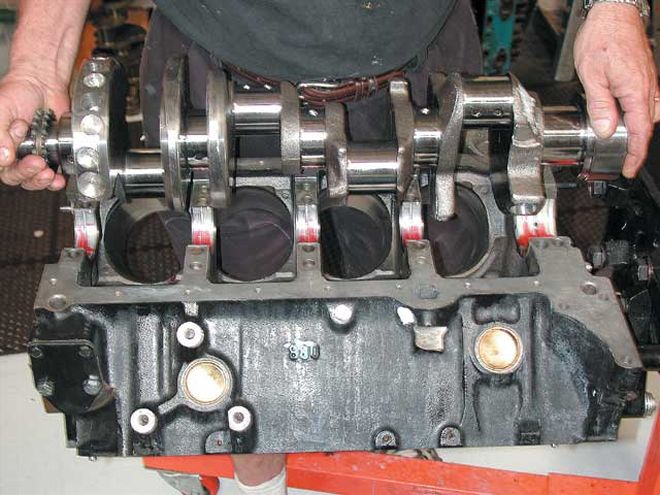
Our core is a '90 Chevy 350 block and crank from a pickup truck. The engine was a low-mileage unit that displayed very little wear in the cylinder bores and bearings. We were about to reassemble it with the original dished pistons and stock rods when we came across a set of barely used GM Performance Parts ZZ4 pistons and rods that had been swapped for aftermarket pieces after a few dyno runs. The ZZ4 pistons are hypereutectic cast-aluminum flattops with a short skirt, nearly identical to mid-'90s LT1 production slugs, as are the powdered metal connecting rods. We figured we could get away with our block's standard bore, allowing us to use these virtually new standard-size pistons.
Picking a Machine Shop
Many rodders seem to place more emphasis on engine assembly than the machining process, though the opposite should probably be true. The process of bolting an engine together-provided you use the proper specs and techniques-is fairly straightforward; it's the machining stage that can make or break a rebuild. Deal with a shop that's on the ball and your role in this stage of the project will be nearly a no-brainer. However, handing your parts off to a hack could create enduring nightmares.
All machine shops are not created equal, though the true measure of any such establishment lies with the skill and experience of those operating the equipment rather than the machines themselves. For your first project, deal with someone who will understand your situation and goals for the final product, particularly if it involves nonstandard equipment (read: speed parts). A lot of "production" shops are geared mainly toward refurbishing engines to get them back in service. Often, places like this won't understand the deviations that are frequently required for performance-engine building, nor are they very tolerant of such things. High-volume re-man shops have also been known to operate under the "good enough" standard, so your money is probably better spent elsewhere. The shop you select should also communicate with you thoroughly, from the time you drop off your parts and discuss the job until the time you pick them up again. Again, the shop should understand what you want, explain what you need, alert you to any trouble areas that may arise, and detail any particulars you'll need to pay attention to during assembly.
Your best bet is to approach a shop known locally for high-performance street and racing engines. Most areas have at least one machine shop that deals with regional circle track or drag racers, and this is typically where you'll find the most knowledge and willingness to deviate from stock. If you're intimidated by approaching experienced race-engine builders for your first project, keep in mind that most of these shops still have to rebuild truck engines and the like to keep the workflow steady and the cash drawer full-your project is not beneath them. Be honest about the objectives of your engine (don't pretend to be chasing down Warren Johnson the following weekend) and don't be afraid to ask questions, though you should attempt to make them as informed as possible; again, preparation is the key.
We've worked with a number of machine shops over the years, but one of our recent regulars is Dougan's Engine & Machine in Riverside, California. We've established a good working relationship with co-owner Ray Field, and we trust his recommendations on machining procedures. Dougan's rebuilds plenty of standard-duty engines, but has also become known among local racers for quality work. We figure if its rebuilds can endure the rigors of circle track racing, it's good enough for our junk.
The Drop Off
Once you've picked an engine and established a relationship with a reputable machinist, it's time to deliver the core. You could provide the shop with a complete engine, but disassembling the core will save some expense, and the shop staff will likely appreciate the effort. Besides, if you've done any of the initial checking we recommended in the core selection section, you should have already pulled off the heads and the oil pan at a minimum. The best approach would involve completely dismantling the engine on your own, while keeping and labeling all the old parts. The old camshaft and lifters can go in the dumpster along with the timing chain and gears, but some of the used parts should be retained. For instance, after the pistons are pulled from their bores, make sure to bolt the caps back on and keep the old bearings in place-the machine shop may want to use them for preliminary measurements. The crank should be removed from the block, but handled carefully-the journals are vulnerable when out of the engine, and damaging them is remarkably easy. Wrap the journals in rags or put the crank in a heavy plastic bag until you drop it off. To prevent warping, crankshafts should be stored by standing them on end, not laying them on their side. Once the crank is out, bolt the main caps back in place, again retaining the old bearings and keeping everything in the same position it came from.
When you arrive at the machine shop, you should have a bare block with the main caps fastened, a crank, and the pistons and connecting rods you plan to use, plus the cylinder heads if the originals are to be rebuilt. Don't disassemble the heads-let the machine shop handle that.
When we dropped off the 350 at Dougan's, we'd already disassembled the engine and degreased it. This made it easier for the machinists to give it a quick inspection before we even took it out of the back of our truck. It also saved us the labor cost of having a shop employee toil over a grimy mess. The original bearings were left in place in the mains and the rods (we brought the old piston/rod assemblies just for reference) and the crank was transported on the floor inside the cab to avoid damage from rolling around in the bed.
Plan of Attack
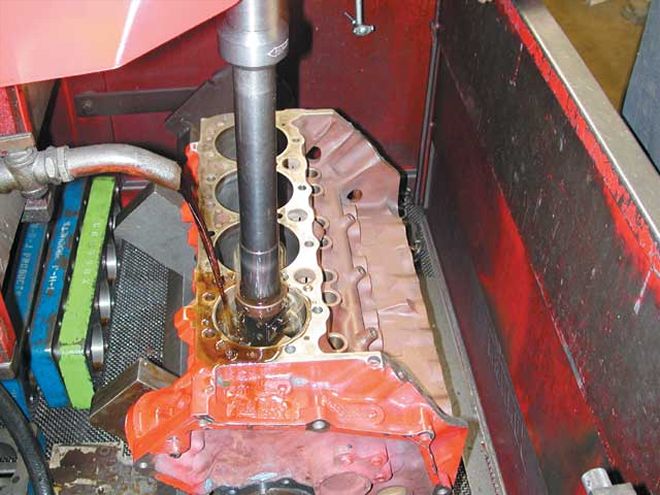
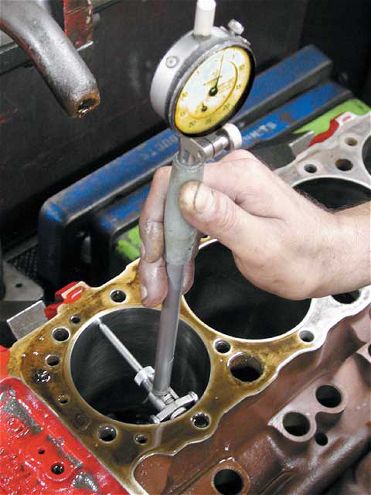
When you turn your parts over for evaluation, you're making a commitment. Some machine shops will do a preliminary check of the cylinder bores and maybe a few crank journals to determine if you're handing over junk, but time is money, so once the stuff goes in the back, you've pretty much incurred expenses. Step one is usually a bath for the block in the hot tank. Most shops will do this before any serious handling of the parts.From here, the parts will be more accurately measured to determine what needs to be replaced or resized. This is why new parts shouldn't be ordered until after the machine shop thoroughly inspects your hardware. For example, you may have measured the bores yourself and determined that perhaps 0.030-overbore pistons are what you need, but if the machinist discovers a groove or other imperfection in one bore that won't "clean up" at 0.030-over, you may actually need to go for the 0.040 pistons. That could mean a costly error in judgment on your part if you already ordered the 0.030-over slugs and rings.
The next step is usually the crack-checking procedure, often referred to as Magna-fluxing-a trade name for the process of magnetizing colored iron powder to reveal cracks or flaws. This process may be considered optional, but it's well worth the expense. You don't want to rebuild a boat anchor. If the block and crank receive a clean bill of health, you're ready to discuss the actual machine work. During the inspection, the machinist will have determined the size of the bores and crank journals, and from there will determine if these dimensions need to be altered, and by how much. Most American V-8 engines require an overbore after significant use because the bores are worn to the point that they are larger than standard and no longer round. The ridge left at the top of each bore where the piston rings reached the top of their travel is often a tell-tale sign of the extent of the wear.
If you're lucky enough to have a block that's been slightly used, you may get away with only a cylinder bore hone, but if there's any significant wear, go for the overbore. The machine shop will likely recommend the minimum oversize, and this is when you'll find out what pistons to order. The crank is more likely to have less visible wear, though it will probably have some scratches. Light grooves can often be polished out, but anything that can catch a fingernail will probably require machining. It's common practice to machine crank journals 0.010-inch under the factory diameter (sometimes 0.020-inch); this simply means you'll have to use the corresponding oversize bearings. Rod and main journals can be resized independently of one another, though all of the journals of one type will generally be taken to the same dimension. For some engines, bearings are available in 0.001-inch under and over sizes, which can be handy for closing up the tolerances on unmodified cranks that are just a hair under standard due to wear, or are just a shade tight after machining.
After inspection, Field agreed that our 350 showed very little wear, but suggested we give it a light hone to clean up the cylinder bores rather than installing the new pistons and rings against the wear patterns of the original stuff. He also suggested we spin-balance the rotating assembly, since our new pistons and rods were significantly different in weight than the originals. Field realized that the budget for a basic project like this should be kept within reason, and worked with us to minimize costs without sacrificing the quality of the job.
The Balance Issue
It's common knowledge to anyone who's worked on engines that the rotating internals need to be balanced. What isn't always so clear is why and when engines must be rebalanced during the rebuilding process. Engine builders typically offer spin-balancing as an option, which may seem confusing since the internal balance of the rotating assembly is considered critical. In truth, most factory-balanced engines aren't spot-on, and you'd be surprised to see just how far out of balance some stock crank/rod/piston assemblies are when placed on a dynamic balancing machine. The original manufacturers often allow a broad margin of tolerance in this area, as most passenger-car engines don't rev very high or for very long.
The reason the spin-balance procedure is considered optional in many shops is because a basic rebuild often consists of an original crankshaft and connecting rods with a new set of pistons. The pistons in most quality piston sets are weight-matched, and the difference in weight between the originals and the stock-type replacements is often slight enough that a rebalance is not absolutely necessary. When significantly different pistons or connecting rods are substituted, rebalancing becomes more critical. For stroker engines, it's mandatory.
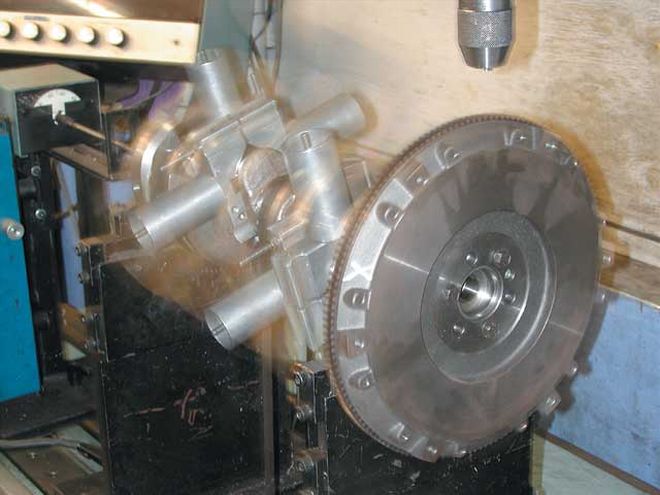
The spin-balancing procedure is labor-intensive and therefore not cheap. Figure on somewhere between $150-300 for this service. However, even if you're only swapping in a set of replacement slugs, spend the extra cash if you can swing it. The balance job provides peace of mind and usually a noticeable improvement in engine operating smoothness. The lack of imbalance will also be easier on the internal components over the long haul.
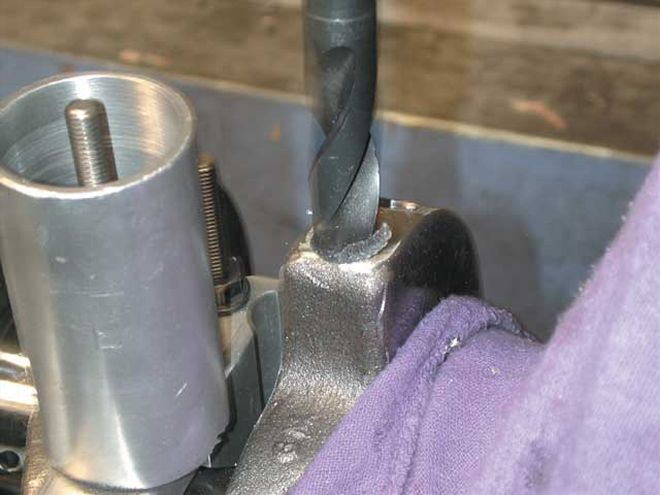
As previously mentioned, Dougan's recommended that our rotating assembly be spin-balanced. This was primarily due to the change of piston and rod design, which seemed to indicate a significant change in the weight of these components. After the balancing procedure had been performed, it was clear we'd made the right decision, as the new piston/rod assemblies definitely didn't jibe with our stock crank. This was easily corrected by strategically drilling the crank counterweights to remove material in a few specific areas.
Preassembly
Your role in the project will be limited to decision making while the core components are in the machine shop, but once you get them back, it's time for hands-on participation. Here again, a good machinist can provide you with any pertinent information upon returning the refurbished parts. Of note are the various oil and coolant-passage plugs that have been removed by the machine shop. Most good shops provide fresh plugs with the completed job, but may not install them unless you ask. If you have a rapport with the machinist, ask him to show you how to install them. Part of the challenge is knowing where they all go (refer to those source books again), as well as how to properly install them so they stay put. If you're unsure and can't get assistance, pay the extra few dollars to have the shop install the plugs, and verify when you pick up the block that it's ready for assembly.
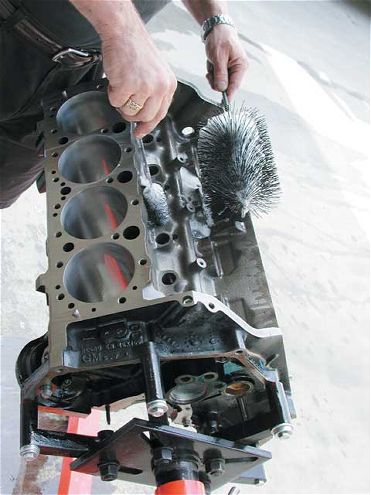
After getting the parts back, everything should be thoroughly cleaned before assembly actually begins. Most builders recommend a basic soapy water solution-liquid dish soap works well. Hot water is preferred if available, and though many will simply blast the block with a hose, a set of engine cleaning brushes allows more thorough cleansing.
Once the cleaning is complete, blow the block dry with compressed air (if available), or wipe it down with clean rags. If you don't intend to begin the assembly right away, wipe down all the machined surfaces, like the cylinder and lifter bores, with engine oil, and coat the rest with a light spray lube like WD-40. Keep this in mind later when it comes time to paint the engine, which will have to be degreased with solvent. If the block and parts will be stored prior to assembly, seal them in plastic bags after coating them with oil.
After collecting our stuff from Dougan's, we blasted the block with the hose, then doused it with hot, soapy water and began scrubbing using the various brushes included in the cleaning kit we picked up. The brushes allow for cleaning threaded holes and other tight areas where dirt and metal filings can hide, waiting to come out after the engine is started and the oil is flowing, only to ruin the fresh rebuild. After the block was cleaned and dried, we immediately rolled it into the shop to begin the assembly.
Assembly
Numerous books have been written on the subject of engine assembly, and since this is a general information article, we won't attempt to cover all the details; source your reference material for the particulars. However, there are some basic tips and techniques that apply to most engines.By now the block should be cleaned, dried, and mounted on a suitable stand. All fasteners to be used should have also been completely cleaned, and all threads free of burrs. Have quality assembly lube on hand-this stuff is preferred to regular engine oil for its ability to stick to the parts it's applied to rather than running off into the oil pan prior to the initial start-up.
If the machine shop has done a good job, there should be no concerns over bearing clearances at this point, but it's always a good idea to check. The novice builder is unlikely to have a set of micrometers, but inexpensive Plastigage is cheap insurance that's available at most good auto parts stores and machine shops.
For most American engines from the '50s up into the '90s, the only specialty tools needed for assembly are a torque wrench, a ring compressor, and possibly a harmonic-balancer installer.
Use plenty of assembly lube on the bearings and make sure that all fasteners that don't require sealant are coated with a few drops of engine oil on the threads and under the shoulders. Dry threads can create inaccurate torque readings. Piston rings should also be treated with a thin coat of oil before being installed on the pistons, and the rod bolts should be covered-a short piece of rubber hose works-to ensure that they don't scratch the crank during installation. Continue to spin-test the rotating assembly after torquing each rod to make sure there is no binding. Check main- and rod-bearing clearances, crank endplay, and rod side clearance as specified by the manufacturer. Crankshaft end seals (rear main and timing cover) should also be coated with engine oil.
When it comes time to install the cylinder heads, make sure to follow the torque sequence listed in the factory manual, and work up to the final torque by following the sequence in three steps ( for example, 25 lb-ft, 50 lb-ft, and then 75 lb-ft). Intake manifolds usually have a factory-prescribed torque sequence as well. Procedures for valve adjustment should be found in your source books, but if the only instructions are for assembled, running engines, try consulting the camshaft manufacturer-most have tech lines and Web sites.
Our 350 went together without incident, though at one point we did notice that the crank suddenly felt as if it didn't want to turn. A quick check revealed a misplaced main cap, the result of a very faint position stamp that we misread. Fortunately, since we were spin-testing frequently, the mistake was quickly discovered. We worked smoothly and steadily, starting with the crank, then the piston/rod assemblies, followed by the cam and timing set. We topped off the bottom end with a fresh stock oil pump before buttoning up the timing cover and oil pan, and then flipped the block over to install the heads, valvetrain, and intake. All in all, it was a full afternoon's work, but we'd done it before. Take all the time you need-it's not a race...yet.
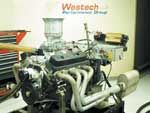
Dyno Day
Most completed first engines will go from the stand to the car (see "Starting a New Engine" in this issue for more on that), but we wanted to dyno-test our spare-parts mule to see how well it would run before installing it. Our standard-bore, flattop piston 350 was capped with a set of cast-iron Chevy Vortec heads featuring stock 1.94/1.50-inch valves and 64cc chambers. We used Fel-Pro steel shim head gaskets to get as much compression as possible (around 9.4:1) and installed a Crane PowerMax H-278-2 cam kit with 0.467/0.494-inch lift and 222/234 degrees duration on a 114-degree lobe separation angle. An Edelbrock Performer RPM Air Gap intake matched our goals of a smooth-running yet potent street engine. We dressed the engine with GM Performance Parts center-bolt valve covers and installed a Speed Demon 750-cfm carb and MSD distributor just after filling the crankcase with Union 76 Racing motor oil and priming the oiling system.
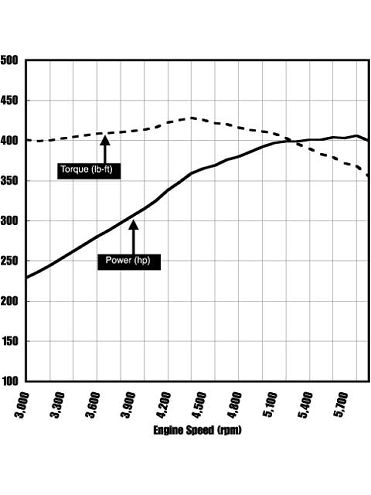
The fresh engine fired right up and instantly displayed strong oil pressure. The first order of business was to break in the cam at around 2,000 rpm for roughly 15 minutes. After the break-in lube was replaced with fresh oil, we made a series of power pulls, and found that the combination needed very little tuning. With 34 degrees total timing, our low-buck 350 made 404 hp at 5,600 rpm, and 428 lb-ft of torque at 4,400. The torque curve was very flat, showing 400 lb-ft at 3,000 rpm where the pulls began and maintaining 380 lb-ft at the horsepower peak. This very basic combination proves that a well-planned combination can yield excellent results, even when the biggest, baddest parts are left on the shelf. Just think how good that 400 hp and 425 lb-ft, combined with a sense of accomplishment, would feel during that first testdrive. CCOur low-buck 350 made 404 hp at 5,600 rpm, and 428 lb-ft of torque at 4,400. The torque curve was very flat, showing 400 lb-ft at 3,000 rpm where the pulls began and maintaining 380 lb-ft at the horsepower peak.