In this high-tech age of computer-controlled fuel injection, it seems we have swept aside some of the foundations of hot rodding. Sure, a high-tech rod is really killer if you can afford one, but many of us simply can't. Traditional rodding with old-style carbureted mills is much more within the average rodder's means.
A Holley carb is the old reliable of a traditional hot rod, used so dependably over the last bazillion years. In particular, the Holley 4779 750cfm double-pumper is a special favorite for street performance. To make it perform even better, we spent some time with the Carb Shop, going over a few rebuild tricks and how to customize one just for your engine and application. We were able to not only breathe new life into our tired old gas pump, but also to muscle it up so it pumps like a weight lifter on steroids.
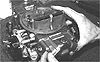
When your carb arrives at the Carb Shop, it is first completely cleaned and disassembled. All the parts are inspected and replaced if defective. The Shop has thousands of cores from which to obtain good used parts as well as bins full of replacement parts.
After thoroughly inspecting the carb, the rebuild begins. This Holley will be used on a 385hp Chevy small-block with a 10:1 compression, in a 1930 Ford. Our goal is good throttle response, even fuel distribution, and a smooth idle. All that's no problem for the crew at the Carb Shop.
The boosters are removed from the main carb body, and any original casting flash is filed off. The venturi are balanced and matched so they all are exactly the same size. New modified boosters enhance fuel distribution. All the booster holes are drilled to the same size, and a small step is machined into the bottom of the boosters to create a better signal. A special press is used to install the boosters, which flares the inlet to create a smooth radius for improved fuel flow. The booster level in the main body is checked on a special jig to ensure correct height. This will create equal air flow and fuel distribution in each venturi.
The main body is milled on both sides and on the base for maximum gasket seal. Stock castings can warp over the years from heat and overtightening, and the metal can develop high/low spots that cause gasket leaks. Milling removes this potential problem. All the carb holes are then chamfered to remove burrs or rough edges.
The pilot holes are drilled out to complete the circuit through the metering block to the main body and then on to the brass plate, in order to have an idle circuit on the secondary side as well as on the primary side. This modification improves the overall idle characteristics of the motor. Also, by drilling out the vacuum feed pilot hole, we now can use a power valve on the secondary side. After the machining modifications are accomplished, the parts are glass beaded and submerged in a dichromate dye to replace the original factory look of a new carb. You sure don't want an ugly lump of metal sitting on top of your detailed engine!
The final step before starting reassembly is to modify the emulsion holes and power valve restrictions according to the application or owner specs.
Reassembly begins with installing the secondary throttle shaft and plates. A drop of red Loctite on the butterfly screws prevents them from loosening. The left and right circuit channels in the base are now blocked to isolate the primary and secondary sides of the idle circuit. This modification allows for a more accurate idle adjustment. One small (.089-inch) hole is now drilled in each butterfly to allow more air without opening the throttle blades. This leans out the carb for fine-tuning the mixture screws. The larger the cam, the bigger the hole for better idle signal.
The baseplate is now secured to the main body and the throttle linkage is installed. The rod connecting the primary shaft to the secondary shaft is bent slightly to ensure full secondary throttle opening. The bending is increased slowly until the butterflies are completely open in the baseplate. New throttle speed adjustment screws and springs are installed.
Next, the accelerator pump discharge nozzles or "shooters" are installed. We are using .031-inch primaries and .035-inch secondaries since this is a performance application, and for better throttle response.
The power valves are now installed, and care is taken not to distort the gaskets. The vent baffles also are installed to prevent fuel from sloshing out the vent tubes. We are using .072-inch primary jets and .074-inch secondary jets on both sizes. Next, the Carb Shop installed the idle mixture screws with rubber O-ring seals, which are better than the original cork ones.
Finally, the metering blocks and fuel bowls are reinstalled and the carb is ready for bench testing. The Carb Shop runs each carb prior to sending it out to be sure it is performing correctly and there are absolutely no leaks. You can fine-tune the carb on your engine to suit your taste.
The carb was a work of art when finished and performs exactly as we wanted for our hot rod. Being able to call the shots on your carb's performance is really cool, with no disappointments when you drop the hammer. We got just what we asked for—-great throttle response, even fuel distribution, and smooth idle.