Times certainly change. We'd guess our subject '36 Chevy truck was revamped in the 1970s, and a plank of wood was fitted into the dashboard to hold the instruments. While the wood may have seemed attractive at the time, this truck is destined to be a TV star, and Kevin Tetz, the host of the new Classic Rides program on the DIY network, contacted us about bringing the dash into the 21stcentury.
Unfortunately, the previous builder cut away most of the original dash when he installed the wooden version, so we were faced with making a new dash panel, keeping only the "eyebrow" that fits just below the windshield opening. This seemed like a great subject for an article, since these techniques could be adapted to the dash of virtually ANY make and model of truck.
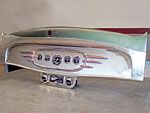
Before any metalworking project is started, you need to make some basic decisions about the shape of the panels to be made, and where the welded joints will be placed. For our dashboard, we started by making a layout of the instrument cluster, and we knew from the start that we wanted to use one of the sensational new gauge surrounds made by Motorhead Jewelry. We chose the "Expanded Winged Oval" style, bringing an opulent Art Deco design element to the dash, which we feel matches the personality of this truck perfectly. Also, this dash surround is big enough to house the full set of Auto Meter gauges, supplied by The Eastwood Company, which Kevin selected to keep tabs on the truck's speed and vital signs. The truck will have an up-to-date A/C system, and Kevin chose a Hot Rod Air unit, with a compact under-the-dash control module that groups the vents and controls in one panel.
Once we knew the size and configuration of the instruments, gauge surround, and A/C control module, we started by making a drawing of a dashboard that encompassed these shapes, incorporating a graceful curve on the bottom edge. This layout was made on chipboard, so it could be used as a pattern to transfer the shape onto the metal being used for the new dash. We decided to put a bead on the bottom of the dash, both for style and strength, and after experimenting with different sizes we selected a 1/2-inch bead. We want this dash to be durable, so the material chosen is 18-gauge cold-rolled steel sheet. Scribing around the edge of the pattern, we were ready to start cuttin' some metal! We used a bench-mounted Beverly shear to do our cutting, but a saber saw would work well, too. The dash needs a flange on the bottom for strength, so we added 1 inch of extra material below the bead so this flange could be formed from the parent metal, avoiding the need to weld a flange on. On large, flat panels like our dash, any welding needs to be carefully planned, or the shrinking caused by welding will pull waves into the metal. We'll form a flange on the upper edge of the dash that matches the shape of the original "eyebrow," so the welding can be confined to an area where it won't compromise the flatness of the dash.
Next, a beading machine is used to roll the bead into the bottom of the panel, using an edge guide to ensure the bead is spaced exactly 1 inch away from the bottom edge. With the bead in place, it's time to form the flange on the bottom edge. We'll use a simple hammerform to create this edge, since it will maintain the flatness of the dash and allow us to create a crisp, even edge along the bottom of the bead. Two pieces of 3/4-inch medium density fiberfoard (MDF) are now cut to size-one to fit under the dash, contacting the bottom edge of the bead, and one to fit on top of the dash, touching the top edge of the bead. We drilled holes for 1/8-inch alignment pins through all three pieces to ensure that nothing would slip as the flange is formed. Now we can clamp all the pieces together-the bottom hammerform, the dash panel, and the clamping block-with our alignment pins locating each piece precisely.
Here's where the fun begins: hammering the 1-inch flange down tightly against the hammerform. This process is actually easy-if you hammer long and hard enough, the metal will move until it's tightly against the form, matching the form's shape exactly. Even a beginning metalworker can have success with this technique, and it ensures that the flange will have a smooth contour and a crisp edge. It's important that everything is clamped tightly together as you hammer, otherwise your panel won't stay flat. Next, we need to create a flange around the top and sides of the dash panel. Since the middle section of the dash is straight, we'll use a bending brake with a 1/4-inch-radius die to form the flange. On the curved corners, we'll use MDF hammerforms. If you don't have access to a bending brake, the entire edge could be done on a single large hammerform, but using a brake speeds the process and allows us to use a smaller hammerform, since it is only needed in the corners.
The side hammerform is laid out to match the contour of the original dash recess, and trimmed with a bandsaw (or saber saw). The cut edge is sanded to remove the saw texture, and then the edge needs to be radiused to match the part bent on the brake. We'll use a router with a 1/4-inch-radius rounding-over bit for this, but the job could be done with a file or sander if you work carefully. We'll radius both the top and bottom edges of our hammerform, so the same form can be used on both ends of the dash-this saves time and ensures symmetry.
Next, a clamping block is cut to size a 1/4-inch smaller than the hammerform itself. The hammerform and clamping block are positioned on the dash, and 1/8-inch holes are drilled for alignment pins, ensuring that nothing can slip as the metal is hammered. The metal is trimmed to overhang the hammerform a 1/4-inch, easing the forming in the corner. Next, the hammerform is clamped to the dash panel, and the metal is hammered tightly against the form, creating a neatly radiused flange.
Now it's time to accurately trim the top edge of the dash panel where it meets the "eyebrow" section of the original dash. This trimming can be done with hand shears. Once trimmed, the dash panel is fitted into its final position, and the edge of the new dash is scribed against the eyebrow. Now we can trim the eyebrow in preparation for making a weld with a butted fit.
With the trimming completed, it's time to tack-weld the new dash panel to the old surround, being careful to get a really good fit at the joint. With the tack-welds spaced about 1 inch apart, the entire joint is carefully worked with a hammer and dolly to make sure everything is flush and properly contoured. After this, the joint can be finish welded. The previous builder really butchered the left-hand edge of the dash, and we decided to replace the mangled metal rather than try to repair it, so we made a new hammerform for this purpose. After the new piece is formed, it is trimmed, tacked, aligned, and welded into place. At this point, all the welds are sanded smooth, and we're ready for the final details. All of a sudden, our dash is starting to look like something.
Now it's time to position the gauge surround in the dash, and drill the mounting holes. Next, the layout of the instruments is double checked, and holes are used to make accurate openings in the dash. It is important to use a drill press when making the instrument holes, and to clamp the metal tightly while cutting. The last thing you want to do is to have the dash get away from you at this point, and scar the surface you worked so hard to keep flat and smooth. The last step is to add a mounting pad on the bottom of the dash for the A/C control module, and then we're ready for the final paint prep and finish. A dash like this is a fairly straightforward project for an intermediate-level metalworker, and will provide a good exercise in layout, cutting, and welding. With a little careful work, you can design a truly unique dashboard, and it can be a real focal point for your truck's interior, as well as a testament to your design and fabrication talents. If you want to see Ron Covell and the project truck on TV, check the program listings for the Classic Rides program on the DIY Network's Web site. The series featuring the truck should debut in early 2006.