
Steve Frisbie of Steve's Auto
Restorations in Portland, Oregon, has been using lead for nearly 30 years to help produce some of the finest customs and street rods in the country. Although Steve produces and sells a DVD that covers all the basic tools and techniques needed for the beginning lead worker, he has agreed to share some of his insights with us in this two-part series. Steve will first provide an overview of tools and materials, and will then steer us step-by-step through a proper lead repair.
Major auto manufacturers began using lead to fill seams and gaps between panels nearly a century ago, but it was the torch-wielding artisans of the post-World War II era who are responsible for forging the malleable metal's indelible role in custom car culture. The use of lead was so prevalent during the first major wave of automotive customizing in the late '40s and early '50s that an entirely new breed of custom emerged, the iconic leadsled. Lead was the medium that allowed early customizers the freedom to chop at will and painlessly erase any evidence of wrong doing. How-to lead articles were advertised as one of the fundamentals of customizing during the mid to late '50s, and were routinely published in titles such as Rod & Custom, Hop Up, and Car Craft. Although lead was superseded long ago as the body filler of choice in the automotive repair industry, lead work has maintained a legacy of mystique and expert craftsmanship. The development of high-quality polyester fillers has reduced the number of capable lead specialists to a scant few, but lead can still serve a vital role in a premium custom body shop.
Although most body shops across the country use polyester fillers exclusively because they are cheap and easy to work with, lead has yet to be rendered obsolete. Lead work requires a skilled hand and patience, but in the ultra critical world of high-end custom paint, the goal is always quality, and quality takes time. In most situations polyester fillers are completely acceptable and perform admirably, but there are some basic properties of lead that make it better suited for some types of repairs. Lead is a much denser and more stable material than polyester filler, and, unlike polyester, tends to shrink and expand at the same rate as the base metal. This stability dramatically reduces the potential for the paint to shrink back into the material and reveal sand scratches, which is a far too common occurrence when materials are sprayed over polyester that has not fully cured. Lead is also much more suitable for use on edges of doors or fenders and will not crack off as easily as polyester.
Polyester fillers also have a tendency to trap innumerable air bubbles when mixed too hot or applied incorrectly, and air bubbles can lead to blisters and pinholes in a painted part. Lead is far less susceptible to trapping air pockets because the material is melted in the application process and allowed to flow into the void being filled. If, by chance, tiny air pockets are trapped by the lead, the sheer density of the material prohibits the air from ever escaping. The natural stability and density of lead also contribute to the longevity of repairs in which it is used. Although lead can become brittle and begin to crack after decades of extreme expansion and contraction, chances are you will start breaking down long before the repair.
The basic tools and materials you will need to assemble to fool your friends into thinking you actually know what you are doing is short, but specific. The first thing you will need is a chemical respirator. Although the toxicity of lead is common knowledge, the fumes from the hydrochloric acid in the tinning solution are equally dangerous
Prior to melting lead all over your feet, the base metal in the area to be repaired must be clean and free of rust and contaminants. Steve likes to wipe the area down with lacquer thinner and then, with a respirator on, scrub it with a wire brush dipped in Stay-Clean soldering and tinning flux. The tinning solution ensures a clean and etched surface that is ready for the tinning process.
There are some basics about lead that you need to know before you get your tackle box out and start melting a bunch of fishing weights into a puddle. The lead you need is not just lead. The lead used in auto bodywork is a special mix referred to as 30/70 lead, which is a tin/lead alloy. The number designation means the alloy is composed of 30-percent tin and 70-percent lead. Lead is available in other designations, so make sure you get the right stuff. If you use the wrong type of lead it may be hard to work with or too brittle. Another bit worth mentioning is that many guys try to reuse the lead that hits the floor after filing for something other than paperweights, but this is a risky practice. The chemical composition of the alloy may be altered when melted and result in a mixture other than 30/70 and potentially cause problems in future applications.
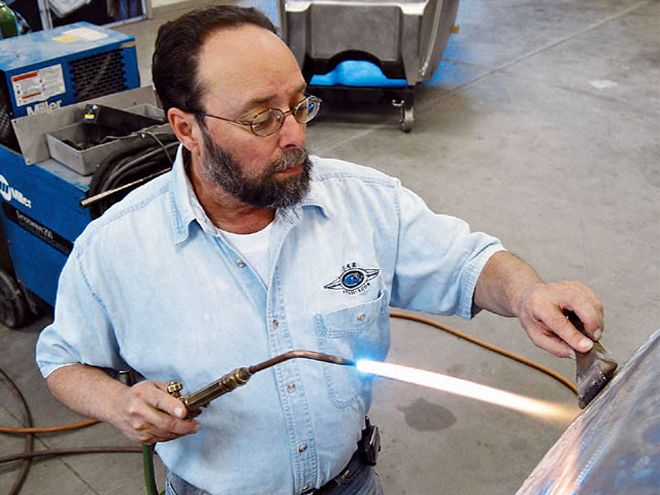
An oxyacetylene torch with a small tip (00-02) is necessary to produce a consistent source of heat that is easily adjustable and controllable. Typically, a feathery flame with very little yellow on the end and a bluish-white core about 1 to 1 1/2 inches long provides the best results. The base metal must be slowly and evenly brought up to temperature by being tickled with the feathery tip in a consistent motion over and around the area that will receive the lead. Never heat the base metal in one spot or make it red hot. This is where patience comes into play. The size of the flame and amount of heat introduced to the base metal is crucial to the effectiveness of the repair. If the flame is too hot the base metal can become overheated and warp, and the lead will simply melt all over the part and drip onto the tops of your shoes. If the base metal is too cool the lead will not properly adhere, and the entire repair will have to be redone. The whole process sounds intimidating, but practice makes perfect.
Next, you will need a least one wooden paddle and some bee's wax. The wooden paddle is used to smooth out the lead after it has been melted onto the panel. The paddle must first be heated and then coated with the bee's wax. The wax helps prevent the lead from sticking to the paddle and burning it. By smoothing the lead with the paddle you will be able to evenly direct the lead into the desired areas, which makes filing and sanding the lead much easier.
To finish the job you will need a sharp file that fits the contour of the desired shape. A grinder, though effective, is not recommended because lead is so soft that you can quickly remove too much material and have to start over. Grinding lead can also fill the air with toxic dust that will undoubtedly settle on everything you own. Files are available in many different shapes and sizes and, like potato chips, you can't have just one.
Now that Steve has shared with us the basic tools and materials needed to look the part of a professional, he will show us how the real work is done in the next installment.
A chemical respirator is a must-have. Both lead and the hydrochloric acid in the tinning solution are toxic. Be certain you have the appropriate cartridges.
Some sort of tinning solution or compound is absolutely necessary to maximize adhesion.
A quality oxyacetylene torch setup is necessary to produce a consistent and controllable flame.
Assorted wooden paddles are used to shape and smooth the lead. Short ones, long ones, round, and flat all have their place.
Do not expect paddles to last forever. Over time the molten lead will char and slowly eat away at them.
Notice the difference between the flat and round paddles. The round one works excellently in concave areas.
These two new paddles, one flat and one rounded, are available from Steve's Auto Restorations.
This is a well-used chunk of bee's wax that is used to coat the paddles and prevent lead from sticking to them.
Like paddles, you can never have too many different types of files.
This is a flexible, flat mill body file with eight teeth per inch for fast cutting. It is secured to a maple handle, but files are easily replaceable.
This half-round body file is similar to the flat mill but is ideally suited to concave surfaces.
Here you can easily see the difference between the flat file on the left and the half-round on the right. These two files should be the ones to start your collection.
This adjustable file holder uses the same flat mill file as the maple holder but can be adjusted to shape the file to fit a number of contours.
This is one of Steve's homemade file holders. Sometimes you have to be creative to get the job done.
This unique bullnose file is one of Steve's favorites. It works great in odd contours and tight spots.
Although this small file (only about 3 inches long) is rarely used, it is irreplaceable in tight spots.
Here are three different shapes of lead rod. From left to right is a tri-bar, round-bar, and star-bar.
This custom taillight application is a perfect example of how lead, when used properly, can be a customizer's best friend.
Steve's Auto Restoration
4440 SE 174th Ave
Dept. SRM
Portland, OR 97236
(503) 665-2222
www.stevesautorestorations.com