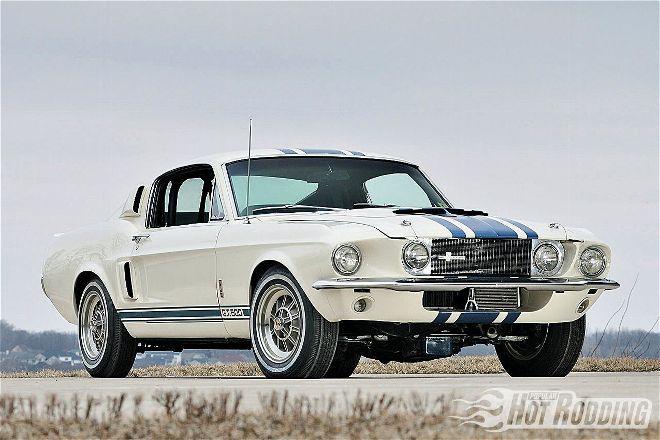
After a lengthy build full of custom fabrication, we were finally at the point with Project Max Effort where it needed paint. Still wearing its aged and discolored original white coat contrasted with bare steel, Max's appearance just wasn't flattering for a car with so much quality work in it. It was time to get Max respectable looking, and we needed the right guy to show us how it could be done. Thankfully, we met that guy at the Goodguys Columbus show, where he was standing next to the coolest custom 1967 Cougar we'd ever seen.
That guy was Wes Adkins, aka "Wild Wes." Adkins has been an artist and painter literally his whole life; he started learning by helping his father in his small paint shop when he was just a little Wild. He learned the body and restoration trade quickly and began painting when he was only 12 years old. By the time he was 18, he was already winning awards for his work on show cars. As luck would have it, Adkins is an admitted Cougar fan, and knew our own project well. What started as a happenstance conversation quickly grew into the opportunity to explore the boundaries of designing, restoring, and painting what may be one of the nicest street-legal Mercurys in hot rodding history. We just had to figure out how to do it all with materials and tools you can easily get using techniques you can duplicate at home, then cram all Adkins's know-how into a short 14-page story!
Evolution of Design
When we started on our 1967 Cougar project, we knew everything under the skin would be modern race equipment, but we wanted the exterior to have a vintage racing flavor. Something like Shelby American would have built if there had been a GT350 version of the Cougar. With that in mind, we asked artist Tavis Highlander to sketch the first incarnation of the Max Effort Cougar based on Jerry Titus' Team Terlingua 1968 Mustang, one of the earliest Trans-Am racers with the blacked-out hood treatment.
With an ethos of function over form, we didn't give Max's paint scheme much more thought until paint and body time. By then, we felt the simple white/black look lacked the colorful punch that it deserved, so we called up Highlander again to bench race ideas. This time we decided to pay homage to the Bud Moore Trans-Am era Cougars, but combine it with a different upper treatment. Turning back to that original Shelbified Cougar idea, we remembered our favorite Shelby of all time: the one-of-one 1967 GT500 Super Snake. So Highlander took the Super Snake's unique three-stripe theme, combined it with the Trans-Am Cougar lower body stripe, and created a new vision for Max Effort. As you can see from the end result, it pays dividends to plan your paint design well in advance; a quality rendering like one from Highlander can be the shining beacon you need in the darkest hours, motivating you when your ride is sitting in a corner, stripped and awaiting rust repair.
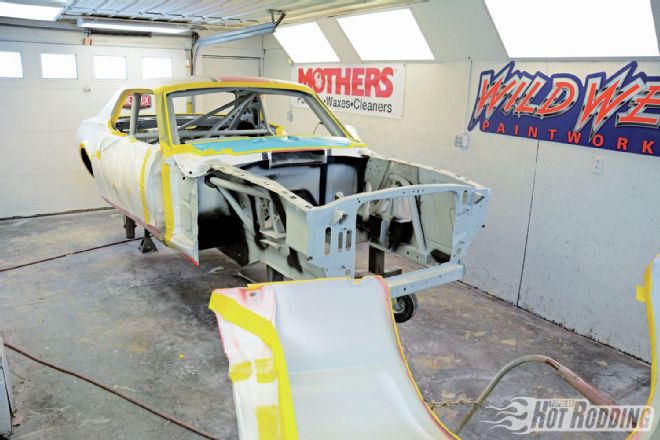
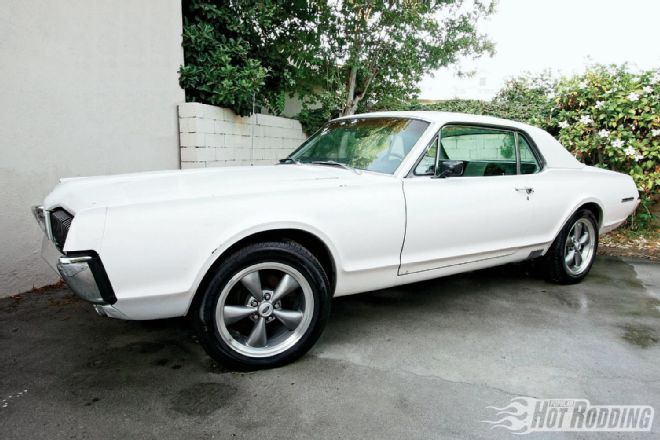 1. Max Effort was a very clean-looking white-on-white ’67 XR7 Cougar when we picked it up in 2010. As we discovered earlier with Project Nova, white paint is quite forgiving in photos. It was complete, but everything was tired and in need of attention.
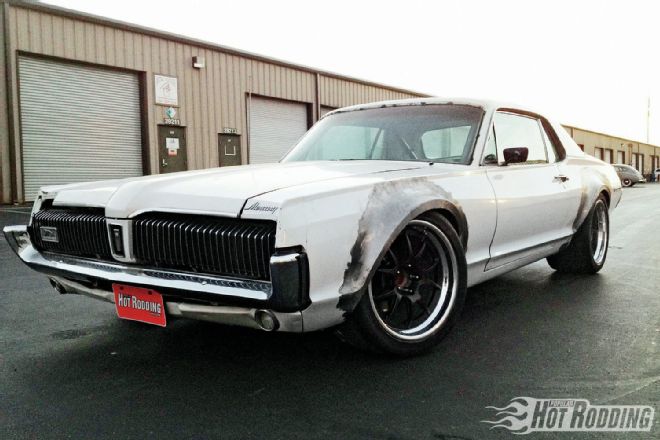 2. Fast-forward through three years of fabrication and custom work: Max has a much more imposing appearance. Living at shops and in less-than-ideal storage conditions had taken its toll. Max’s paint had degraded and, combined with dings and rust spots, it was walking the line between looking tough and just rough.
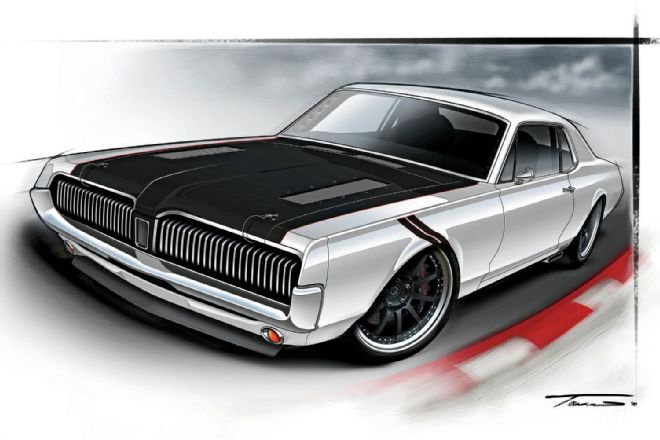 3. It’s hard to go wrong with the simple matte-black hood treatment. Based off Jerry Titus’ ’67 Mustang coupe, Highlander created the first rendering of Max Effort. We actually still like this version, but decided Max needed more color, and we needed to update the various changes Max had gone through during the build.
 4. When looking through vintage stripe packages, we wanted a Shelby American feel, but definitely not the typical dual stripe. The one-of-one ’67 GT500 Super Snake’s unique triple stripe struck us as a good place to start.
 5. We love how the red and silver Bud Moore Cougars looked, but we wanted Max to have its own identity that would be instantly recognizable. Nearly every Trans-Am Cougar we’ve seen had that lower body stripe, so we decided to pay homage by working it into the new look.
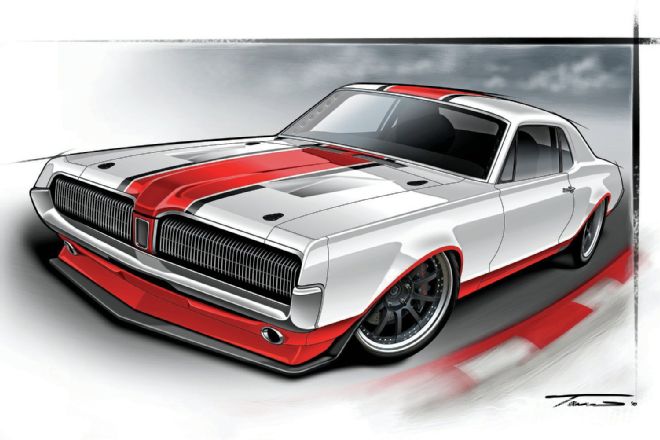 6. After a few days of trading ideas back and forth with Highlander, this was the final look. It hits both the Trans-Am and Shelby notes while still being distinctive. Note the larger wheel flares, the custom air extraction hood, the custom grille by Adkins, and the chin spoiler and splitter that we’ll build later.
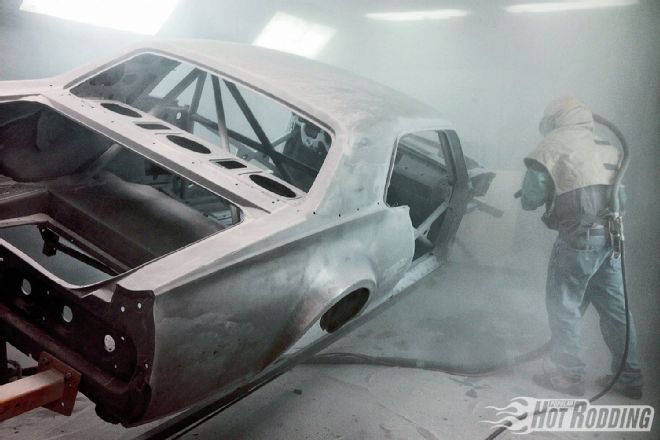 7. To remove the excess crust, rust, and paint, we stripped Max down and sent it to PCPC. This is a great shortcut if you’re in a hurry and have the cash, but many hobbyists elect to media blast at home with a media blaster from Eastwood, Summit, or Harbor Freight. Mechanical removal of paint through abrasives is also an option, as is chemical removal with sprays. (Check out the Feb. ’14 issue for more details on how PCPC blasted, then powdercoated the Cougar’s body.)
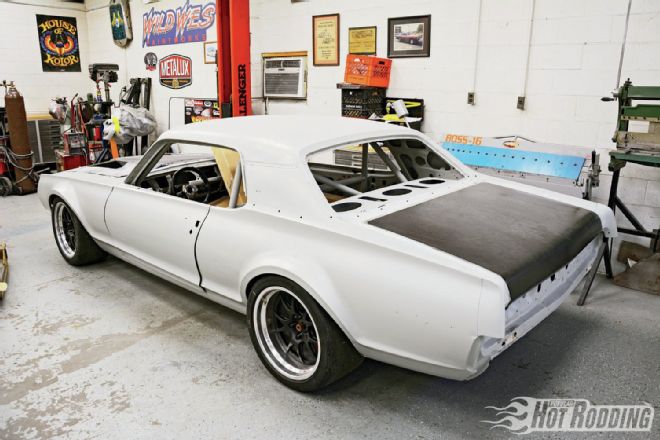 8. Here’s how Max arrived at Wild Wes Paintworks after being transported by Reliable Carriers. Note the decklid—it’s a hand-laid carbon-fiber piece we built along with an air-extractor hood.
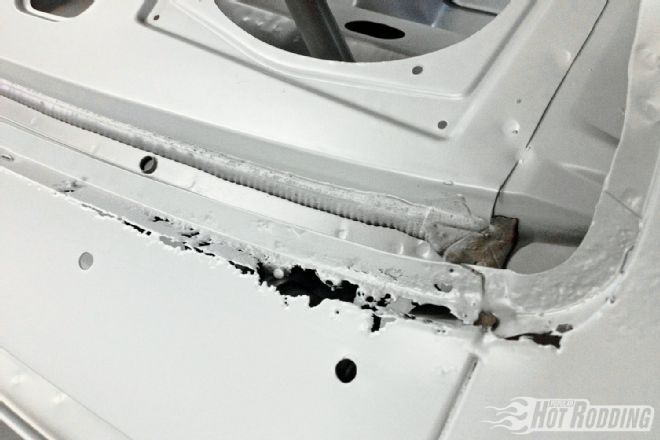 9. We didn’t have any real surprises from the blasting, other than large portions of the rear windshield filler panel disappearing. This is very common on ’67-68 Cougars, especially if they were equipped with vinyl tops. Max had one originally.
 10. Rejoice Cougar fans! WCCC has just released the very first available patch panel for Cougars. We’re pleased to report that it greatly simplified the repair, and it fit like a glove. We’ll have a great how-to on replacing rear window filler panels in an upcoming issue.
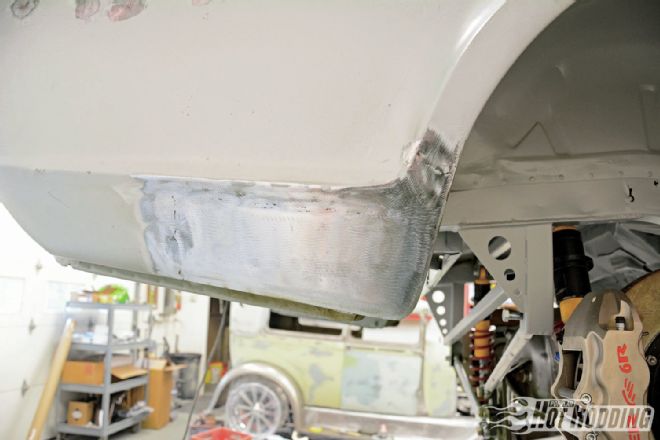
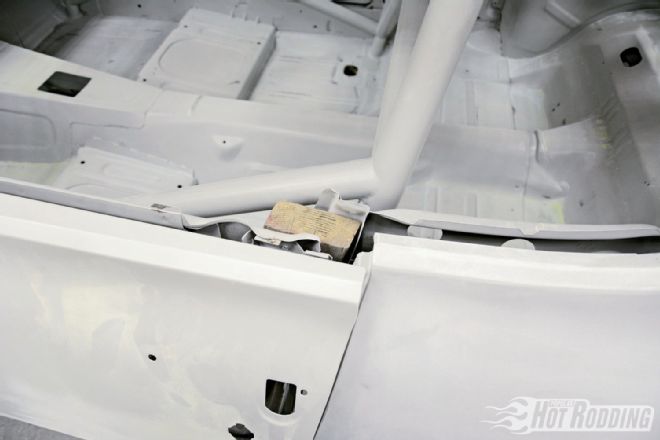
 11. Luckily most of the rust did not carry through to the inner structure (except the driver’s door), so patching was greatly simplified. The ¼-inch round bar at the forefront of the photo is the structure for the new wheel lip on the custom flares.
Assessment & Blasting
Our gut always wants to just sand and spray, but sometimes it's not the wisest decision. In this case, we knew that we had to take Max down to bare steel since much of the paint had been sanded off for fabrication purposes. Moreover, the quality of the paint that was still clinging was a poor base to apply new color over, and rust was bubbling in the driver's door, both rear quarter-panels, the trunk floor, below the rear windshield, and (we suspected) the cowl vent as well.
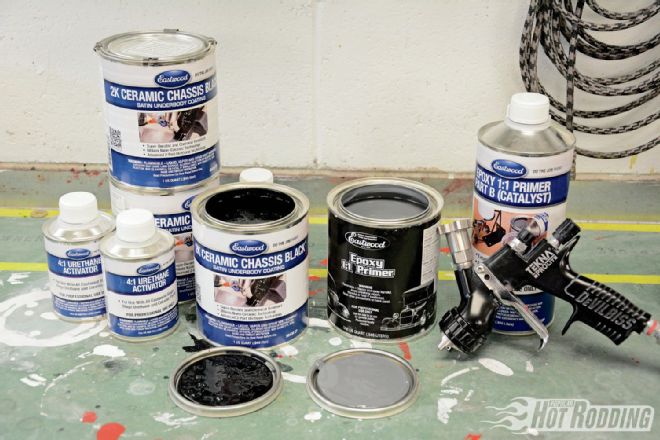
For paint stripping, Pacific Coast Powder Coating (PCPC), our go-to blasting shop, typically uses nonabrasive plastic bead, which is essentially just crushed buttons. This stuff will remove paint, but it will not build heat and will be kind to the body panels. In areas that need more aggressive material to remove heavy rust, undercoating, or other more dense buildup, PCPC used aluminum oxide to blast away the crud. If you find yourself in this situation where the rust is piling up, and you want to get to the bottom of it fast, a commercial stripper like PCPC is the way to go, but it's not the only route. Eastwood offers affordable mediablasting solutions for home use, such as the dual-media Master Blaster covered in our Project Nova resto.
As is typical, all the small spots of rust that were visible grew greatly in size once the paint was removed. Unfortunately, that's typical with rust, and like the iceberg that sunk the Titanic, there's always a lot more than meets the eye. The rear windshield filler panel on Max was perhaps the biggest surprise and the most extensive rust that was uncovered. Before moving on to the repairs, PCPC applied an epoxy primer powdercoat over the entire body and chassis to completely seal it. Since it's applied as powdercoat, the tiny particles drift into every nook and cranny and completely seal the body.
Rust & Damage Repair
Despite being fairly popular in their day, Cougar's don't have a great deal of aftermarket replacement patches available for rust repair. That's why we were extremely excited when West Coast Classic Cougars (WCCC) offered up the very first preproduction version of their rear windshield filler for 1967-68 Cougars to help us with Max's repairs. This panel is an extremely common spot for Cougars to rust, especially those equipped with vinyl roofs. Until now the only option was to seek out a less damaged one in a junkyard or spend a great deal of time patching. Now, the process is as simple as drilling out spot welds, clamping in the new panel, and spotting it in place. Watch for the full tech article on this exciting new patch in an upcoming issue.
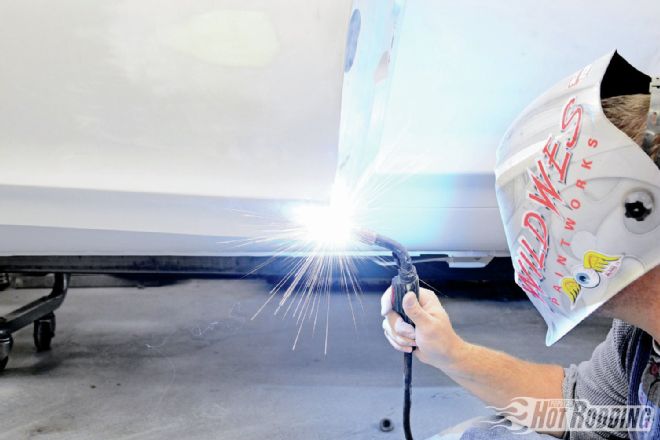
Unfortunately, the rest of the rust patches would need to be handformed. Thankfully, Adkins has a well-equipped shop and is adept at creating custom steel. We already knew there was rust on the trunk floor, but the driver-side door was also revealed to have significantly more damage than previously thought, and both quarter-panels were harboring rust behind the wheelwells. For all affected areas, Adkins used a Norton cut-off wheel to remove all the affected steel and create a simple geometric hole to patch.
Starting with flat pieces of steel snipped to roughly the correct size, Adkins used a combination of Eastwood body hammers and dollies, as well as an Eastwood shrinker to compress excess material and form patches that laid precisely into the cut hole. Once he welded it into place and ground it down, it was impossible to tell that there had even been rust. Becoming an expert takes practice, but the techniques are quite simple and easy to learn. (Look for more in the Apr. '14 issue with the details on how Adkins shapes steel.)
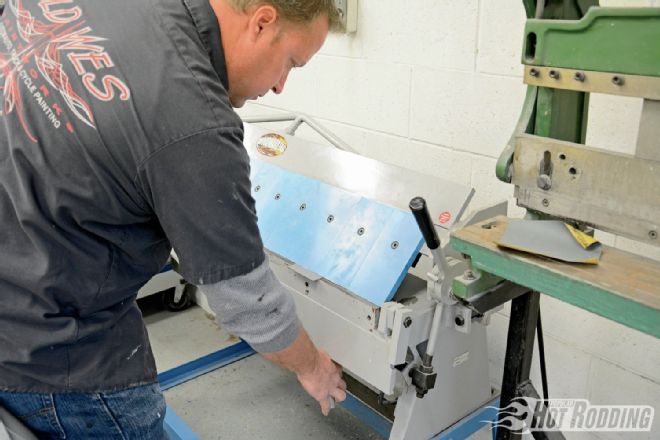 12. To create a true and sharp bend in patch panels, Adkins uses a Woodward Fabrication BOSS-16 50-inch box and pan brake, available through Summit Racing. Smaller versions are available, and Eastwood carries a convenient vise-mounted version for home garages. We highly recommend one if you do your own metalwork.
 13. The sheetmetal brake can help get curves started, but to truly form in the right shape to match the original requires hammer and dolly work. Adkins has a selection of popular Fairmont body hammers from Eastwood for shaping. Here he has one clamped into a vise while he works the edge of the patch. This curve will also require a bit of metal shrinking to pull it into shape.
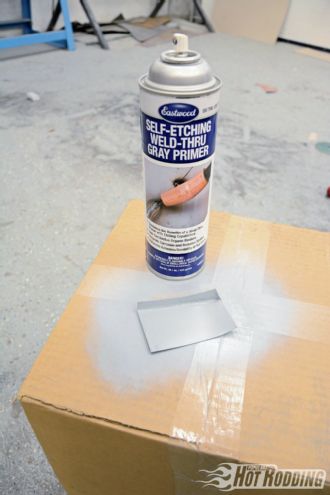 14. Before tacking any of the patches into place, Adkins coats the backside with Eastwood Self-Etching Weld-Through Primer for protection without contamination.
 15. Trial fit and reshaping is the name of the game for custom patches. Don’t get in a rush; taking extra time at this stage will pay off later in the final product. More work here equals less bodywork later.
 16. Patience results in a panel that’s almost impossible to spot once welded in and ground down. A few tiny pinholes in the welds are visible; Adkins will completely fill all of them with weld to ensure no air gaps are left for possible moisture retention. For more tech from Adkins on how you can make your own custom patch panels, check out last month’s issue.
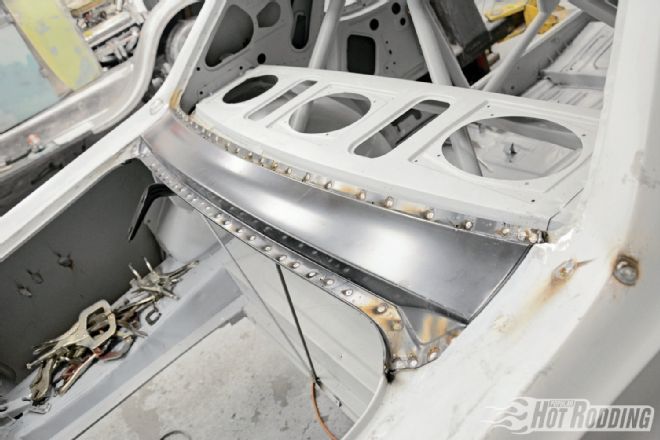
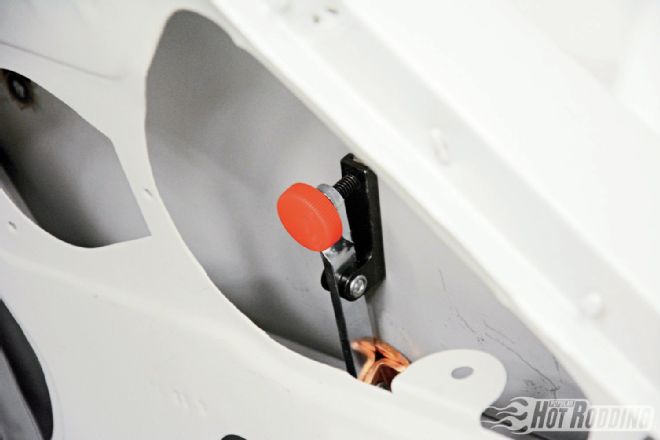
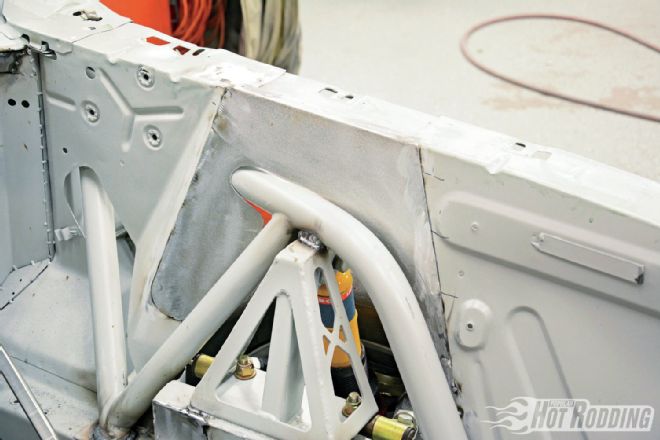 17. Speaking of patches, Adkins was able to make our absence of shock towers into an attractive addition to the engine bay by integrating the Kertz Fabrication rollcage into the wall. The lower section was left open for ease of maintenance and to show off the CorteX Racing Xtreme Grip Vintage Full Race front suspension.
 18. Though it was pulled off early in life, Max was originally equipped with a vinyl roof, as were most XR7 Cougars. We’re not installing one, so we need to fill the original trim holes. These are roughly ⅜ inch, far too large to simply tack them in. Eastwood has the perfect problem solver with this magnetic hole filler.
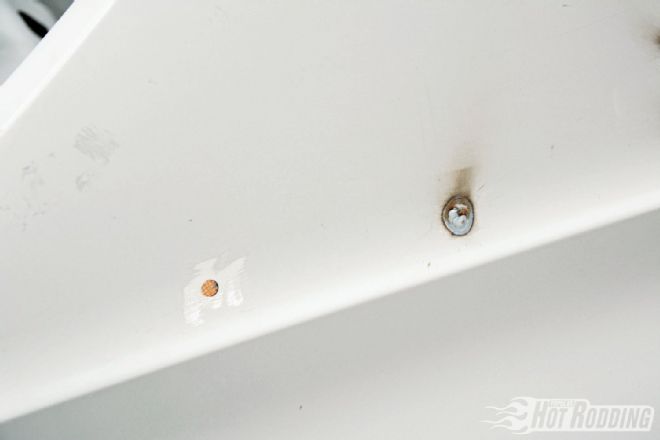 19. With a copper head that won’t adhere to or contaminate steel weld filler, the Eastwood magnetic hole filler provides a copper surface against which Adkins can slowly fill the hole. Though it also acts partially as a heat sink, avoid putting too much heat into the sheetmetal.
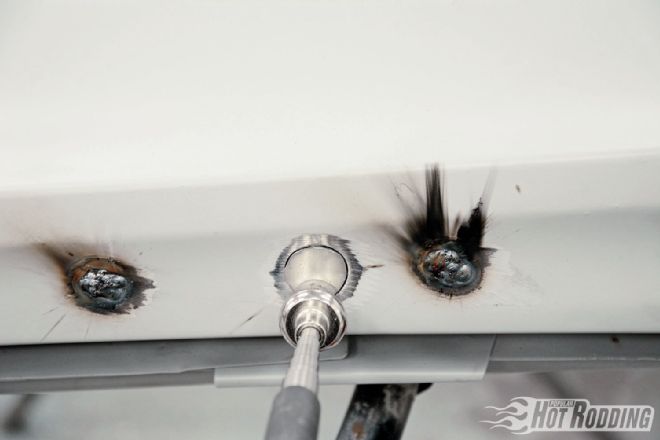 20. If the hole is too large for the Eastwood tool or it’s simply not possible to slide it behind the hole, we have to cut a patch. To hold a small piece like this into place, use a strong magnet. This will keep it level with the surrounding sheetmetal and keep your hands away from the heat.
 21. Our Cougar was fairly straight for a 46-year-old muscle car, 21. but had plenty of dings at the apex of the body. Look closely and you’ll see three typical dents on the front of this quarter-panel.
Bodywork
While it appeared fairly straight, after more than four decades Max had plenty of dings and minor damage in the sheetmetal. Before moving on to body filler, the goal is always to remove as much of the inconsistencies as possible by hand. The key here is patience and the right tools, namely a good set of hammers and dollies, such the Fairmont tools from Eastwood. The idea is quite simple: press an appropriately shaped dolly against one side of the steel while tapping the other side with a body hammer. (You will want to experiment with various techniques, as hammering directly on the dolly versus off the dolly will produce different results.) Stamped metal does have a memory, so hammering is used to coax it back into the original location.
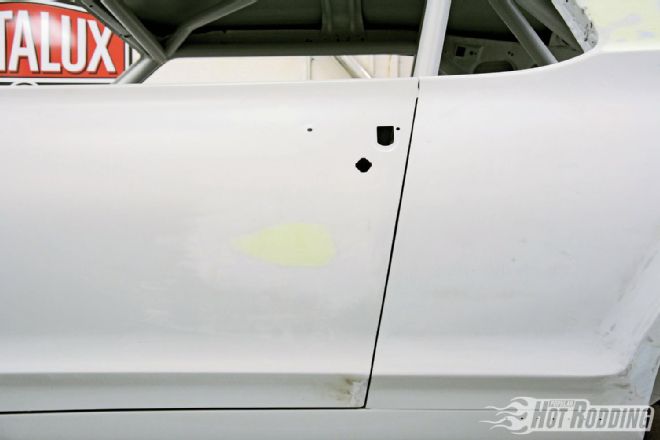
We wanted to de-badge the Cougar and fill the holes left from the factory vinyl roof trim, radio antenna, and external rearview mirror, so we had holes of various sizes to delete. The diameter of the holes dictates what method is used to fill them. For example, the rather small 3/16-inch diameter holes from the pushpins on that factory quarter-panel emblem are the easiest to fill, requiring only a few quick tacks from a MIG welder followed by grinding the welds level. The much larger ⅜-inch diameter holes used for the vinyl top trim, however, require a backing plate for the welds to bridge the gap successfully. For that, Adkins used an Eastwood Magnetic Hole Plug Welding Tool. Featuring a copper head that welding wire will not adhere to, the tool is ideal for holes up to 1 inch in diameter. Using this also keeps material waste and heat to a minimum when filling larger holes. Sometimes, however, there are spots that such a tool simply will not fit behind. To fill in the larger holes left by the factory remote door mirror, Adkins used a magnet to hold a small circle of steel into place as he welds it in.
Door Fit
From the factory, most vintage cars had mediocre door alignment at best, so taking the time to make it perfect makes any car stand out from the crowd. Max's doors were in decent alignment, so before removing them for blasting at PCPC the hinges were pinned, meaning a hole was drilled through them to mark their location on the body. Using this as a starting point, Adkins left the bolts on the body side of the hinge loose and adjusted the rear of the door to match the quarter-panel body lines as much as possible. He then tightened the body side of the hinge and slightly loosened the door side. This allowed him to adjust the forward edge of the door to match the rocker panel. Theoretically, if the door is true, then this should align the rear to the quarter as well. Nevertheless, slight twisting that causes the lower section of the rear to stick further out is extremely common. Adjusting this requires a bit of brute force. Using a wood block placed at the top of the doorjamb, Adkins twisted the rear of the door to push the bottom in and force the top outward. Pushing a little at a time and checking progress eventually yields a door that will line up at the top and bottom.
 22. Dings are shallow by nature, but rather than fill them in, Adkins makes the metal as perfect as possible first. Using a Fairmont body hammer and heel dolly, he gently taps the sheetmetal from the inside to push the ding outward. The dolly essentially provides a stopping point for the metal.
 23. Panel alignment makes all the difference on any level of paint and body. It’s fairly common, however, for panels to simply not be straight. Driver-side doors, for example, are often twisted out of shape and cannot be completely aligned. To address this after he has aligned them as nicely as possible, Adkins must twist it back. He first places a wooden block between the top of the door and the jamb.
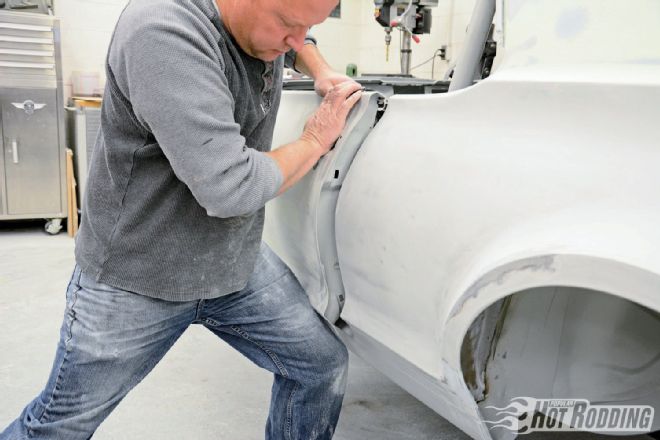 24. With the top of the door braced, he pushes slowly, but very forcefully against the lower section of the door. Go slowly here and check your progress regularly.
 25. Previously the bottom of Max’s door stuck outward about ⅜ of an inch from the quarter-panel; now it sits perfectly flush.
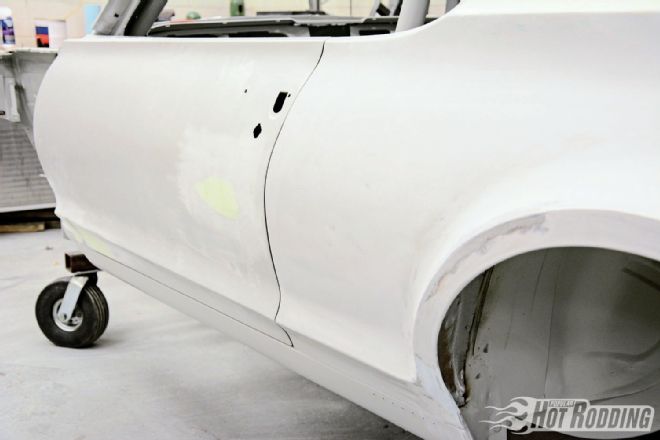
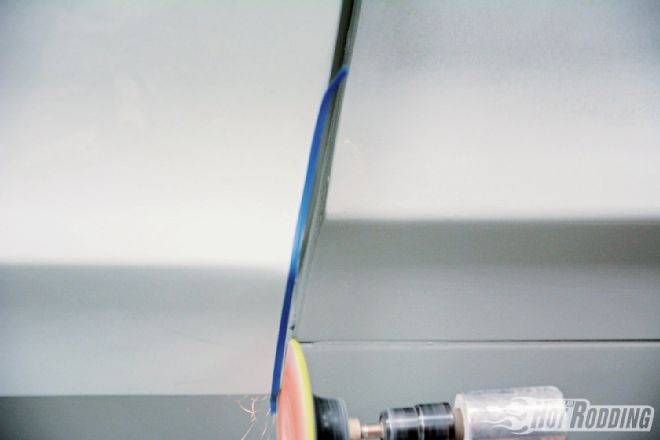 26. Panel gapping is another hallmark of a quality resto. Max fit pretty well, but the lower sections of the doors were a bit tighter than the ideal ⅜-inch gap due to a high factory tolerance. To remedy this, Adkins ran a line of Norton detail tape down the side to mark the ideal line, then ground the extra steel off with a Norton abrasive disc.
 27. The grinding breaks through the doorskin, so Adkins tacks everything solid again and then grinds down his weld.
 28. That extra attention to detail results in a door with absolutely perfect gaps all the way around. Little tricks like this are worth doing to achieve a tighter, more precisely built look.
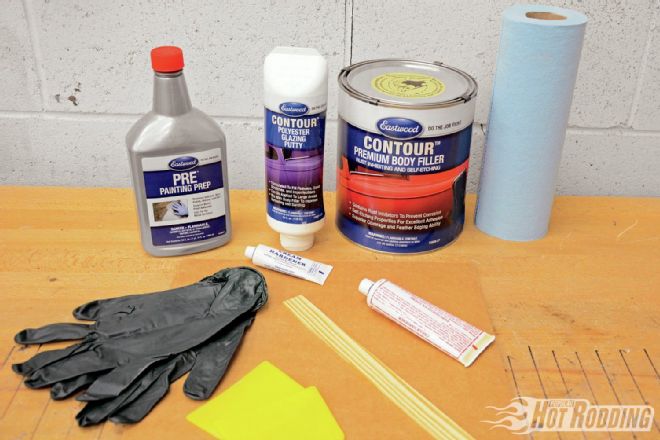 29. High-quality fillers make for easier spreading, sanding, and a superior surface for applying the primer. Eastwood’s Contour Premium Body Filler and Contour Polyester Glazing Putty are some of the best out there, while still being affordable. The Eastwood Pre Painting Prep and fresh blue shop towels will be used to clean the surface prior to priming.
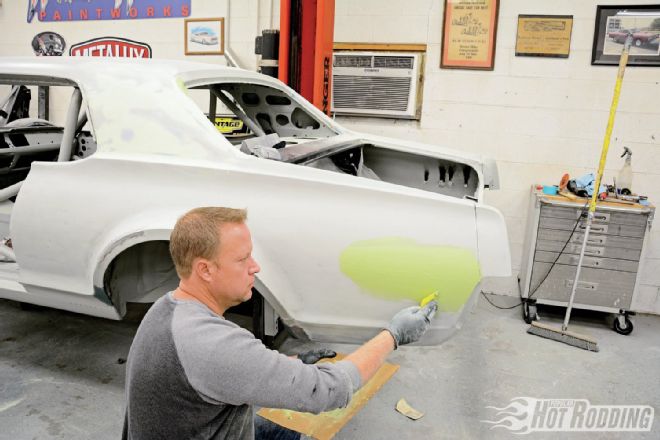 30. After adding the correct ratio of hardener to the Contour filler, Adkins uses the plastic blade to spread a thin layer of the filler across areas with repairs or known low spots, such as the previous location of the rear emblem. The main concern here is smooth, consistent application with no air bubbles.
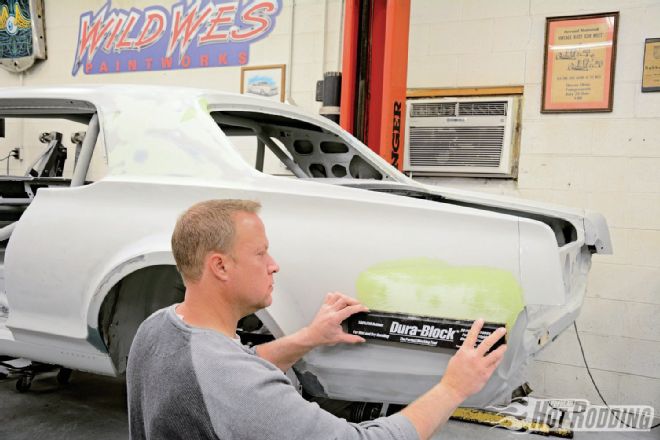 31. Quality blocks make a difference, so Adkins used Dura-Blocks from Eastwood. A good rule of thumb is to use the longest block possible and work in an “X” pattern following the curve of the surrounding sheetmetal. Remember, these lows are millimeters deep at best, so much of the material will be sanded off.
 32. Flat blocks won’t work on curves like a Cougar’s fender flares or body lines. For this, Adkins switches to a teardrop profile Dura-Block that lacks the sharp edges of a standard block and will flow with the contour.
Filler & Sanding
Prior to any filler work or applying primer, be sure to rough all epoxy-coated surfaces with a minimum of 180-grit media to promote adhesion. Adkins started with USC All Metal 14010 and USC Duraglas 24030 from Eastwood for areas that have been patched or welded. These fillers are less likely to absorb moisture. Normal lightweight fillers are basically talc and resin, and talc absorbs moisture readily, the difference being that All Metal is comprised from aluminum particles and resin, and Duraglas is ground fiberglass strands and resin.
Duraglas is also preferred for areas that may need a little thicker application as it is much stronger than a lightweight filler. Adkins uses it to get close, then switches to a lightweight filler that is much easier to sand. Eastwood Contour Premium Body Filler 13520 ZP was used for most of the areas, followed by Eastwood Contour Polyester Glazing Putty 13521 to fill any micro pinholes that are common with lightweight fillers. Remember the smoother and more carefully you apply the fillers, the easier it is to sand and shape. Take care here to save yourself from unnecessary or additional work due to sloppy application.
Once dry, the filler was rough shaped with Norton 36-grit, then finished in 80-grit before applying Metacryl Epoxy primer. Epoxy was chosen to ensure a good bond and corrosion resistance to the existing PCPC powdercoated epoxy primer and seal any raw metal spots exposed during bodywork. Metacryl Epoxy primer (gray) 7396A mixes 1:1 with 7365 Hardener. Adkins applied two medium coats, allowing each to flash 20 minutes before applying Metalux 2K HS Filler Primer 9341 in three coats, allowing 15 minutes flash time between coats. This filler primer mixes 4:1 with 9091 Hardener (fast, there are multiple speeds available for different temperatures). This versatile primer also doubles as the final sealer at a 5:1:1 mix ratio with ChemSpec 1155-222, which conveniently eliminates the need to purchase another product.
Final Block Sanding
After the primer had cured overnight, Adkins used Norton 80-grit for the initial block sanding. Some may cringe at the thought of using such an aggressive paper to start with, but Adkins prefers the faster cut since it makes a car straight in a fraction of the time it would to start with 180-grit. With three coats of the Metalux high-solid primer, there is plenty of material to cut, and follow with 180-grit to smooth out the rough scratches before repriming. Norton Black Powder Guide Coat was used to highlight the low spots, pinholes in the filler, or deep scratch lines that the primer may not have filled. To eliminate them, Eastwood Contour Polyester Glazing Putty was applied and finished with 180-grit prior to re-priming with the ChemSpec 9341 filler primer.
The second round of filler primer gets two medium wet coats, allowing 15 minutes flash time between and at least overnight drying time before blocking again with 220-grit. After the 220-grit, Adkins reapplied the Norton Black Powder Guide Coat and re-sanded with 320-grit. If everything looks good, you are ready to go to the booth. If more work is needed, it's not necessary to re-prime the entire car; just spot prime and repeat the final sanding steps.
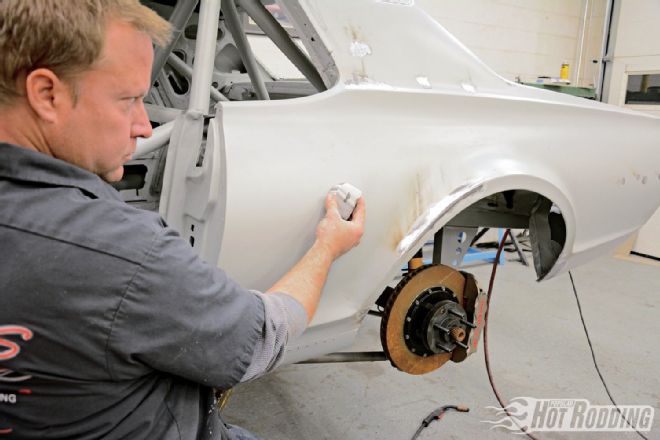
 33. During the blocking phase you’ll mostly find low spots, but occasionally around repairs there will be a high spot. The fix here is simple: lightly tap it flush. Body hammers, like this Fairmont pick are ideal for this. Never use a standard hammer.
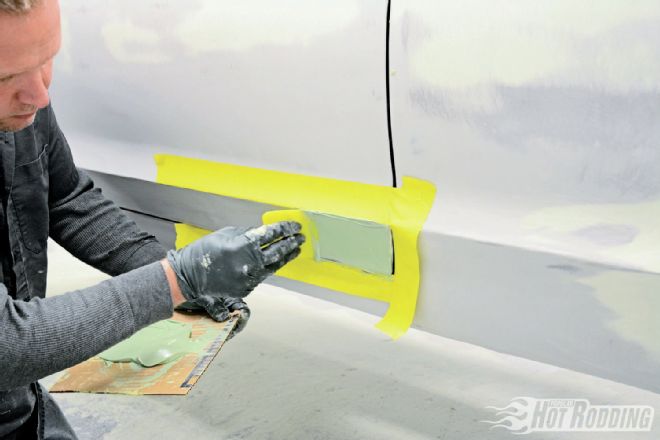 34. Here’s a useful trick for controlling unnecessary filler spread and minimizing work, especially around body lines and panel gaps. Adkins uses Norton painter’s tape to create a border around the area to be worked that can be pulled away. That way the line stays crisp and filler does not flow into the gaps.
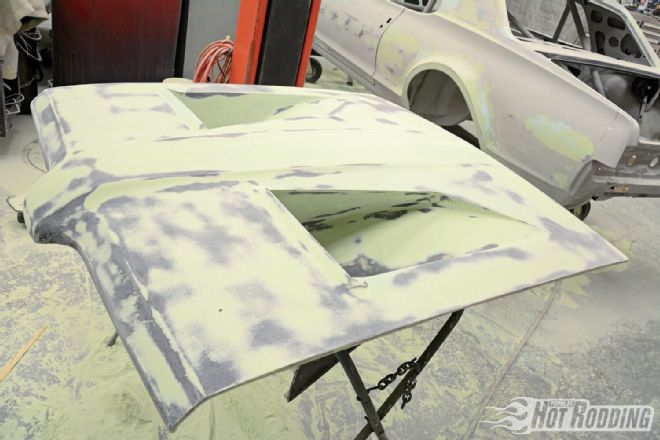 35. This is your first preview of our hand-laid carbon-fiber air extraction hood for the Max Effort Cougar. We wanted it painted rather than raw, so Adkins worked it with filler like the rest of the body. It’s far from perfect, but not bad for an ambitious design pulled together in the wee hours after work. Watch for more on how you can make your own carbon-fiber panels in a future issue.
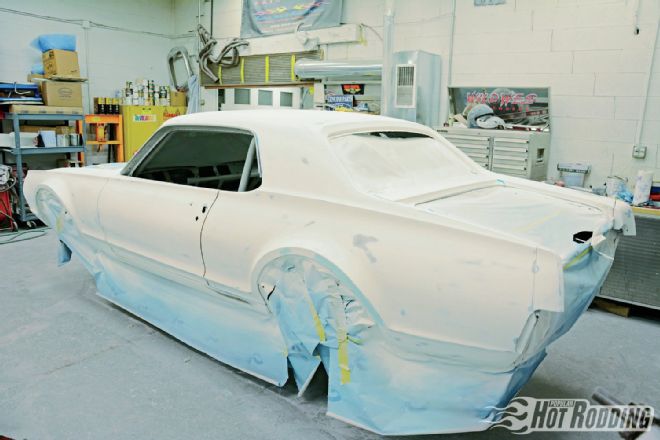
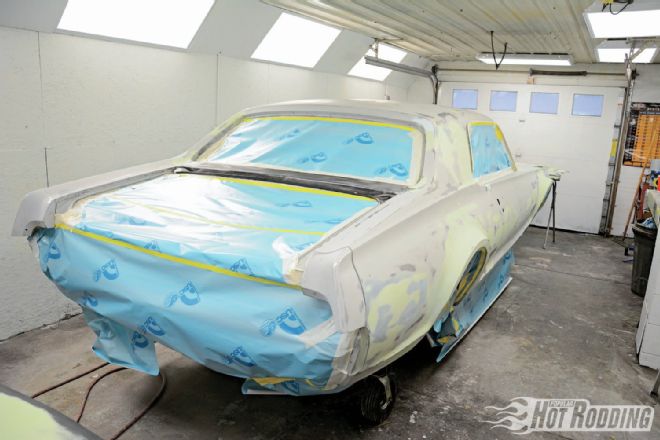 36. It’s often overlooked, but having a good masking paper makes a huge difference in the quality of paint, and can save a great deal of time. We don’t need to blast the interior with more primer, so Adkins used USC Polycoated Blue Masking Paper from Eastwood.
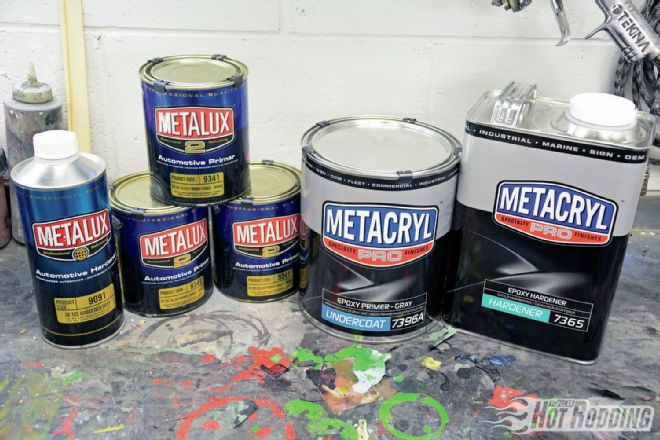 37. We’re using ChemSpec’s Metacryl epoxy primer to bond with our epoxy powdercoat from PCPC and cover any breakthrough to metal. Before we move on, Adkins will follow with white Metalux filler primer.
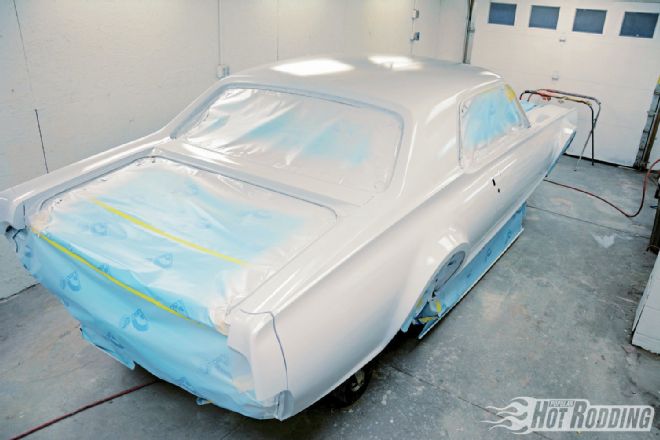 38. Filler primer is essentially another type of thin material to allow even finer bodywork. Three coats were applied, though quite a bit will be sanded off, just like with the Contour filler and glaze. Since this versatile primer can also be used as the final sealer primer, Adkins chose a white tone to ensure that the final paint had a bright finish.
 39. To find low spots, the whole car was coated with a layer of Norton Black Powder Guide Coat. This is fine charcoal that will provide a “go, no-go” gauge for spotting lows without adding more material.
 40. Nearly all of the powder will be sanded off, except where low spots persist. Some of these are extremely shallow and will be sanded out via the filler primer. Slightly deeper ones will require a minuscule smear of Contour Glaze to level them.
 41. PCPC was extremely thorough during blasting and removed all of the old seam sealer since it was dry and cracked. To replace it, Adkins used Eastwood’s 2K Self-Leveling Seam Sealer in areas like the quarter-panel-to-trunk junction where good flow is needed. In places where more viscosity is needed, such as the firewall, Eastwood’s standard Seam Sealer Cartridge will be used.
 42. After two additional coats of Metalux filler primer, Adkins reapplied the Norton Black Powder Guide Coat and re-sanded with 320. These steps essentially repeat until the body is completely flat. It took two rounds to be ready for sealer primer.
Sealer & Base Color
To keep thing simple for ordering, and for any potential damage repair due to track use, we went with standard OEM colors in ChemSpec's Metalux line of paint. ChemSpec is not widely known in the hot rodding and customizing world, but they are huge in the collision and refinishing world. Adkins loves the quality and spraying capability of the Metalux line of primers and paints, but is especially fond of how consistent their OEM colors are. He knows he can order with just a paint code and get a can of paint that will dry to a perfect match.
Before spraying any paint, the surface needs to be as clean as possible. Adkins begins by washing everything with either a solvent wash like Eastwood's Pre Painting Prep to remove any contamination like fingerprints with skin oils or dust particles trapped in the sand scratches. To dry, he only uses clean virgin paper shop towels; never reuse a shop rag for this; you will deposit contaminants from the dirty rag back onto the surface.
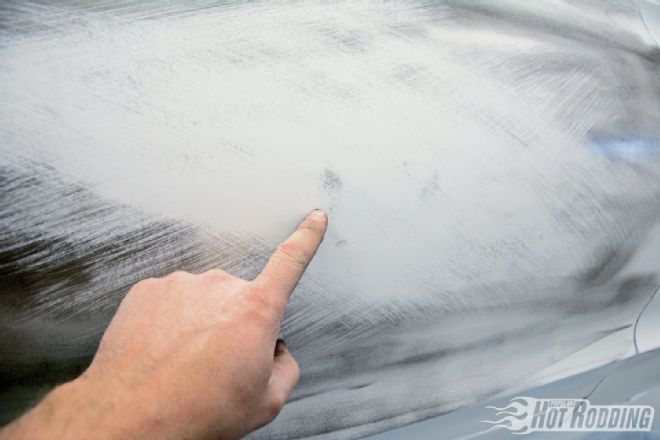
Before the base color can be sprayed, Metalux sealer primer is applied in one medium coat and allowed to flash for a half hour. Adkins inspected the finish and removed any dust nibs or texture by lightly scuffing with a Norton Soft Touch Sanding Sponge Pad (No. 03076) in 600-grit. The small amount of dust is removed via air blasting and a tack rag. The Arctic White Metalux Base Coat mixes at a 2:1 ratio with the same ChemSpec 1155-222 reducer used for the primer. Three medium coats are applied, allowing 15 minutes flash time between coats.
Stripe Layout & Clear Coat
Our redesigned paint scheme for Max looked much more aggressive and vintage Trans-Am, but it also complicated the painting process greatly with multiple stripes of different color. It takes not only multiple rounds of careful masking, but a mastery of perspective to ensure that the stripes look correct on the car. Fortunately graphics are something Adkins excels in creating. After the third coat, Adkins let the base cure for about an hour before laying out Max's stripes. (There is a lot to consider in getting the right look, so watch for a full tech article on designing and laying vintage-style racing stripes in an upcoming issue of PHR.)
Once satisfied with the striping, everything was cleared with Metalux 9354 clearcoat activated at 2:1 with 9352 2K hardener and 10 to 20 percent 1155-22 reducer. This clear is not like a traditional clear in application; it only requires a coat and a half for a 3 mil film. Adkins recommends starting with a moderate tack coat, not really worrying about getting a flow at this point, just even coverage. Then after allowing a 10-minute flash time, he follows with one good wet flow coat. The Metalux clear flows extremely well, lays flat, and has enough film build to almost level the stripes even before wet sanding and buffing. Adkins advises to resist the urge to lay this clear on extra thick, or add extra coats, as it will likely cause issues such as solvent pop or die back. This is solvent-based paint, so make sure to allow for good exhaust airflow for at least 20 to 30 minutes after spraying to evacuate and dissipate solvents.
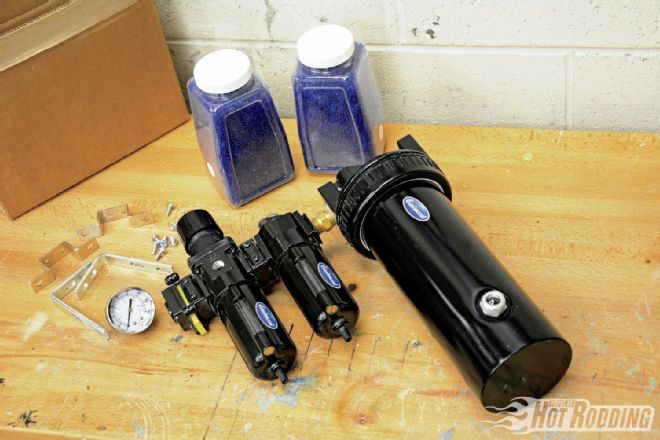 43. A key point of painting often overlooked is that you must have a clean and dry air source. Water is common in compressors due to humidity and temperature changes, and it can play havoc with drying times, adhesion, and reliability. An expensive refrigerant-style air dryer is the choice of most pro facilities, but an affordable option for quality, dry air that we can recommend is a four-stage desiccant dryer from Eastwood. Check out www.PopularHotRodding.com for more on this system.
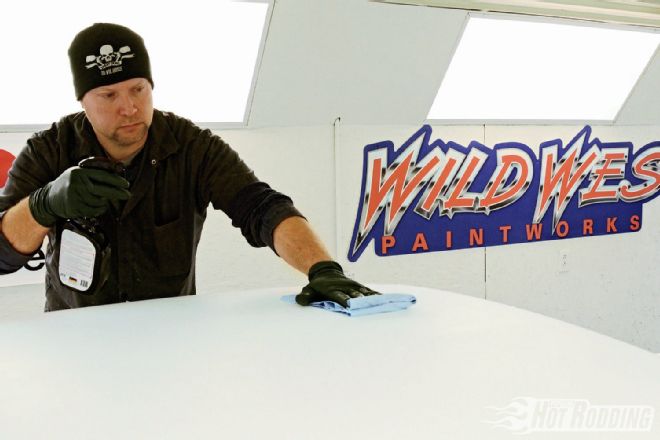 44. In painting, cleanliness is next to godliness. Contamination can ruin your day, so after blowing away particles outside the booth (or your bagged-off garage space) wipe all surfaces with a cleaner like Eastwood’s Pre Painting Prep with virgin paper shop towels.
 45. We’re finally ready for color coat. To eliminate potential contaminants, Adkins wipes everything down with Eastwood’s pre-painting prep. The Artic White Metalux Base Coat mixes at a 2:1 ratio with the same ChemSpec 1155-222 reducer used for the primer.
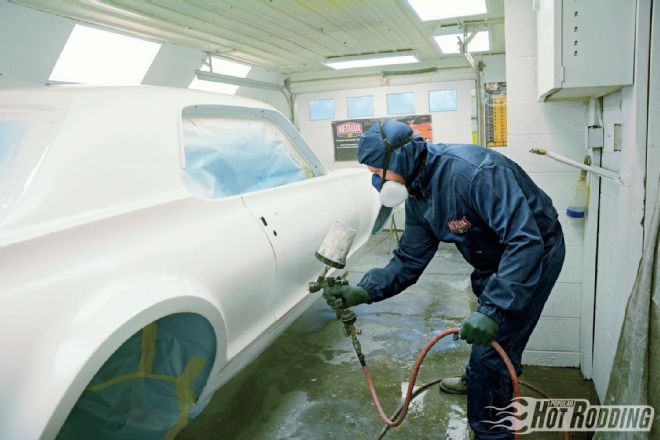 46. It’s not as critical during priming, but for painting, a full paint suit like this from ChemSpec is highly recommended to prevent lint, dirt, and hair from contaminating the surface. Using his preferred Tekna gun from DeVilbiss, Adkins applied three medium coats, allowing 15 minutes flash time between them.
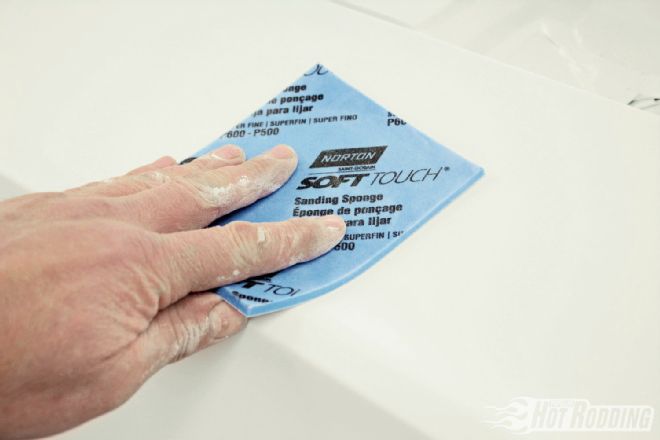
47. For gently nib sanding any minor imperfections that arise, Adkins uses a Norton Soft Touch Sanding Sponge Pad.
46. It’s not as critical during priming, but for painting, a full paint suit like this from ChemSpec is highly recommended to prevent lint, dirt, and hair from contaminating the surface. Using his preferred Tekna gun from DeVilbiss, Adkins applied three medium coats, allowing 15 minutes flash time between them.
47. For gently nib sanding any minor imperfections that arise, Adkins uses a Norton Soft Touch Sanding Sponge Pad.
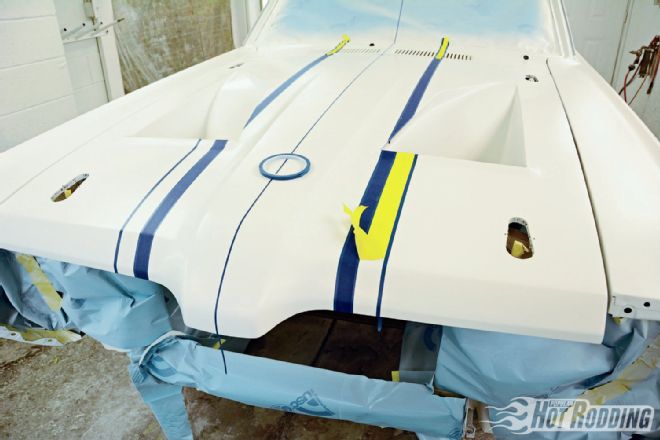
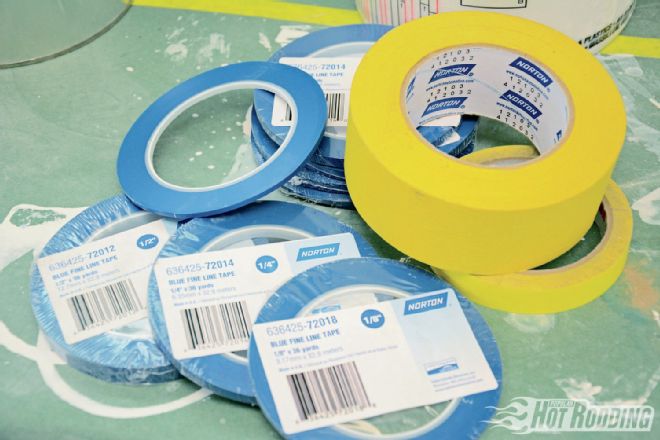 48. Tape has mostly been used for preventing overspray so far, but now it moves into the artistic realm. Adkins uses a variety of thin Norton painter’s tapes to create designs since they shape easily and maintain crisp dividing lines.
49. There’s much more than simple measuring going on here to create Max’s stripes; the lines need to complement the body lines and create the proper perspective. We’ll bring you more on Adkins’ technique in a future issue.
48. Tape has mostly been used for preventing overspray so far, but now it moves into the artistic realm. Adkins uses a variety of thin Norton painter’s tapes to create designs since they shape easily and maintain crisp dividing lines.
49. There’s much more than simple measuring going on here to create Max’s stripes; the lines need to complement the body lines and create the proper perspective. We’ll bring you more on Adkins’ technique in a future issue.
 50. To create the lower body stripe, Adkins used the Cougar’s body line to guide the tape. This is where good quality thin tape really shines, since it will create smooth curves over the wheelwells without crimping.
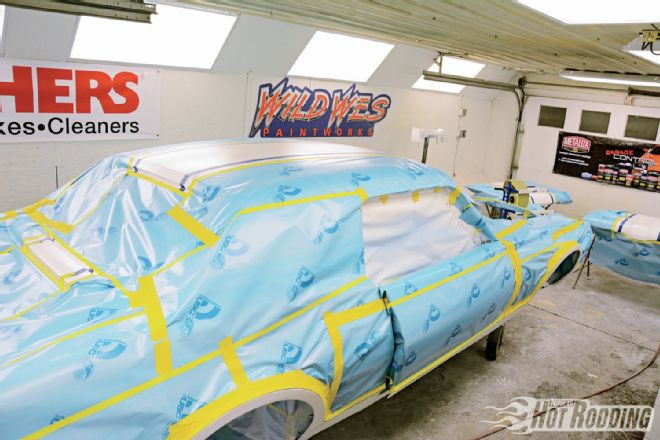 51. To spray the inner red section of the stripe, Adkins thoroughly wraps the entire body in USC Polycoated Blue Masking Paper from Eastwood to allow him to apply full coats without fear of overspray on the completed white body.
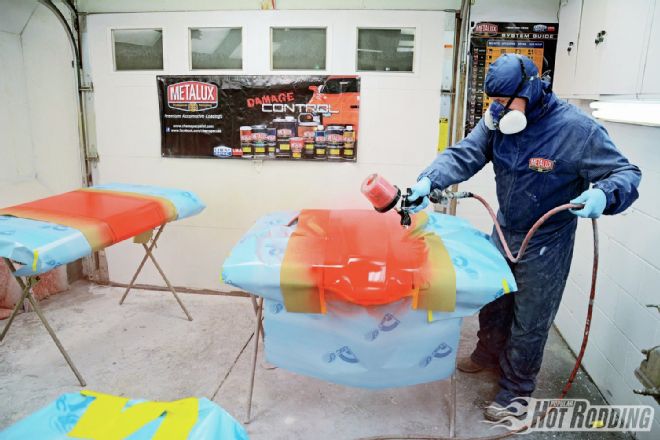 52. Our choice of red is the intensely bright Torch Red from Metalux. It’s also another OEM color that is easy to match.
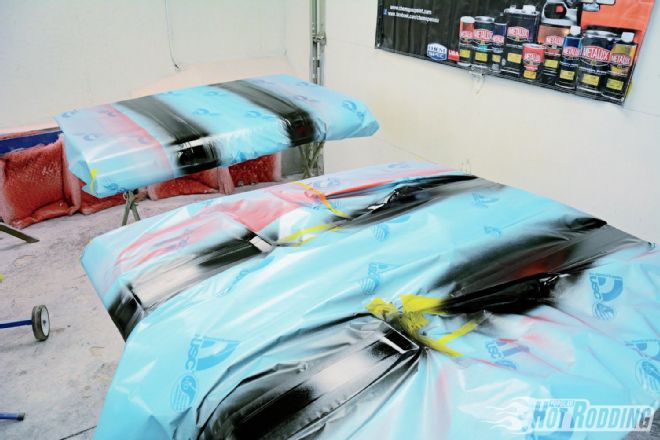 53. After allowing plenty of hours for the Torch Red to dry, Adkins covered it with masking paper and removed the tape covering the section that will be black. This color is just a generic gloss black from Metalux, but is a very pure black with excellent depth.
Wet Sanding & Polishing
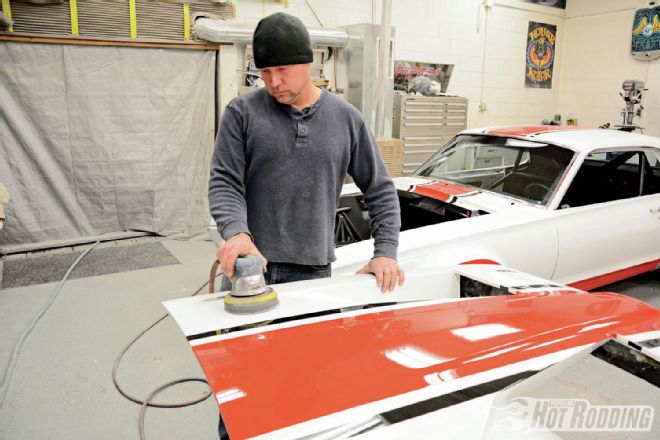
After at least 16 hours of air dry time, Adkins begins by dry sanding all the flat areas with an Eastwood DA sander with 1,500-grit 06041 Norton Dry Ice paper for polishing. For areas that need hand-sanding due to contours and sharp edges that could easily cut through with a machine sander, he switches to hand wet-sanding with Norton Black Ice 662611.
Following that, Adkins re-sands with Norton Ice 3,000-grit DA discs (No. 06013) using an interface pad to soften the DA pad surfaces. He works from bottom to top using a squirt bottle with water mixed with just a touch of dish soap as lubrication to sand the surface to a light shine prior to compounding. Wet sanding from the bottom up ensures that he is moving into clean water and not grinding the removed particles into the paint. Mothers 81132 or 81232 HD compound with a wool pad are used for initial cutting. A switch to Mothers 83432 polish with a foam pad then removes scratches and swirls from the compound. To finish to a crystalline shine, Adkins hand-details everything with Mothers Glaze and fresh microfiber towels.
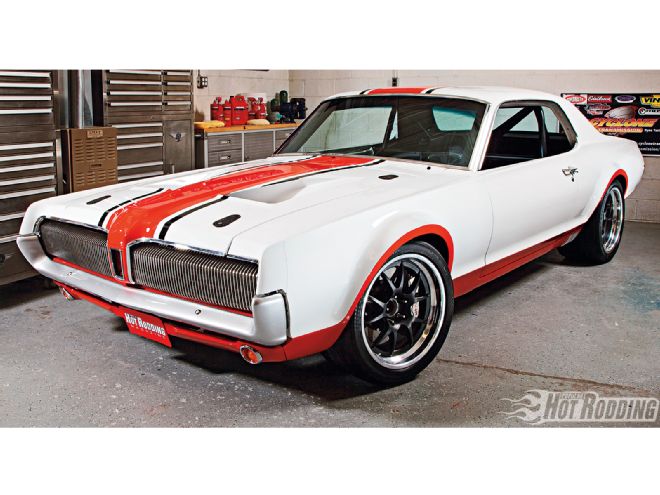
Max Effort will always be more about function over form, but thanks to quality tools and products, and Adkins' exceptional talent, no one would ever guess we weren't planning on just building the best-looking Cougar track car ever. Man, that first rock chip is going to hurt.
BY THE NUMBERS
Supplies & Tools
ChemSpec Paint Supplies QTY: Description: PN: Price: (1) Metacryl Epoxy Primer (Gallon) 7396A $96.75 (1) Metacryl Epoxy Hardener (Gallon) 7365 $78.18 (11) Metalux White Filler Primer (Liter) 9341-001 $43.07 (2) Metalux Primer Hardener (Quart) 9091 $62.83 (2) Metalux Clear Coat (Gallon) 9354 $139.70 (4) Metalux Clear Hardener (Quart) 9352 $46.53 (2) Metalux Reducer (Gallon) 1159 $41.62 (2) Metalux Basecoat (Gallon) 1159-222 $35.83 (1) Metalux GM Arctic White (Code 10) (Gallon) WA9567 $226.94 (2) Metalux GM Torch Red (Code 70) (Quart) WA9075 $149.32 (2) Metalux Super Black (Liter) 9302 $66.08
Eastwood Materials QTY: Description: PN: Price: (4) Weld-Through Primer Aerosol 12899Z $14.99 (2) Eastwood 2K Self Leveling Seam Sealer 51653Z $29.99 (4) Eastwood Contour Body Filler 13520ZP $59.99 (4) Eastwood Contour Glazing Putty 13521ZP $24.99 (1) USC All-Metal 50751ZP $39.99 (1) USC Duraglas 50756ZP $74.99 (2) USC Polycoated Blue Masking Paper 14743 $59.99 (7) 2K Ceramic Satin Chassis Black (Quart) 50430ZP $44.99 (7) Urethane/Ceramic Activator (8 oz) 21854Z $14.99 (2) Epoxy Primer Black (Quart) 12785 $24.99 (2) Epoxy Primer Catalyst (Quart) 50243ZP $16.99 (1) 5-piece Dura-Block 31160 $59.99 (1) Eastwood 6-in D/A Air Palm Sander 13748 $39.99 (1) Fairmount Master Hammer & Dolly Set 14415 $299.99 (1) Eastwood 4-Stage Desiccant System 20474 $449.99
Mothers Materials: PN: Price: Mothers Professional HD Rubbing Compound 81232 $31.97 Mothers Professional Foam Pad polish 83432 $28.97 Mothers Professional Hand Glaze 84532 $17.97
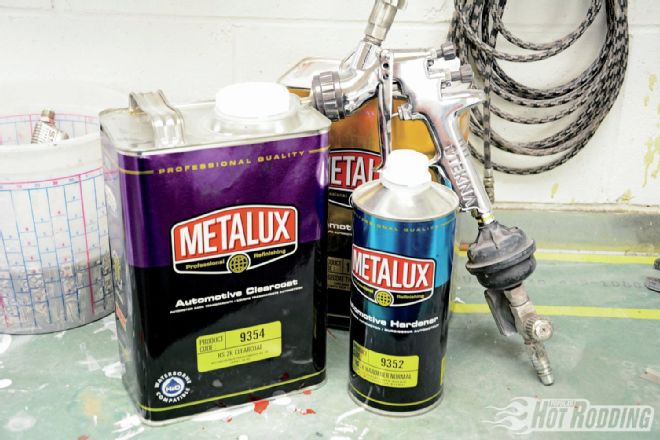 54. While the primer and colors used the same reducer, Metalux’s clear uses a different 9352 reducer. Adkins prefers to lay a quick tack coat, then after allowing a 10-minute flash time, he follows with one good wet flow coat. In this case, that’s all we’ll need.
 55. It’s always fun to see how clear brings the paint alive! Traditionally, multiple layers of clear are required to get a good level coat over stripes thick enough for wet-sanding, but Metalux’s clear only requires a coat and a half for a 3-mil film. That saves time and money, plus reduces the chances of getting trash in the clear.
 56. We’re not finished in the booth yet. Adkins pulls Max’s front clip, then rewraps all of the painted surfaces securely so we can address the engine bay and chassis.
 57. Show cars get painted the same top and bottom, but Max is no show car. We opted for Eastwood’s extremely hard, durable, and chemical resistant 2K Ceramic Chassis Black. It requires its own epoxy primer to be laid first.
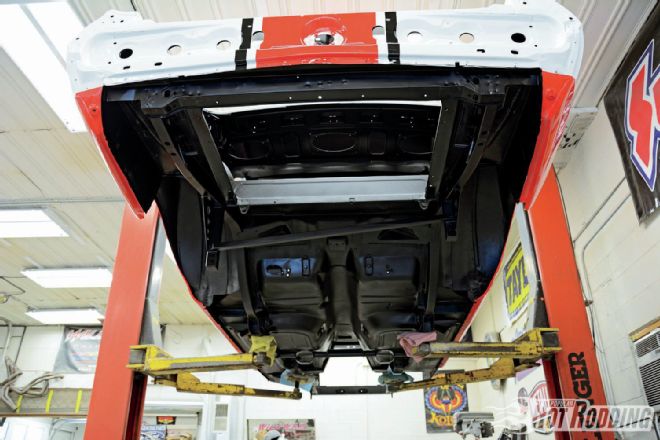 58. The satin black finish of the 2K Ceramic Chassis Black looks great, and requires no maintenance. We are not polishing the bottom side of this track car. Plus, it is easily matched if we need to do further modification to Max down the road.
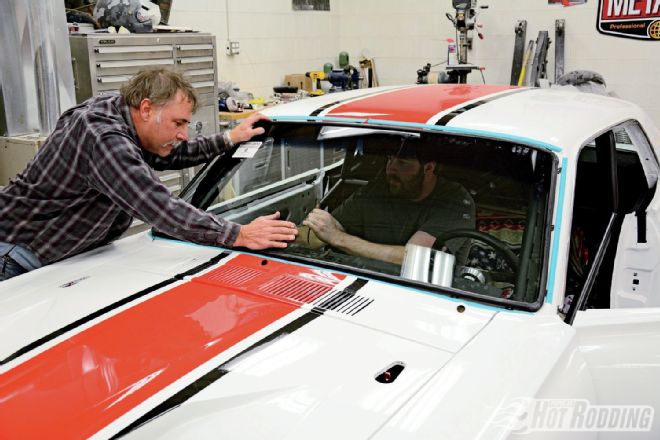 59. We reused the rear glass, but Max’s windshield was shot, so we turned to Walton’s Auto Parts & Glass for a new one. Their prices are terrific, and they are familiar with working on freshly painted classics. Tim and son, Brent, work quickly, and they also installed the ’67-68 Mustang windshield reveal moldings and front gaskets from YearOne (it’s the same as a Mustang) since we are terrible with those little clips.
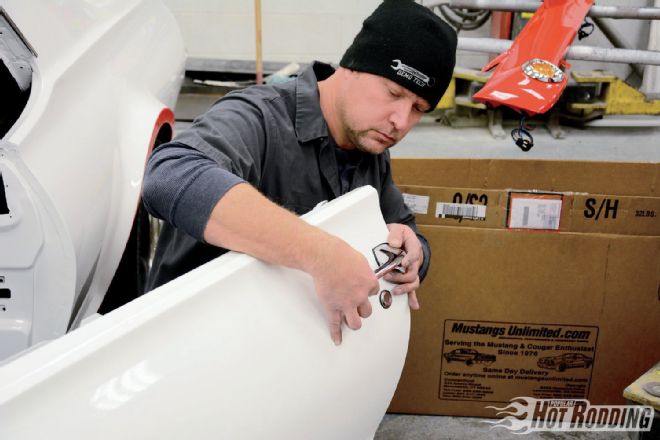 60. Max has very little factory trim left, but it was all in very bad condition, so we opted to replace it. Mustangs Unlimited provided the new door handles while WCCC helped us with new strikers and latches. The lower valence in the background, complete with marker lights, is also from Mustangs Unlimited, since Max’s was banged up.
 61. The Metalux paint and clear lays so flat that wet-sanding is hardly necessary for an outstanding finish. To get a perfect glass-like shine, though, Adkins picks up his Eastwood DA sander with 1,500-grit Norton Dry Ice paper for polishing, followed by 2,000-grit. He’ll hand-sand the edges and curves, however.
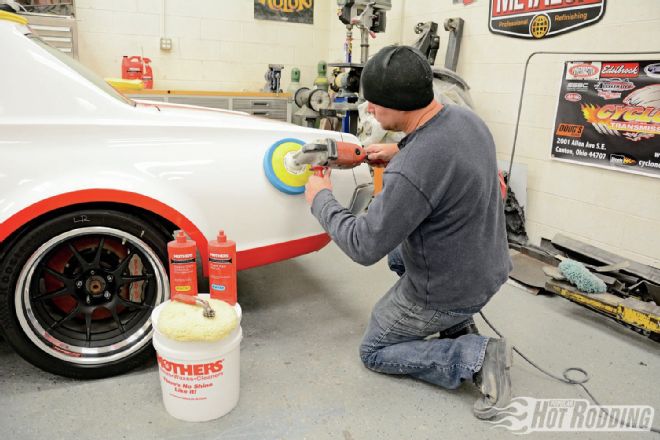 62. To resurrect the shine after sanding, Adkins uses Mothers 81132 or 81232 HD Rubbing Compound with a wool pad for initial cutting. Mothers 83432 Foam Pad Polish with a foam pad wiped away the scratches and swirls from the compound and will leave the clear shimmering. From here, Mothers Hand Glaze will just add extra depth.
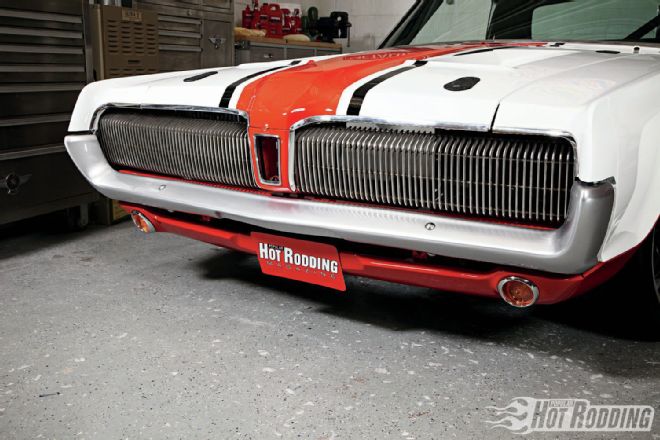 63. We dearly love that custom grille Adkins built for Max in the Mar. ’14 issue! It’s framed with restored stock hood and fender trim from WCCC. They are the only source for it (no repro), and the quality is outstanding. Check out that painted bumper; it’s actually the first available fiberglass replacement from VFN Fiberglass. We were blown away by the perfect fit; it’s actually better than stock.
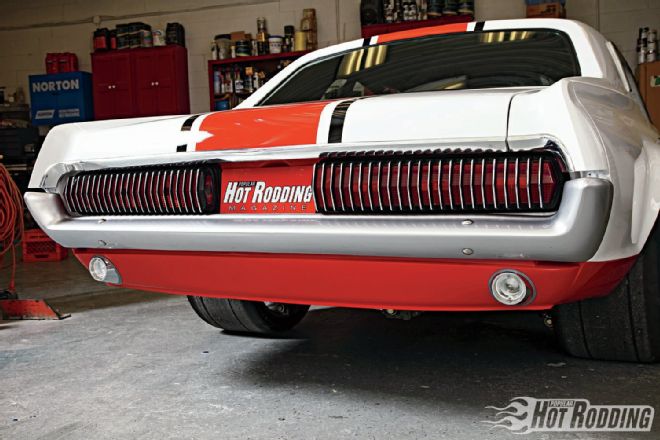 64. Adorning the rear and the custom carbon-fiber decklid is more restored stock trim from WCCC. This stuff really makes the look of the car. The taillights are original, but the lens and body gaskets are from Mustangs Unlimited, as are the rear valance and backup lights, since Max’s were unusable. The bumper is another work of art from VFN Fiberglass with a bumper bolt kit from WCCC.
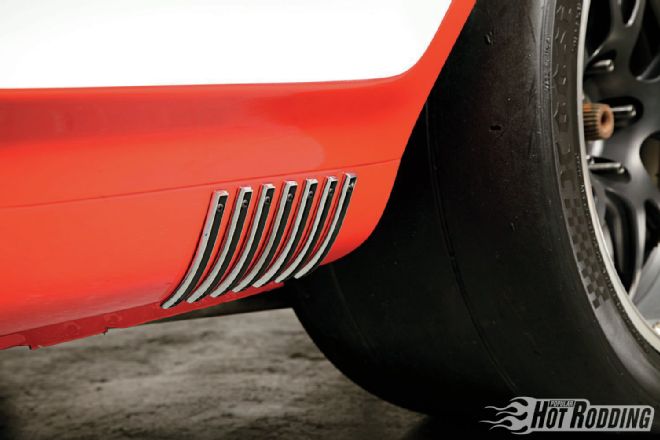 65. We did keep one important piece of trim; the ’67-only XR7 hash marks on the rocker panel. We’ve always loved those, and WCCC carries perfect reproductions. Those Forgeline GA3R’s and Hoosier R6’s have been on Max for a while, but they look better than ever now, and thanks to the hard work and dedication of “Wild” Wes Adkins, we’re a big step closer to putting them to use.