With time whizzin' by and tons of chores left to complete, I finally got back into gear in regard to the Homebuilt Hot Rod. As we can all relate, life sort of got in my way over the last couple of months and the garage just didn't end up being a destination I got to as often as I would have liked. Work, honey do's, and a bit of long-overdo knee surgery combined to knock me off schedule a bit, but I think I'm getting a handle on things now.
That said, it's on to the next bit of home-shop shenanigans. With the chassis fabrication pretty much wrapped up (though I'm sure there will be some small tweaks needed before all is said and done), and the suspension and engine in place, I thought I'd turn my attention to the body for a weekend or so. Elsewhere in this issue ("Gettin' Plugged," pg. 74), you'll note I began by filling and roughing in the cowl vent and some other holes in the body-simple work, but necessary.
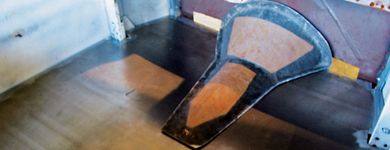
We'll now take a look at how I went about fabbing the roadster's basic floorpan. It's another facet of construction that's by no means rocket science, but again, it has to be done. When I bought it, the roadster cab was equipped with an aluminum floor that was fabricated in about a half-dozen sections, all bolted to a substructure of square tubing welded to the body. The substructure was fine, but I'd kinda like to have as close to a one-piece floor as possible, so I set to work one Saturday trying to make this happen.
Since the floor-support structure was pretty extensive, I figured I could get away with fabbing the new pan using 18-gauge cold-rolled sheetmetal, as there are no really large expanses to span. And so far it looks like it'll be stout enough to serve my purpose. As with most of my home-fabrication chores, I start the process by making patterns out of cardboard (I hoard a lot of it just for this reason) and then transfer the pattern onto the subject metal. I do this mainly because my fabrication skills are not quite up to par with those of a professional builder, and it's a lot cheaper to make my mistakes in cardboard rather than steel. Keep in mind that because I only have a couple of pages this time around, I'll only cover the fabrication of the basic pan. We'll get back to the toe-board, ancillary openings, and mounting tabs at another time. Meanwhile, take a peek at the beginning of the process.