 An A-833 for me? Not quite. Our boneyard gearbox made our tranny swap a flop. We should have rebuilt it right away, but we took a chance and lost.
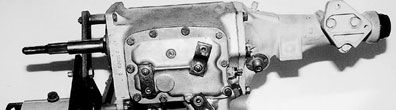
A few months back, we yanked the slush box from our '69 Dart and made the change to four-on-the-floor. We'd scored most of the parts used in the swap from a boneyard '79 F-Body and covered that complete conversion in these pages (see "Crammin' the Crashbox," May '01). In fact, the cast-off Aspen R/T yielded a mother lode of components for the conversion, including what looked like a clean 833 aluminum-case overdrive gearbox. The tranny showed telltale signs of a recent over-haul, bench-checked OK in every gear, and generally showed no signs of undue distress, so we cleaned it up, added oil, and bolted it in. Roll the dice and sometimes you'll come up snake-eyes; in this case, the tranny turned out to be junk, plain and simple.
All it took was the first testdrive to realize all was not well. Balky shift action, popping out of first gear, and the noise of unhappy internals meant one thing: time for some four-speed surgery. The overdrive 833 is virtually identical to the traditional 23-spline gearbox, except for the ratios. From the factory, Third gear was changed to an overdrive ratio (.71:1), while the other two ratios were revised with a low (3.09:1) First gear and a 1.67:1 Second. Of course, the Fourth gear, Direct (1:1), involves no gear reduction. A simple, crea-tive linkage change was made by flipping the 3-4 shift lever so that Direct, which used to be Fourth, is accessed by the Third-gear gate of the shifter, and the tranny grabs the Overdrive gear, which occupies the old Third gear position when the handle is pulled back to Fourth. Clever, huh?
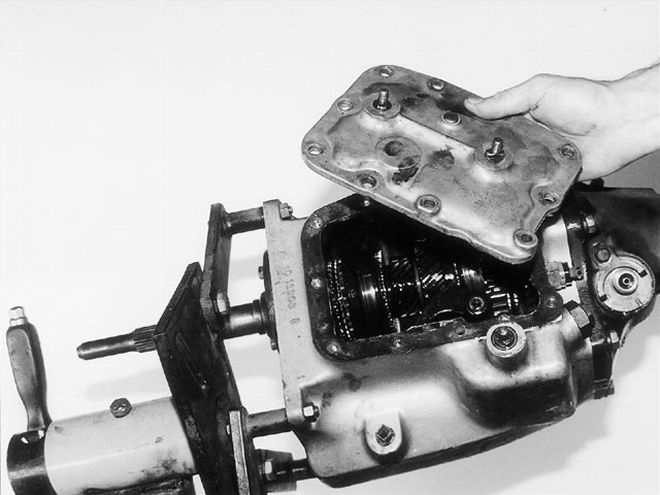 Getting in starts with pulling the side cover. Inside, the gears were slopping around with lots of lash. The loose countershaft in the case allows the cluster gears to back away from both the drive and the driven main gears, creating excessive lash.
The floating countershaft used with the aluminum-case overdrive trannys wasn't so clever, though. In any gear but Direct, torque enters the tranny through the input shaft, is transferred to the cluster gears (which ride on the countershaft), then backs up through the mainshaft to whatever gear the trans happens to be in, and back out the tailshaft. Whenever torque is transferring between the adjacent gearsets, the gears naturally want to push apart. On the iron-case 833s, the countershaft is a light press-fit at each end of the case, providing zero clearance. The aluminum-case 833, however, was built with .005-inch clearance between the case and the shaft. Stab it on and off, the gears load and unload, and the countershaft has .005 inch of running room to gain momentum to pound at the hole in the case. So after a while, the case pounds out, then maybe the shaft has .010-inch clearance to whack back and forth, then .020-inch, then .030-inch, until the loose, misaligned internals result in a grenaded tranny. The production aluminum-case 833 has a miserable reputation in Moparland and for good reason.
The Fix Is In
Years ago, Chrysler used to build aluminum race cases for the 833. While the castings were reputed as beefier, another notable difference between these race cases and the production overdrive unit was that the race case came with steel sleeves for the countershaft; it makes perfect sense. A heavy steel sleeve would have a much stronger supporting surface in the aluminum case, drastically reducing the unit loading from the countershaft. The sleeve can be sized for a tight press-fit into the case, rather than the light press needed for the countershaft in order to slide through the case bores. With a light press-fit (zero clearance) between the I.D. of the bushing and the O.D. of the shaft, plus the much higher strength and fatigue resistance of steel versus aluminum, you have the beefiest setup possible, with no slop anywhere.
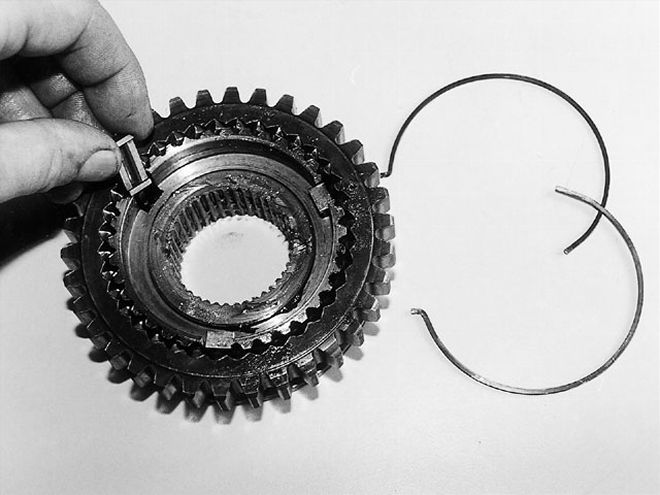 The syncros were reassembled first. Here's the trick: Lay the inner hub on a syncro stop ring, then engage the clutch sleeve over the hub. Drop in the three struts, then wind in a spring. Flip it and wind in the other spring, starting at another strut. The long side of the inner hub goes forward on both syncros (shift fork side of the 1-2 sleeve, and rounded side of the 3-4 sleeve).
Rather than send it back to the junkyard, we decided to sleeve and rebuild our tired aluminum-case 833, making it bulletproof in the process. Sleeving the case isn't the place for meatball surgery. The case needs to be bored out to precise size, and more critically, in the precise location to pull this off successfully. This means a Bridgeport mill and someone who really knows how to use it to get the case prepped; a lathe with some experience behind the handles to whittle out a pair of precision-sized bushings is a must as well. As for the rebuild part of the job, servicing the overdrive trans is pretty much the same as with any 833: The usual replacement wear parts are the bearings, seals, gaskets, thrust washers, and syncro brass. The hard parts are just reused if they pass the eyeball test. Want an Ali-cased 833 that lives? Make friends with a machinist, break out the wrenches, and follow the photos.
Torque Specs833 overdrive four-speedPinion bearing retainer30 lbs.-ft.Extension housing bolts50 lbs.-ft.Shift lever nuts18 lbs.-ft.Trans to bellhousing50 lbs.-ft.Shift cover15 lbs.-ft.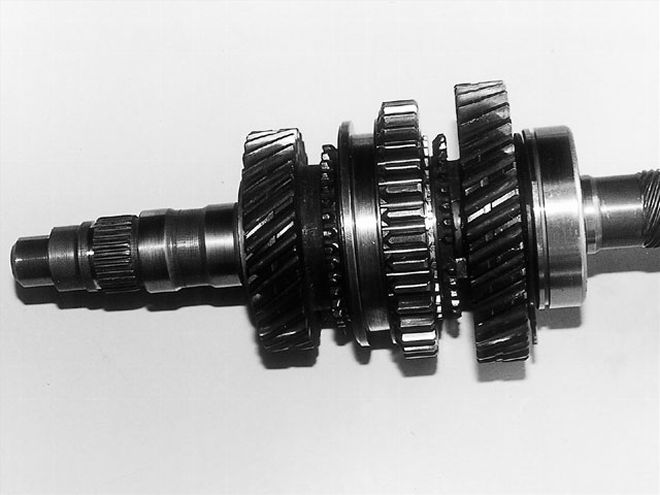 Now the gears and syncros go back on the shaft. Don't forget the snap rings, and press the bearing on to finish the rear of the shaft.
Bushing Bash
Whatever the reason behind the production aluminum-cased overdrive 833's sloppy, loose-fitting case-to-countershaft clearance of .005 inch, the bottom line is that under any kind of punishment, it's a ticking time bomb. It's only a matter of time before the case pounds itself apart and it's over. Bushing the case is the single biggest improvement to beef-up one of these trannys. It won't equate to the brutal 18-spline Hemi four-speed's strength, but we're talking seriously increasing the odds of survival in performance street applications. Bushing the box is a precision machining operation that involves boring the case to accept the sleeves and turning out a set of precise bushings in a lathe.
The basic working specs for the repair bushings on this tranny starts with sizing the inside diameter (I.D.) of the bushing for zero clearance with the countershaft. The bushing outside diameter (O.D.) was machined to 1.25 inches, with a step register .100-inch larger than the basic outside diameter (to 1.35 inches), .100-inch long, machined on one end of the bushing to locate it in the case. One bushing requires a notch for the countershaft key and both need notches at the inside edge corresponding to the slots in the thrust block face inside the case; otherwise, it'll be impossible to assemble the transmission.
The tranny case was bored for a .005-inch interference fit with the bushing, with a corresponding relief cut .100-inch deep, and 1.365-inches diameter to accept the locating register in the bushing. It's critical that the centers of the bored holes in the case are precisely located in order to keep the countershaft parallel, in line, and at the correct clearance to the mainshaft gears. A few thousandths out, and either the trans won't go together or the countershaft won't drive in. In this case, we indexed the center off the unworn portion of the countershaft bore closest to the mainshaft. Finally, make sure good machinist practices are followed, all of the edges are chamfered, and all measurements are dead-on. Hey, if a magazine guy can do it himself, it shouldn't be too tough to find a real machinist to handle the job.