
It's fair to assume that if you're currently building a high-performance engine, it's because you've pushed your engine to its limits, and the time has come for a rebuild. There isn't a universal set of rules that govern a proper engine build; every builder has their own theories and methods that have worked successfully for multiple builds. Here are a few tips and tricks that might come in handy the next time you decide on building a high-performance engine.
Dirty Work Area?
The majority of us don't own a high-performance shop with a dedicated "clean room". For those less fortunate, the home garage becomes a makeshift assembly room. Understandably so, it's not the cleanest assembly area, but that's no reason for assembling your engine under filthy conditions. Using common sense is the best method to keeping the area clean. Wiping up any grease and material both before and after you work on your engine is a good way to keep foreign material from entering your engine. Never sweep the floors or table during the build, as that lifts dust and dirt into the air. Nor should you ever grind metal or file piston rings near your assembly area; metal particles can contaminate parts prior to assembly. We highly recommend using an engine-building area with a steel-topped workbench. It is very useful in both the teardown and assembly of your engines. During disassembly, you can set oily engine internals on it without worrying about oil soaking into a wood top.
 | Top 15 Engine Building Tips And Tricks - Power Pages
Tape It Up!
Over the years, we've heard plenty of horror stories of catastrophic engine failure due to loose bolts and nuts falling into the cylinder head or being ingested though the intake. Many times engine builders and racers put together a new engine and it may sit for several months before it sees any action. Masking tape is a good tool to use to keep dust and unwanted junk from falling into the engine.
 | Top 15 Engine Building Tips And Tricks - Power Pages
Keeping It Clean
If in doubt, clean your engine before assembly. For a head gasket to seal properly, the head and engine deck surfaces must be clean. Any foreign material such as dirt, old gasket material, or grease can hinder the cylinder head and gasket's ability to properly seal, which can ultimately lead to blown head gaskets or worse. To avoid these kinds of problems, make sure both head and block surfaces are properly surfaced at a "qualified" machine shop and cleaned using acetone, brake cleaner, or degreaser before installing the head gasket. Never use a wire brush or abrasive to the mating surface of the cylinder head or block as it can leave an uneven surface.
 | Top 15 Engine Building Tips And Tricks - Power Pages
For those hard-to-reach areas like the oil galleys or journals on the crankshaft or block, we recommend using a gun cleaner kit sold at any sporting goods stores. The kit can be used to degrease, clean, and remove any metal shards or contaminants that might have been leftover by your machinist after boring or honing your cylinder block.
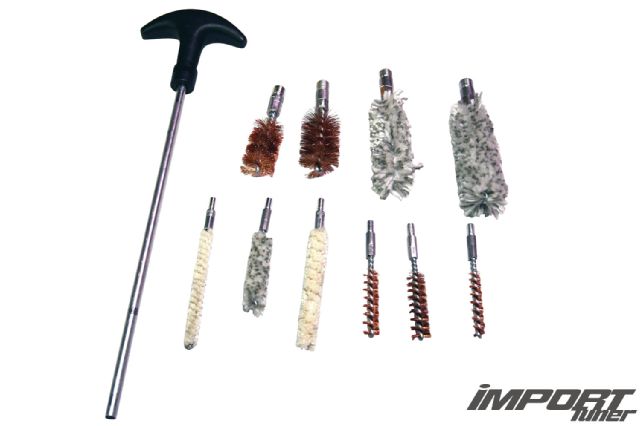 | Top 15 Engine Building Tips And Tricks Gun Cleaning Kit 05
 | Top 15 Engine Building Tips And Tricks - Power Pages
Slathering your soon-to-be-installed pistons in acetone is a good idea, but to truly remove any contaminants from effecting your build, we recommend using a 4-to-1 ratio mixture of warm water and Simple Green cleaner. Using a soft bristled brush, lightly scrub the surface, paying close attention to bristle the piston ring and oil groove channels. Finish it off by blowing it dry using an air compressor.
 | Top 15 Engine Building Tips And Tricks - Power Pages
Piston Ring EndGap Trick
Shingo Yugami of Bluemoon Performance showed us a quick and easy trick when gapping our piston rings using a set of rings that are temporarily fitted on the outside of the piston, making sure it is as square to the cylinder as possible. The beauty of this trick is the ability to check gap, file, and square the piston once again in half the time it takes when doing things the more conventional way.
 | Top 15 Engine Building Tips And Tricks - Power Pages
Electric vs. Manual End-Ring Gap Filer: Which Is Better?
One of the toughest jobs to do consistently during an engine overhaul is to set the piston ring endgap. Old-school builders just used a small hand file or a manual ring end gap filer to remove the material, while others use electric grinders. Regardless of the type you use, it's always important that the rings be lapped flat! Old-school ring filers do have their cons, which occurs when you close both ends of the rings against the cutting wheel, the ring ends will not be parallel once installed in the bore, leaving a large triangular gap. Manual-type filers require a great deal of finesse and should only be used by experienced engine builders.
Electric filers, such as the more affordable Proform filer shown in the image, are definitely an upgrade from a hand filer and leave an excellent finish on the ends unlike a hand filer. Keep in mind you still have to properly deburr the ends of the rings prior to installation.
 | Top 15 Engine Building Tips And Tricks - Power Pages
 | Top 15 Engine Building Tips And Tricks - Power Pages
Piston Rings Inspection
Inspect the rings with a magnifying glass once the rings have been gapped. | Top 15 Engine Building Tips And Tricks - Power Pages
Organize Your Build
Don't be afraid to raid your kitchen cabinet and grab a few storage bags. Using ziplock-type bags will help keep your items neatly organized and easy to access when the time comes to reinstall those parts. Jotting down measurements or specs with a permanent marker on the bags can also help, as we did, by inking our piston ring gaps for each piston as reference.
 | Top 15 Engine Building Tips And Tricks - Power Pages
Lube It Up!
Freshly machined metal surfaces have irregular finishes that must wear together. Until the engine oil circulates, assembly lube provides vital protection against micro welding, dry starts and heat, and dry or inefficient oiling issues. Using assembly lube on pretty much everything outside the pistons and cylinder walls is highly recommended. Assembly lubes, such as Royal Purple's Max-Tuff, in comparison to conventional oil has the consistency of gel that's thin enough for bearings, but thick enough to stay in place really well. We also recommend using a good moly or high-quality moly grease as break-in lube on flat tappet cam lobes/lifter bottoms to ensure there is no metal contact. Be careful not to use a large amount that could plug the oil pickup in the pan. Applying a thin layer on all critical surfaces is all you need to keep your engine properly lubed prior to your engine's break-in.
 | Top 15 Engine Building Tips And Tricks - Power Pages
Bolt Threading
Think all thread chasers and thread-cutting tap and die are the same? Guess again. With a chaser, you will simply be moving metal around and straightening the threads while a thread-cutting tap or die will usually do just that-cut the threads. If you are not very careful with them, you can easily remove threads instead of straightening. Dirty or damaged threads can give false torque readings as well as decrease a bolt's clamping force. We prepped our block using ARP thread "Chaser Taps" (metric size) prior to installing a set of head studs.
 | Top 15 Engine Building Tips And Tricks - Power Pages
Fastener Assembly Lube
Because of frictional inconsistencies with oil, moly, and other lubricants, it takes multiple cycles of torquing the bolt, loosening it, and tightening it again to obtain the required preload or stretch, causing inconsistent values. Typically, when a fastener is first tightened, friction is at its highest point and the preload value or stretch is low. As the fastener is cycled numerous times the friction decreases and the preload increases. This phenomenon is called "preload scatter". This scatter causes bore distortion, hampers piston ring seal, and leads to poor head gasket sealing. ARP representatives state when using their Ultra Torque assembly lubricant, the bolt needs to only be torqued once to get within 5 percent of ideal preload, and it remains consistent through all subsequent cycles (from race-prep machining through final assembly).
 | Top 15 Engine Building Tips And Tricks - Power Pages
Stretch Gauge vs. Torque Wrench
A torque wrench is commonly used to tighten bolts, but did you know that almost all of the leading fastener manufacturers recommend using a stretch gauge when installing connecting rod bolts? Using a stretch gauge delivers the most precise and accurate way to determine the proper preload, or torque, on a connecting rod bolt. Our ARP rod bolt stretch gauge allows you to accurately measure bolt stretch as opposed to a torque wrench that relies on "friction" at its highest value when the fastener is first tightened. The torque wrench method is often found to be inaccurate and inconsistent.
 | Top 15 Engine Building Tips And Tricks - Power Pages
 | Top 15 Engine Building Tips And Tricks - Power Pages
Piston Ring Compressors
Installing pistons doesn't have to be a difficult or frustrating task when using a standard ratcheting-type piston ring compressor, but often more times than not, these sprung steel wrap contraptions with a ratchet action tension mechanism make piston ring alignment as well as proper installation a chore. Companies like ARP offer an alternative and much smarter approach with their tapered ring compressors. These hard-anodized aluminum sleeves have a smooth radius that tapers down to the specific bore size. The design allows compression of the piston rings without damage and can be installed with a simple push of your fingers.
 | Top 15 Engine Building Tips And Tricks - Power Pages
 | Top 15 Engine Building Tips And Tricks - Power Pages
Silicone Overkill
Too much silicone sealant can become more harmful than good for your engine. Why? When too much silicone sealer is used, the excess portions will ooze out and can block oil and cooling passages as shown in our image, which leads to overheating. Using an abrasive pad in a drill may also seem like a quick and easy way to remove gasket residue, but it's risky because the abrasive can also remove metal, leaving an uneven surface that may not seal properly. For this reason, we do not recommend using drill-powered abrasives to remove old gasket material. When cleaning aluminum surfaces, use a nonmetallic (brass) scraper so you don't gouge or scratch the relatively soft metal.
 | Top 15 Engine Building Tips And Tricks - Power Pages
Rubber Band Insurance
Conrods coming in contact with your cylinder wall can scuff your newly honed liners. A quick and ingenious solution is the use of a rubber band strapped to the head studs to keep it from banging around. And the best part? Because it's elastic, you can rotate the crank; the rubber band will stretch with your rods.
 | Top 15 Engine Building Tips And Tricks - Power Pages
Mark It Up!
Dozens of bolts need to be properly torqued when assembling an engine. More often than not, even a most seasoned engine builder can overlook tightening a bolt. A loose valve cover bolt might not be of concern, but can you imagine a loose rod bolt? To ensure every bolt is firmly tightened, we use paint marker to identify each properly torqued part.
 | Top 15 Engine Building Tips And Tricks - Power Pages