 | Engine Diagnostics Part One
 If you break it down, there are really only four elements an engine needs to run: fuel, air, spark and compression. Sounds simple, but if any one of these steps out of line, you can forget about your engine running, or at least running the way it should. These four things are simple, but the havoc they can create is diverse, complicated and usually expensive.
Turbo has a new project car in its garage: a 1990 Plymouth Laser RS Turbo. The car was practically given to us; after we picked it up we learned why. We found out this Diamond Star wasn't without its problems. So before having any fun with our Laser, we took the opportunity to diagnose its 4G63T powerplant from top to bottom - a good thing to do anytime you plan on picking up a used car, or before you start a buildup with your current ride.
First things first: The reason Project Laser was had so cheap was its broken timing belt. This concerned us right off the bat, since Mitsubishi employs an interference engine design here - meaning that if valve timing's significantly off, like from a snapped belt, there's a point in the cycle where the pistons will smack the valves. Naturally, this put a damper on our ability to run the engine, so our diagnosing procedures were quickly limited.
Being the practical thinkers that we are, we picked up the first tool that came to mind: a cell phone. Call this rule number one: if the car's a recent purchase, talk to the previous owner first. We found out more in just a few seconds than we would have using every diagnostic tool on the Snap-On truck. Besides the snapped belt, which didn't take a phone call to figure out, we learned that this Mitsu engine was a chronic smoker. We weren't able to establish the type of smoke produced since it wasn't running, but we knew the car had baggage. The last thing we want to do is put a new timing belt on, learn of some new problem, and take everything apart again.
Clearing The SmokeWhether it's coming from your kitchen or your tailpipe, smoke clouds rarely signal something good. And it really doesn't take more than your own two eyes to diagnose it. There are different types of clouds that can billow out of an exhaust port, each indicative of its own problem and color-coded for convenience. Most of the time, smoke goes hand in hand with a power loss; and even more often it'll cost you a citation or an early visit to the smog station. Since we don't know for certain what type of smoke Project Laser has been puffin', we'll run through each scenario.
Let's start with black smoke if for no other reason than it's fairly common in the high-performance world and relatively easy to diagnose. Black smoke signals an improper air/fuel ratio balance - specifically, a rich condition caused by excess fuel molecules wasting away in the combustion chamber. At the very least, this condition robs two things: horsepower, and your cash at the gas pump. It'll also sic the environmentalists on your back from the emissions nightmare it can pose. At worst, an overly rich condition can wash fuel past the piston rings into the crankcase. Mix enough fuel and oil together and you can say goodbye to important parts like rod bearings and rings.
There are lots of reasons a fuel-injected engine might run rich. The culprit could be mechanical - such as leaking fuel injectors, a clogged air filter or a damaged fuel pressure regulator, fuel pump or return line. Other times the problem might lie in the electrical realm with a faulty PCM, MAP or airflow sensor, or a misfiring ignition system. The best place to start is to check the system's fuel pressure and to follow the flowcharts in your vehicle's service manual. On turbocharged vehicles, be sure and check all intercooler pipe connections for leaks or clogs. Based on our visual inspection, we have a hunch Project Laser wasn't smoking from excess fuel, but we won't know for sure until it's brought to life.
Checking the fuel system is relatively simple. Use a fuel pressure tester to check the pressure of both the pump and regulator at the fuel rail. With the vehicle running, fuel pressure should increase when the regulator's vacuum source is disconnected and plugged. If fuel leaks out of the vacuum connection, this obviously signals a bad regulator. Fuel pressure should drop no more than roughly 20psi once the key is turned off. If it drops more, you'll need to check the pump, injectors and regulator. To determine what's causing the problem, block off the fuel supply line and look for a pressure drop. No drop? Replace the pump. If the pressure does drop, block off the return line and check it again. Pressure drop okay? Replace the regulator. Not okay? Look for a leaking injector. You can also use a stethoscope to ensure that the injectors are pulsing properly; they should all make the same sound under normal idling conditions. A noid light can also be hooked up to any injector's electrical connector to test whether or not it's receiving power, but that's a topic for next time.
When it comes to smoke, probably the last one you want to see streaming from your tailpipe is blue ... or gray as some may see it. Blue, gray, call it what you want; either way it means the same thing - oil's burning here and there's something wrong under that valve cover. Oil doesn't like to burn. That's why it stinks so much. Like the black smoke scenario, oil is escaping into the combustion chamber and smoldering along with the air/fuel mixture. This can't be good for performance. Mild cases result in little more than nausea from the oil stench, and the embarrassing smoke stream from the exhaust; while more extreme cases can foul out the spark resulting in misfiring. We're pretty sure this is where the Laser's smoke was coming from. After pulling the spark plugs, we noticed quite a bit of oil sitting on top of the pistons and coked onto the plugs. Again, no tricky diagnostic tools here. But we still don't know how the oil got there.
There's more than one place to look when trying to determine the source of burnt oil: piston rings, valve stem seals and valve guides are what you have to choose from. Sooner or later, they'll all wear out, causing oil to make its way into the combustion chamber. But you don't need to go yanking off that head just yet, blindly installing piston rings, stem seals and guides just to cover all your bases. If your car's running, there's much you can learn just by watching the smoke's habits for a few seconds.
Pay attention as to when the engine is producing its oil-burning smoke. At startup? When decelerating? In between shifts? They all point to different causes. Let's start with the common morning puff of smoke during initial startup. This often indicates worn valve stem seals or valve guides. After miles of abuse, wear and tear, their clearances increase. And while the engine rests for a significant period of time - overnight - oil drips down into the combustion chamber. The smoke usually lasts for a few seconds until the engine begins to reach its operating temperature and it burns off. Excessive smoke under engine acceleration or at idle is usually caused by poor piston ring sealing, if you're lucky though, it might be nothing more than thin or excessive oil. Do an oil change here with the proper viscosity and cross your fingers. Smoking under no-load deceleration is more than likely caused by worn valve stem seals or guides.
Oops. I take back what I said earlier. White smoke can be just as bad as blue smoke. And like black and blue smoke, the white stuff can be traced back to an unwelcome substance burning inside the combustion chamber, in this case, water or coolant. The white smoke you're seeing exit the tailpipe, though, is really just steam. Steam sounds harmless enough, but it points to a pretty serious problem. A point will be reached where there's too much coolant in the chamber to burn off, and the excess liquid will look for another escape - there's nothing to stop it from mixing with the oil down below now. Mix enough coolant with your oil and you can forget about proper lubrication. Water or coolant can enter the combustion chamber a few ways: cracked cylinders, a cracked head or a blown headgasket or intake manifold gasket are the most common. We didn't find any signs of coolant or water inside our Laser's combustion chamber. We're glad.
Wait. Don't panic. It's normal for a car to puff a small amount of white smoke in cold weather or in the morning. About a gallon of water is produced for every gallon of fuel burned - meaning the steam is not coming from the cooling system, but instead it's just a byproduct of good old-fashioned chemistry and the combustion process.
The best way to determine whether or not you're losing coolant is to perform a cooling system pressure test. Most pressure testers connect to the radiator cap location and can be done with the engine cold. Verify what your vehicle's pressure is supposed to be and monitor the pressure gauge with the vehicle running. Losing pressure? Look for a leak. Too much pressure? Chances are that cylinder pressure is escaping into the cooling system and coolant's getting inside the combustion chamber. You could use a scope to look for coolant specs on top of the pistons, but more than likely they'll be soaked. A combustion gas detection tester can also be used to check for escaped cylinder gases inside the cooling system, but isn't exactly the type of tool you'll find in the top drawer of your average toolbox.
The easiest way to determine whether or not you're losing coolant, though, is to pop the radiator cap. Stop! Not when the engine is that hot. Notice air bubbles here? Not good. Inspect the vehicle's oil cap for signs of coolant. If it's mixing, the oil will appear caramelized, foamy - you might even be able to detect a smell of coolant there. All signs point to a damaged headgasket or cracked cylinder in this case. A vacuum test is a good one to perform as well. A leaking headgasket will cause the vacuum gauge needle to vibrate erratically. Just hook the test hose up to any intake vacuum source and read away. A normal engine should produce around 18-21 inches Hg. We don't know what ours is.
Narrowing Down The Problem
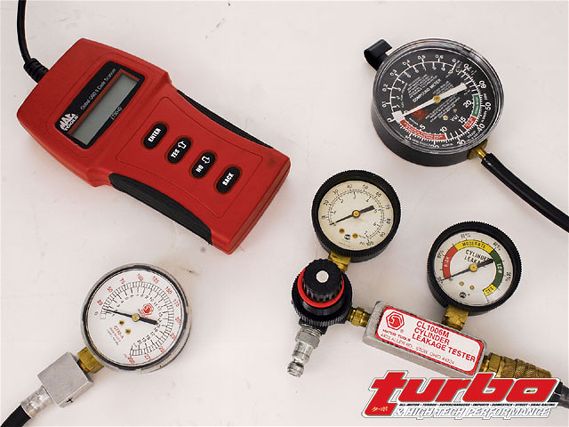
Blowin' smoke? Down on power? Suspect a blown headgasket? One of the best places to start after you've visually diagnosed the situation - and if you don't have a broken timing belt - is a compression test. We weren't able to perform this test on Project Laser, but if we could have we would have. There are two ways to perform a compression test: the more popular static compression test, which measures how well the cylinders are sealing; and the dynamic compression test, which measures how well the cylinders are breathing. Both methods measure pressure and are expressed in pounds per square inch.
A static compression test's results can tell you a lot, like how well the pistons, rings, cylinders, valves and even the headgasket hold compression in. This is the stuff you want to know if you suspect a problem. For an engine to run smoothly, all cylinders should produce similar readings. Before performing any compression test, make sure the engine is warm, and that the battery is fully charged. The compression tester adapts to each cylinder individually, and you'll need to remove all of the spark plugs to ensure easier cranking. To prevent the engine from spraying fuel, disconnect power from the fuel injectors. Disable the ignition by disconnecting the coil. The idea is to crank the engine over at wide-open throttle until the gauge's needle stabilizes to get the maximum reading; this takes about four cycles or so. Be careful not to crank for too long since the oil pump isn't as effective at lubricating engine components at this stage. Also, hold the clutch in during the process so the starter doesn't have to spin the disc. Compression tests can be somewhat abusive. Repeat the test for each cylinder and record the results. There's not a magic number you're looking for here. Depending on the engine's compression ratio, static compression test results will vary a bit. Naturally, an Integra Type R's results will be significantly higher than our 4G63T's low-compression turbo engine. The key is to look for major variances between any of the cylinders or major drops across the board. There shouldn't be more than a 20-percent variance between any two cylinders. Be sure that the reading after the first compression stroke is roughly half that of the final stroke's reading, which should be the highest.
A dynamic compression test will tell you even more than a static one, like how well an engine breathes. For a dynamic test, reconnect the coil, reinstall all but one spark plug and restore fuel injector power to all but one cylinder. It's a good idea to ground the unhooked plug wire. Insert the compression tester's adapter and start the engine. Take a reading at idle. Open and close the throttle as quickly as possible and take another reading here. Don't use the gas pedal - it's not quick enough. The idea is to monitor the biggest, quickest gulp of air possible, and it will be different than the static test's results since there'll be no intake manifold vacuum, which means more cylinder pressure. You should have three results now: static, idle and dynamic compression. Idle compression should be about half of static compression while dynamic compression will be closer to 80 percent of static compression. It's not going to be more like you'd expect since we're only doing a blip of the throttle here.
So how can we translate a dynamic compression ratio's test results into how well an engine breathes? We can learn a lot from a reading that's either too high or too low. Too high? Look for an exhaust restriction here. Could be a cam lobe problem. When the cam lobes are worn down, they're unable to move the valves up fully - this causes a restriction. If all of the cylinders read abnormally high, look for a clogged catalytic converter. Too low? You guessed it: look for an intake problem. Worn cam lobes and intake valves with serious carbon deposits could be the culprit.
Narrowing Down The Problem Even More
So you have a cylinder that reads a bit lower than the rest. What do you do with this information? Before you go yanking off that head, it's possible to narrow down the problem even further. By re-performing the static compression test, this time with a couple of squirts of oil poured into the cylinder, we can better determine the culprit. If the results at the beginning of the "wet test" increase this time around, we can safely assume the pistons rings or cylinder bore is to blame. Either way, we know that we need to get into the bottom end. Still reading low? It's probably the valves or headgasket here. At this point, it's best to get the leak-down tester out for more conclusive results.
The leak-down what? Leak-down, or cylinder leakage tests are typically less popular than compression tests for two reasons: the equipment is more expensive and requires more skill to use and to interpret the results. Like we tried to determine with our compression test results, a leak-down test will better pinpoint where an engine is losing compression. We can also perform this test without cranking the engine over, which means it's perfect for our broken-down 4G63T.
Like the compression tester, the leak-down test adapter threads into the spark plug hole and has a monitoring gauge; but, unlike the compression tester it requires compressed air to work. Not exactly the kind of test you can perform on the side of the road. The idea is to plug off the desired cylinder, shove air in and take a reading. Do this by bringing the cylinder to top dead center so the valves are closed and hook up the compressed air line. Some testers are equipped with two gauges: one for the actual reading, and one to calibrate the amount of air being pushed in. Be sure that the amount of air being pushed in is the same for each cylinder for consistent results. Leak-down results are measured by a percentage, not a quantifiable value like psi. The higher the percentage of loss, the worse off the engine. Here's the cool part about the leak-down tester though: all this compressed air is going somewhere, and the fun part is figuring out where. Pistons, rings? Pull the oil cap. Hear a howling sound inside the crankcase? Pistons, rings or cylinders are your problem. Hear something coming out the tailpipe? Feel some exhaust puffs coming out? Plan on replacing those exhaust valves. Open the throttle body. Hear that whooshing sound inside the intake manifold? Start shopping for intake valves. None of the above apply, but you're still getting a bad reading? Chances are, it's the headgasket. Pop the radiator cap off and do the bubble test we mentioned earlier. Readings any higher than 20-30 percent mean you've got troubles. Project Laser measured in between 60-90 percent across the board, right out the tailpipe and also past throttle body. If you're getting readings of 100 percent, double check that the cylinder is actually at TDC on its compression stroke. If you're off by just a few degrees, the forced air will push the piston down the bore, giving a false reading. It's unlikely the damage is this bad. The cylinder might actually be okay.
As for project Laser, the leak-down test worked best - although we can't exactly say we're happy with the outcome. Most of the Laser's valves are bent, so we know we'll be yanking that head off soon. Damn. Gotta love those interference engines.