| cummins Head Bolt Tech How To remove Valve Covers
A certain amount of leeway is built into almost every factory part. Take Project Rust Bucket's turbocharger for example, which is now producing 37 pounds of boost instead of less than 20. Or the transmission, which aside from a new torque converter, is handling twice the power it was designed to. As we get into the 400-500 horsepower range, we're going to start worrying about our stock head gasket blowing, which could very well happen, especially since we're going to be using nitrous oxide.
From the factory, Cummins uses a torque-angle method of tightening head bolts, which usually will result in a torque spec of a little more than 115 lb-ft. We'd heard racers were having success at wrenching down the stock bolts past factory torque specs, and were running 600, 700, or even more horsepower on stock head bolts without blowing a head gasket. Everyone seemed to have a different idea of how things should be done, or how tight you should torque down the factory hardware, but a common consensus seemed to be that 125 lb-ft of torque was a pretty good number.
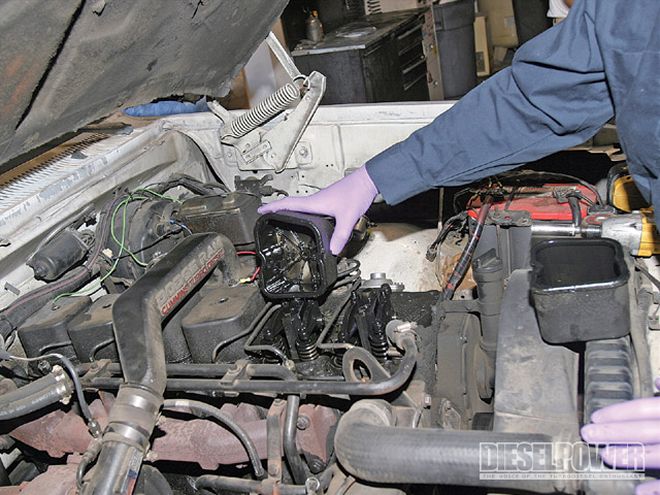
| To gain access to all the bolts, our intake pipe and fuel lines had to come off.
Now, before you run out and tighten all your 12-valve's head bolts to 125, know a few things. First off, bolts will actually stretch. When you tighten them down past specs, two things can happen-one, the bolt will stretch only slightly, and its clamping force will be greater than stock, or two, the bolt will stretch too much, and weaken. If the bolt weakens, it may have less clamping force than stock, or in a worst case scenario, break.
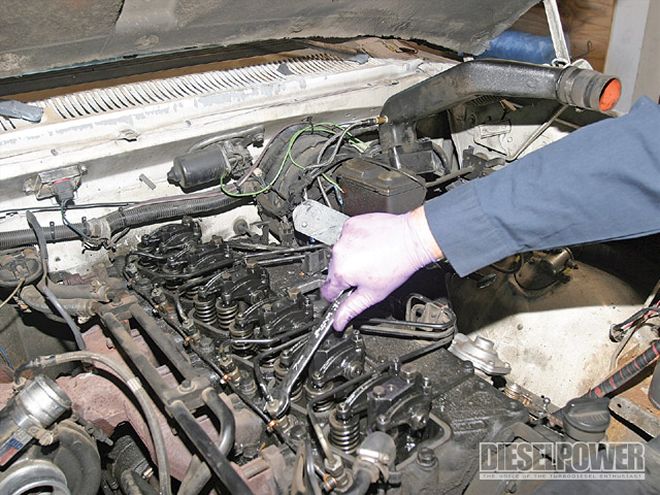
So how do you know if one of your head bolts is in the danger zone? For one, the bolt will feel "buttery." It will keep turning, but won't tighten up any more than a certain amount. To keep empirical track of any butter bolts, we first torqued them all to 100 lb-ft, and found that some had to be turned 1/8 to 1/4 of a turn to even reach the 100 lb-ft mark, indicating that 20 years of running may have stretched our bolts already. Once we got to 100 lb-ft, we marked all the bolts to keep an eye on any that were turning excessively. The engine was still hot as we tried the first bolt, which we took up to 110 lb-ft, then tried for 115 lb-ft. In trying for that next step, the bolt kept turning more and more without reaching the 115 lb-ft "click" of the torque wrench. We decided to leave it be, and let the engine cool off. We loosened it up a little, then put it back to 100 lb-ft.
After a three-hour break to let the engine cool off, we tried it again. This time we went from 110 lb-ft to 115 lb-ft in just about 1/8 of a turn (45 degrees), so we felt the bolt was holding this time. We then tightened them all to 115 lb-ft, then finally to 120 lb-ft, where we stopped. In our wrenching from 100 lb-ft to 120 lb-ft, all the bolts had turned at least 30 degrees, while some hit a quarter turn (90 degrees) from stock. All the head bolts only needed about 1/8 of a turn to jump 5 lb-ft, so we were fairly certain that they had all clamped down properly.
So what now? Well, now we feel better about pushing our truck toward the 500-horsepower mark, especially considering some of our head bolts were below the factory torque specs. Once we get there, however, we'll be doing it right and upgrading to a set of ARP head studs, which provide much more clamping force than bolts. But for now, we're willing to see how far we can push the stock parts. Hey, better us break stuff than you, right?
Disclaimer:Just because we did this doesn't mean you have to. We're pushing 200,000-mile factory components to their limit, and if you're planning on re-torquing your own Cummins head bolts, be very careful and do so at your own risk.
Method #2In talking with a few other high horsepower head bolt guys, we found that some of the more serious racers use a different torquing procedure. After letting the truck sit overnight to where it is completely cold, they'll take out one bolt at a time, coat it in oil, then torque it in 5-10 pound increments to 125 lb-ft. Oiling the bolts gives them a friction advantage over stock bolts that may have burned off all their oil, and it also makes sure all the fasteners are clamped down evenly. We took a couple bolts out of Rust Bucket to check to see if any were oiled, and some of the middle bolts were, but the exhaust side bolts had long since gone dry, which explains why they didn't turn as much. It takes much more torque to turn an un-oiled bolt than an oiled one, so if you really want to do it "right", we'd suggest this method.
Proof Load and Yield StrengthGive yourself two points if you know what these terms mean. We were kinda hazy on the subject until we started researching our head bolt dilemma. We'd heard horror stories of people breaking bolts, so we double-checked on the proof load of our grade 12.9, 12mm head bolts. As it turns out, the bolts were rated at 123 lb-ft of torque at 90% proof load when being torqued with SAE 10-weight oil. What is proof load? It is a measure of when a bolt will start to deform and stretch, and is usually a 90% value of the bolt's yield strength-the value when it finally gives way and loses its clamping force. We found the actual minimum number when a grade 12.9, 12mm bolt should start to give way to be about 151 lb-ft of torque. Since non-oiled bolts can see a torque reading of about 20% higher than oiled versions, we felt pretty safe that we weren't damaging anything by torquing ours down to a "mere" 120 lb-ft un-oiled.


