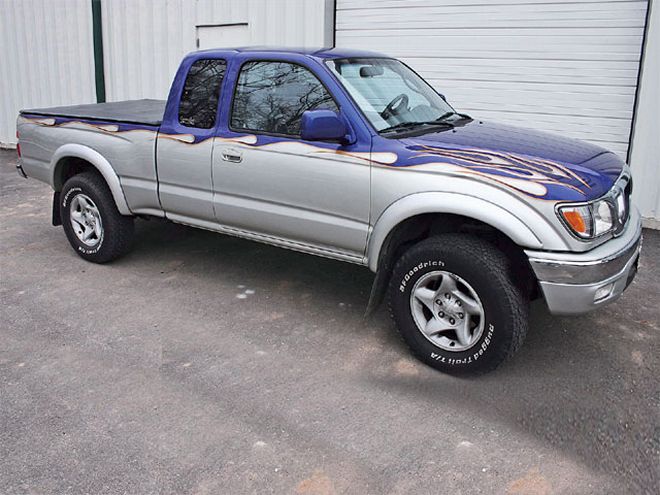
| toyota Tacoma painted Truck
We've all seen it, that one truck that stands out from all of the others. It seems to have it all, the right wheels, the perfect stance, the outstanding interior, and the flawless paint and graphics. What's it take to get that show-stopping finish? Where do you start? What products do you use? And how do you make it all come together? We hooked up with the talented staff at Clean Cut Creations in Webster Groves, Missouri, to give you some tips and tricks on what goes into a well-thought-out, two-tone flame job. This shop has been cranking out customs for some time now and even built the 'bagged Colorado we put on our Nov. '04 cover. Throughout this story, John Meyer and crew will be showing us what and what not to do when adding graphics to your ride.
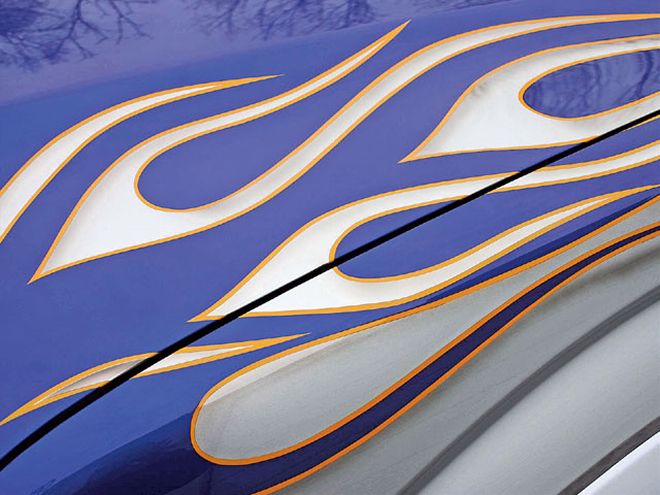
| toyota Tacoma flames
1. Design It Take some time to get your ideas down on paper. Make a few sketches of your own, or you may even want to consult with a rendering company. Now is a good time to consider your color options, paint manufacturer, and just how detailed you want your design to be. This would be a great time to call in the advice of friends who paint and see what they recommend.
Have a place to start, and get your ideas down on paper. Think about the lines and curves of the body when working out your graphics. Keep it simple, too, adding just basic two-tone paint and graphics really livened up this relatively stock truck.
2. Prep ItNow that you have a good idea of the direction that you want to take, turn your attention to disassembling and cleaning your truck to prep for paint. On most trucks, you'd want to remove your grille, marker lights, bumpers, door handles, tailgate handle, and emblems, so you can get the paint underneath everything for professional results. If you mask around your taillights for example and then get some aftermarket lenses and they happen to be a little smaller, you'll end up with the base color showing up around the edges. On this project, CCC took it one step further and removed the bed to get the paint perfect on the back of the cab. If there are any areas that bodywork has been performed, sand the primed areas with 400- and then 600-grit sandpaper to give the primer the right tooth for the paint to stick. On the non-bodyworked areas, use a gray scuff pad and scuffing paste to produce the right finish.Take your time when scuffing and sanding because your new paintwork will not stick for long to a shiny, unsanded surface. After scuffing, thoroughly wash the entire vehicle, including the jambs and engine compartment, to remove any dirt or sanding dust. The paint comes out of a gun with an air stream, and you don't want the dust blowing out of the jambs and onto your wet paint. Make sure you let the truck completely dry before starting to mask.
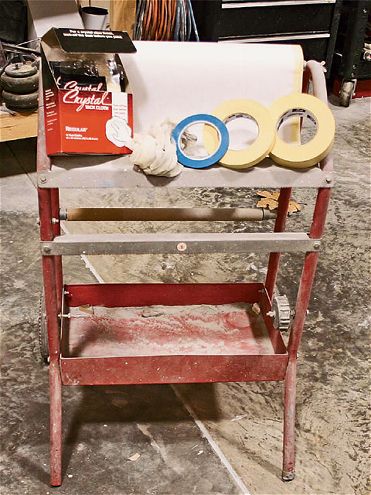
| toyota Tacoma 3m Masking Tape
3. Mask ItWith the prep out of your way, you should be ready to tape up your truck. This step is very important for keeping the paint where it is supposed to be and preventing overspray. Start with the underhood and grille area, making sure that when you close the hood no tape or paper sticks out of the edges. Then, move to the doorjambs, and mask by starting the tape 1/4 inch from the edge of the jamb. Be sure to mask off any areas that are left open after trim removal, such as the door handle or antenna holes, since these will usually be covered from the back side of the panel.
For ease of masking, use a tape machine that applies tape to paper, as you need it. CCC uses American masking tape and 3M blue fine line. Crystal Tack Cloths are great for removing dust prior to clear.
4. Lay itNow that your truck is masked, it's time to lay out the graphics. Start by referring to your rendering ideas and pick a starting point on your truck. For this truck, CCC started on the fenders above the body line. Depending on how detailed your graphic, you can use either 1/4- or 1/8-inch fine line. John used 1/4-inch fine line for the initial design.
Once you are satisfied with the layout of the graphic, start masking the outside of your artwork, covering everything that is not part of your graphic. When you are finished masking at this stage, you should be able to see only the parts of your truck that will be painted with your graphics. Wipe down your graphic with wax and grease remover, followed by a tack rag, and you're ready to spray. For layered or multicolor designs, repeat the previous steps for masking out each layer.
5. Duplicate ItTo get your graphic design to be identical on both sides, a common method to duplicate a pattern is to make a rubbing. This will be used to duplicate your design on the opposite side of the truck. Once you have the rubbing, you punch holes along the lines with a pounce wheel. This perforation will allow the chalk in the pounce pad to go through and stick to the surface of the truck, leaving you a traceable line.
6. Paint ItSome painters prefer to apply the edge stripe after the graphic is applied or use pinstriping. At CCC, John prefers to do the edge stripe first. He starts by painting the edge of the graphic a contrasting color. After proper flashtime, he runs a line of tape to cover the edge of the graphic. This tape will protect the color of the edge stripe while the rest of the graphic is being sprayed. After proper flashtime, you can remove all masking around your graphic and prepare to clear. Always pull masking tape back and away from the graphic keeping the tape as close to the panel as possible.
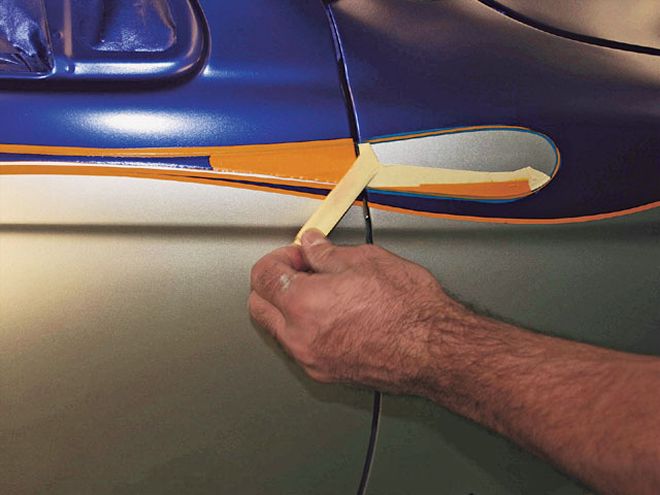
| toyota Tacoma masking Tape Removed
7. Clear ItNow is the time to be critical of your artwork and masking.
| toyota Tacoma truck Painted
Always pull masking tape back and away from the graphic, keeping the tape as close to the panel as possible. Make sure color is dry. Failure to remove the tape correctly can cause the paint to be pulled off the truck. Do not get in a hurry! Double-check all of your masked areas before clear to prevent unwanted overspray on glass and trim.
| Use 3M Perfect-It 3000 and a wool pad to cut the sanding scratches to produce an incredible shine.
Shine ItIf you are a perfect painter, you can skip this part. If you are like the rest of us, you will need to sand out the tiny specs of dust, any runs, or orange peal you may have in the clear. To get the surface smooth as glass, you should be using wet sanding paper that is no more coarse than 1,000 grit. Keep your area as wet as possible with a sponge or spray bottle. Sand until the surface has no tiny shiny spots. Once you are finished sanding, it is time to move on to buffing. You will need an electric variable speed buffer, a wool pad, and compound for initial cutting. Use your favorite cutting compound for this part; John uses 3M Perfect-It 3000 Compound. Work the buffer in a sweeping back-and-forth motion, using the compound per the instructions on the bottle. After initial cutting, it's time to get out the swirls or the scratches the compound left. Get out a foam pad and Perfect-It Black Compound and buff lightly until all swirls are gone and you have a clean finish. It is recommended that you do not wax your new paint for at least 30 days. Consult your paint manufacturer for their specific recommendations.
The Final WordAdding a set of simple well-thought-out graphics to your ride will set you apart from crowd, and if you do it right, the results will be sick.
Speak ItSo you don't look like a complete rookie around the shop, here are some terms you need to know. Now go impress your friends!
*
Blow-Throughs: Tiny bits of color that show up where you don't want them, caused from improper masking.
*
Cutting: Using coarse liquid compound as a polishing agent.
*
Drop Shadow: An airbrushed soft line around a graphic used to provide depth.
*
Eraser Wheel: Rubber wheel attached to an air tool, used to remove double-face tape and striping without damaging the underlying paint.
*
Overspray: Unwanted excessive paint that usually shows up as a fine mist or haze on glass or unpainted areas.
*
Fan: The area of paint spray that comes from the end of your paint gun tip. Seen in a triangle pattern width is measured 12 inches from the air cap.
*
Fine Line Tape: Tape used for masking artwork and graphics. Available in 3/4-, 1/2-, 1/4- and 1/8-inch widths and constructed of either vinyl or paper.
*
Flashtime: The period of time it takes for a paint product to dry.
*
Jambs: Inside edge areas of fenders, doors, hood, engine compartment, and tailgate.
*
Nib: Piece of dirt in paint.
*
Pounce Wheel: Small round wheel with points at the end of a handle, used to perforate paper.
*
Pounce Bag: Small cloth bag filled with colored chalk dust. Tap this bag on a perforated pattern to create a dotted outline to follow.
*
Rubbing: The process of copying artwork from one side of a truck to make a perfect pattern, so it can be transferred to the other side. Common method uses a piece of paper laid over the graphic that is rubbed with a crayon, creating a pattern of the graphic onto the paper.
*
Scuffing Paste: Abrasive paste used in con-junction with a Scotchbrite pad to leave the proper finish for the new paint to stick.
*
Swirls: Circular hazy pattern commonly left from wool buffing pads and compound.
*
Wax & Grease Remover: Solvent applied to a panel to remove dirt and fingerprints prior to painting.


