
 Fred Williams
Brand Manager, Petersen’s 4Wheel & Off Road
Fred Williams
Brand Manager, Petersen’s 4Wheel & Off Road
If you own an old truck, or an odd truck, you may be having a hard time finding aftermarket upgrades. In fact, we have a pretty common 4x4 (’86 Chevy K30), but we couldn’t find an abundance of parts for it. Yes, there are tons of suspension upgrades, but we were looking for a winch bumper, and nothing really jumped out at us for the truck. The solution was simple: Build our own.
This truck, the Alabama Army Truck, is a retired military pickup. We wanted to keep the military look but add a winch to the front. We had built a similar truck years ago where we hid a winch behind the front bumper, but this time we wanted something different. Rather than remove the entire military bumper and brushguard, we decided to build a winch mount that worked with those parts but had the look and design that still felt military. Over a long day of cutting, grinding, and welding we ended up with something that is strong and solid to hold a 10,000-pound winch and yet doesn’t seem too out of place on this G.I.-mobile.
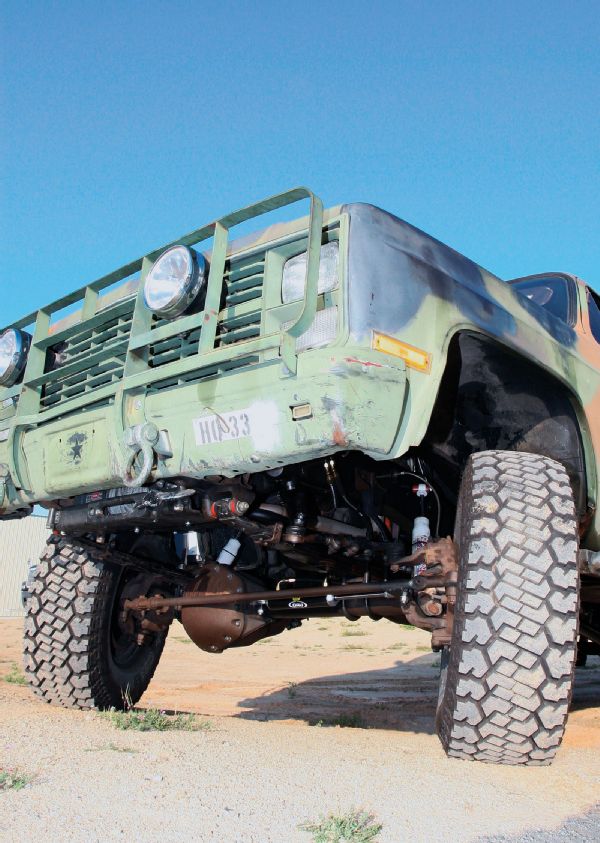 1. Our old army truck bumper was built back in 2005, and you can see how that winch was tucked up behind the factory bumper. This design is great in that it helps the approach angle and keeps the truck shorter overall. The problem is it makes it hard to access the free-spool lever, especially if the truck is buried to the frame in mud.
 2. Our Alabama Army Truck weighs about 5,500 pound since we swapped in the light aluminum V-8 engine. As such, we decided on a Warn Zeon 10-S 10,000-pound winch. An 8,000-pound winch would have been fine, but if we ever add more body armor or a camper shell, having the added capacity will be welcome. Plus, we wanted the lighter weight of the synthetic rope, and the Zeon 10-S comes with it standard. We also sourced a winch tray from Warn to use in our bumper build.
 3. In our state you’re required to have a front license plate, so we either had to move it or move the winch out of the view of the plate. On our truck we found that the brushguard is bolted through the bumper to the frame, and so we opted to build the winch mount straight off the guard up above the license plate.
 4. We mocked up the winch mount to the brushguard and decided to trim the end of the mount slightly. A chop saw, grinder with cutoff wheel, or hack saw could have done the next step, but we used our Miller plasma cutter. It made short work of shortening our winch mount.
 5. Next we ground off the paint and welded the mount directly to the front of the brushguard. The mount is level and square to the guard but still needs plenty of gusseting to make it strong enough to pull the truck from a stuck situation.
 6. Adding gussets required a bit of CAD work, but we don’t mean computer aided design; rather, cardboard aided design. We took measurements, did some drawings, and came up with a few simple pieces that we could cut and weld to multiply the strength of the winch mount.
 7. We cut the gussets out of 3⁄16-inch steel plate we had lying around with our plasma cutter and tacked it in place with our Miller MIG welder. The design of the gussets has the winch mount securely tied into the bottom of the brushguard right where it attaches to the frame for maximum strength.
 8. We lucked out when we realized our cardboard design could also work as a side gusset for muscle in a lateral pull scenario. These days many shops draw all these parts up on a computer to easily replicate the design; we’re still working towards that type of fabrication setup at our shop, so stay tuned for a future article on a cool plasma table we are testing.
 9. To keep the basic straight-line military look, we added a strip of 1⁄4x1-inch steel around the front edge of the bumper. This is a trick we’ve seen done by many fab shops, and it gives a nice clean finish to the bumper and reinforces the gussets like an I-beam. The strip is stitch welded (no need to fully weld it the entire length), and then beat around the gussets with a hammer and clamped in place for welding.
 10. As our day job is magazine writer, we’ll never claim to be the best fabricator or welder, but since many of the welds on our brushguard aren’t perfect either, our average- looking welds match perfectly. With all the welding done and the welding spatter dingle berries knocked off, we bombed the bumper in primer and let it dry overnight.
 11. We gave the bumper a final coal of Rust-Oleum camouflage Deep Forest Green paint and stood back to admire our work. The bumper turned out better than we expected and doesn’t clash with the look of the truck while putting our new Zeon out front for easy access. The mount does reduce the approach angle of the truck by about 12 degrees, but this is only at the center of the bumper, so that is a compromise we’ll have to take.
 12. The wiring of the Zeon is simple. Two big wires to the battery, and you’re done. Now we’re ready to put the truck somewhere it shouldn’t be. Adding a winch to your 4x4 is a great precaution, and building a bumper is a good starter fabrication project.
