Painlessly Wiring An Old Jeep - 4-Wheel & Off-Road Magazine

Fred Williams Brand Manager, Petersen’s 4Wheel & Off Road

As a rule, the older the Jeep is, the less stuff is required to make it run. And when you choose to use mechanical gauges, as we're doing with our '49 Flatfender, it should mean even less wires. Since the Jeep has been through at least a couple rebuilds and repowers over its lifetime it has gathered a nest of wires, switches, and plugs. We have no plans for a full restoration on this retro wheeler, but we do want a reliable running machine with working gauges, head/tail lights, and a power outlet to run a CB or electric cooler.

1949 Willys Flatfender Painless Wiring wiring Madness Photo 28839274

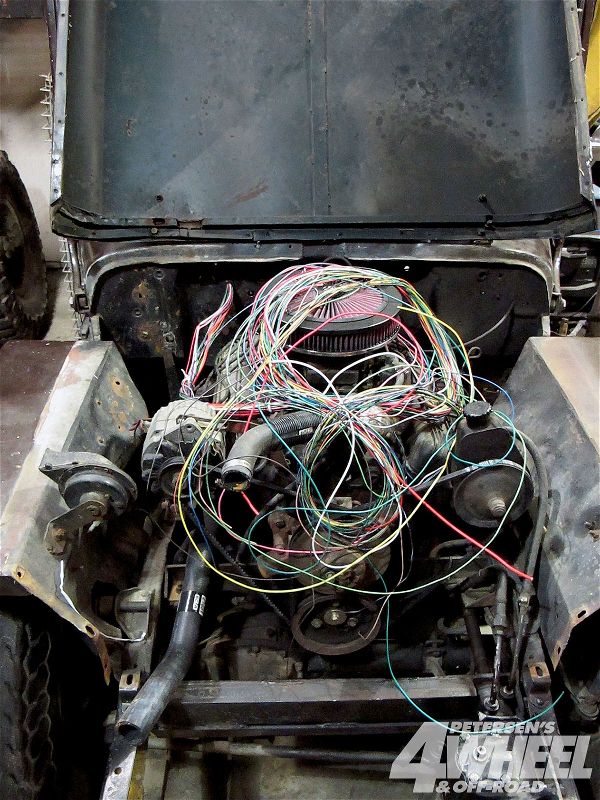
To achieve our electric goals we called up the guys at Painless Performance for their 12-circuit '74-and-earlier Jeep CJ harness kit. We eventually used even less than 12 circuits to route the juice around our little Jeep by cutting out things like the third brake light, electric fan, and heater circuits.

The secret to wiring a vehicle is taking your time and laying out the harness before cutting and attaching any wires. We spread the job out over a couple hours each night for a week, and the harness fell in place quickly and cleanly.

Even Less Painful
If you are just wiring up an engine, or a vehicle without turn signals and many extra circuits, then we recommend the Painless CSI (Charging, Starting, Ignition) Universal Engine Harness PN30830. This harness has everything needed to power any non-fuel-injected engine. The harness would be perfect for a carbureted buggy, and there are additional circuits for some simple lights, or an electric fuel pump or fan.

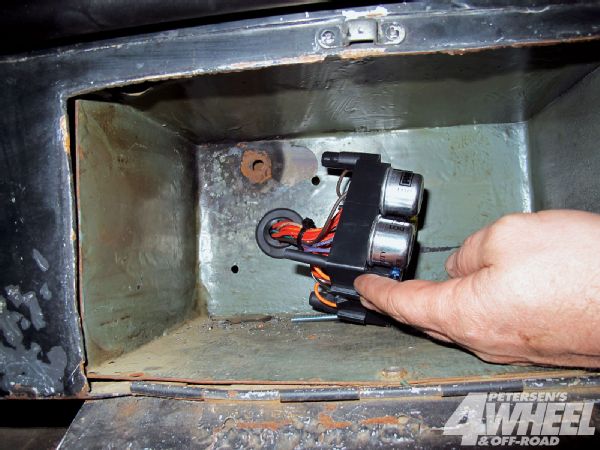
1. Job 1 of wiring is laying out the harness to find the best place for the fuse block. Drill and grommet any firewall holes, and loosely route the wires to their destinations. We decided the fuse block would be well protected yet still easily accessible inside the glovebox a former owner had built into the passenger-side dash.

1949 Willys Flatfender Painless Wiring fuse Block Photo 28839277 PhotosView Slideshow <strong>2.</strong>    The Painless harness is split into major component legs such as headlights, tail section, and ignition section. We narrowed ours down to three: Interior, for wires that would go to the interior, such as gauges and switches; Exterior, for everything in front of the firewall and underneath the tub, such as engine and lights; and Fuse Block.
<strong>3.</strong>    We like to use different options for the bundling of wires. For example, everything in the engine bay is zip-tied every 3 inches and mounted to the firewalls or inner fenders with vinyl-coated metal loop clamps attached to 1/4-inch bolts that are welded to the body. Leaving the wire visible makes for quick and easy diagnosis of any electrical issues.
<strong>4.</strong>    The wire going under the tub is wrapped in Painless Performance's Power Braid. This will protect the wires from chaffing, but we still mounted the wire away from heat and sharp edges, and also supported the loom with more loop clamps.
PhotosView Slideshow <strong>5.</strong>    The wires in the Painless kit are labeled with their origin, destination, and a number code. The instructions tell you the size of each wire so you can easily pick the appropriate crimp end. The crimp ends are covered in shrink wrap for a trouble-free connection. We added additional heat shrink with adhesive inside for added insurance.
<strong>6.</strong>    We used a remote battery cable kit and remote junction blocks from Painless. The two 16-foot No. 1 cables allow the Optima YellowTop to be mounted in the bed, underneath, or hidden in the rear fender. The junction blocks will allow jumpstarting from the Jeep even if the battery is out of reach.
<strong>7.</strong>    Wiring the dash section of the Jeep is another slow process, but when it comes to wiring, patience is a virtue. Our gauges are all mechanical Stewart-Warner Heavy Duty Plus, commonly used on tractors and heavy equipment, meaning we only wire their lights. The headlight switch is a basic push/pull style, and the turn signal is a Truck-Lite Signal-Stat 900 that attaches to a tubular steering column.