We have been working off and on for several years on the Grocery Getter Model A roadster pickup and we now have two out of the three major milestones completed. The chassis and driveline are complete, as is the body and paint. The final major milestone is the interior.
We have read the how-to-do-interior articles for years. And yes, they have given us inspiration, tips, and ideas. But unless you have a walking foot sewing machine and the needed patterns, not to mention the skill, a do-it-yourself interior is not very realistic for the average street rodder.
However, there are alternatives for us do-it-yourselfers. In our case we dialed up the folks at LeBaron Bonney Company. LeBaron Bonney offers premium auto upholstery kits for classic Ford, Mercury, Chevrolet, Buick, and other GM vehicles. We found the LeBaron Bonney staff friendly, knowledgeable, and easy to work with. With over 100,000 kits sold, we felt confident they would meet or exceed our expectations.
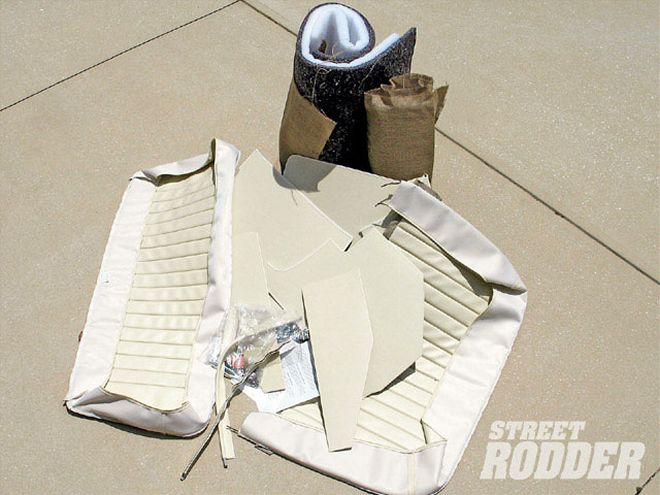 The leBaron Bonney Co. upholstery kit came complete with all of the panels (kick, door, and shoulder) upholstered, the seat covers, padding, and instructions.
We discovered that the original Model A Roadster pickup truck interior consisted of plain, flat, door panels, plain, flat, kick panels, and plain, flat, seat covers. And we believe the original choice of fabric colors were black or oxblood. After all, the Model A pickup truck was a utility vehicle and as such had no frills.
LeBaron Bonney specializes in "original" interior kits, but they are also well aware of the street rod market and were eager to work with us to put together a kit that would meet our needs.
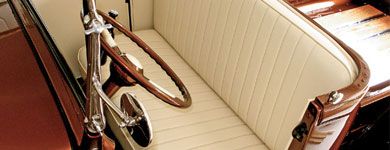
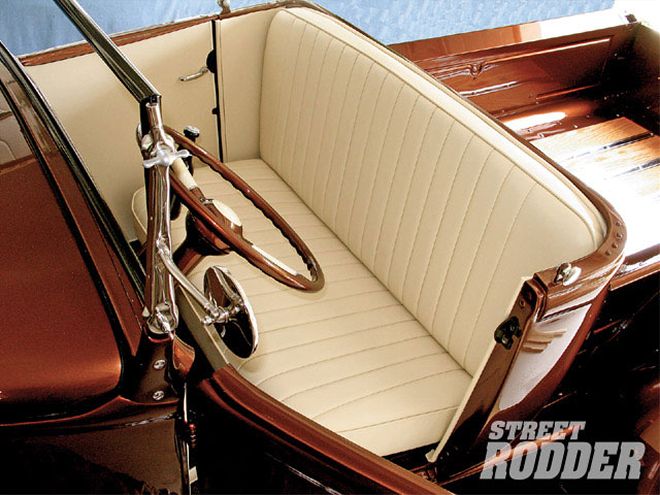
We leafed through their catalog and studied the fabric samples they had supplied. Armed with that information we were ready to order. Since the paint color is House of Kolor Cocoa (root beer) and the wheels, grille insert, and other assorted items are cream, we selected a cream vinyl for our interior. The simplicity of the smooth door panels and kick panels intrigued us, so we went that route. However, we wanted a few more frills for the seat cushion and seat back. We were able to order the seat covers made from the roadster pickup truck seat patterns, but sewn with the wide rolls and pleats, like those found in the more fancy Model A roadster.
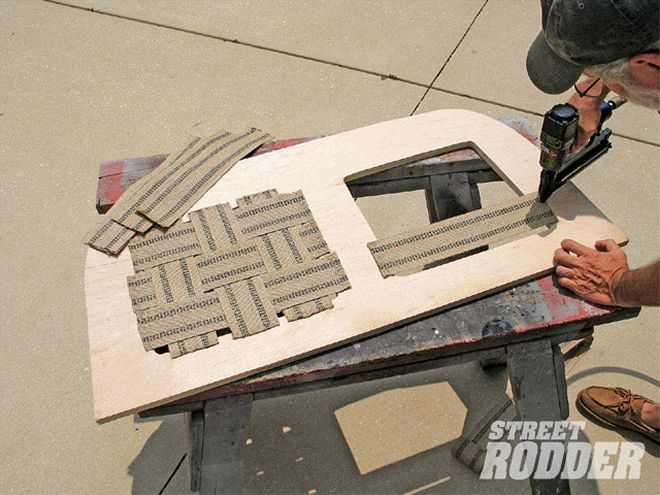
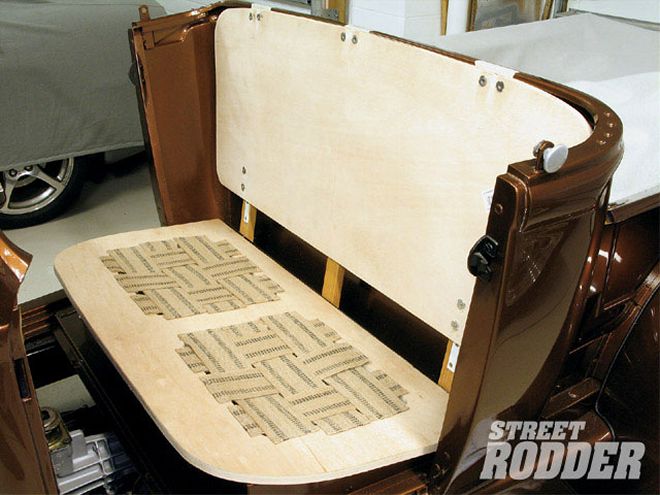
 Our first step was to produce patterns by tracing the shape of the seat cushion cover and the seat back cover onto craft paper. These patterns were then used to define the shape of the seat cushion and seat back wooden frames. They were also used to define the shape of the seat cushion and seat back foam.
The UPS truck showed up about three weeks later and we had our upholstery kit. We also had the burlap, batting, hog rings, and everything required for re-upholstering a Model A roadster pickup. Since we desired to sit a little lower in the truck (chopped windshield) and a little further back (more room) we opted to build our own seat frames instead of using the stock spring set. All those previous upholstery articles afforded us the knowledge to build our own seat frames.
We began our project by making some paper patterns that matched the shape of the seat covers. These patterns would be our patterns for the wooden seat frames and the foam for our cushions 3/4-inch thick marine plywood was cut to form a seat cushion frame and a seat back frame. The seat cushion frame was cut out in the center of the driver and passenger seating areas, and webbing was installed in the cutout areas. The webbing will allow additional give in the seat frame to absorb the shock when we hit bumps in the road. The webbing material is available from almost any upholstery shop, fabric store, or on line. (We had to cut out an area of the wooden seat platform cross brace located in our Brookville Roadster body. The cross brace was located at the area of our seat cushion frame cutouts.)
Blocks of wood were attached to the underside of the seat cushion frame to center it up and prevent it from moving forward. The compression of sliding the seat cushion under the seat back will hold the seat cushion in place.
 After the seat cushion frame was cut out, we removed wood from the seating areas. Burlap lacing was woven front to back and side to side and stapled over these open areas. This will allow more give in the seating areas.
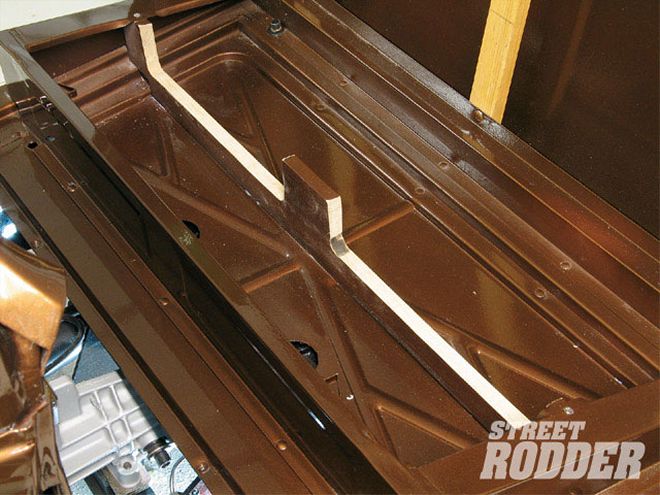
The seat back pattern was transferred to a piece of the marine grade plywood and cut out. We chose to use the three metal tabs that are on the Model A body to hold the top of our seat back to the body. Metal straps with washers as spacers were fashioned to allow the seat back to slide up onto the three metal tabs. This not only held the seat back in place, it located it near where the original seat back would have been. Metal straps were drilled and attached to the lower portion of the seat back where they could be attached to the wooden rear Model A body supports.
Next, we took our seat patterns to a local foam supply shop and had them cut out foam for our seat and seat back. We sat on various densities of foam until we found what we felt was comfortable. We chose a medium density, closed cell, foam for the seat and slightly higher density (harder) foam for the seat back. Four-inch thick foam was selected for the seat and 2 1/2-inch thick foam for the seat back. Keep in mind we had the thickness of the foam in the rolled and pleated seat covers to consider in the over all thickness, as well as the compression of the foam when we pulled the seat covers tightly around the seat frames.
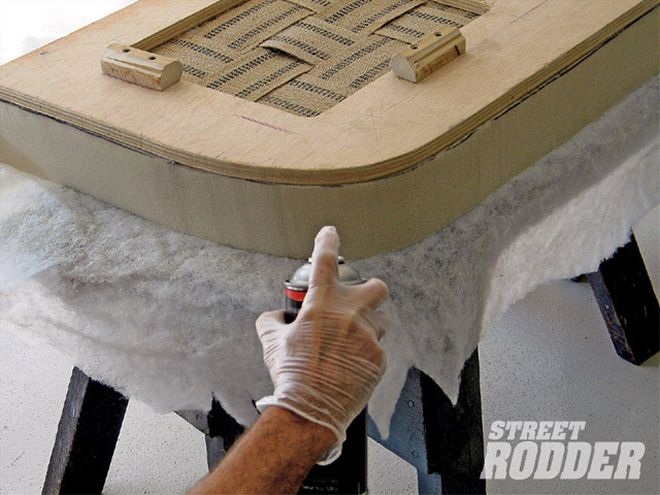
We used 3M 08090 Super Trim Adhesive to hold the foam to the seat cushion and seat back frames. We coated each piece, waited five minutes (you can wait up to an hour), and put the pieces together. This contact cement has a permanent bond, so make sure everything is lined up when you put the pieces together.
 We had to cut out areas of the wooden seat platform cross brace in our Brookville Roadster body. The crossbrace was located in the area of our seat cushion frame cutouts.
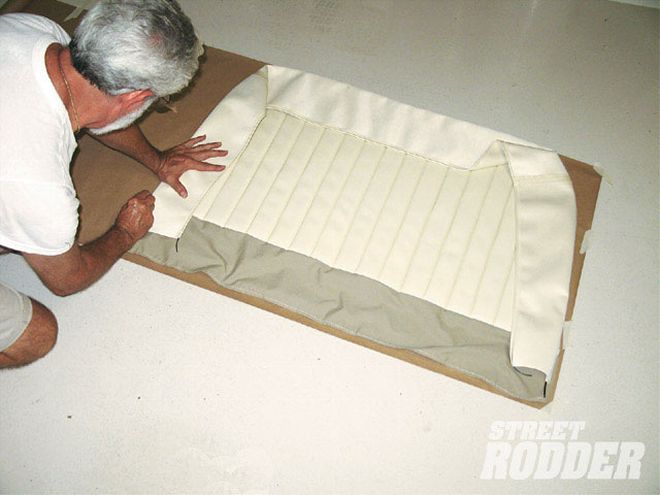
A thin layer of the batting that came with the upholstery kit was applied over the foam on the seat cushion and seat back. The batting is porous and very thin, so a light coat of 3M 08090 adhesive was used. The batting was then pulled around the seat cushion and seat back frames and stapled for added security.
The center of the seat back frame was located and marked, as was the center of the seat back cover. Starting at the center and working our way out, we lined the top of the seat cover up with the edge of the cushion and began stapling the seat cover in place. We then pulled the seat cover tight at the bottom and stapled that in place. Next, we pulled the sides tight and stapled them in place. We found working in the hot sun or using a heat gun helped us stretch the vinyl and kept it smooth and tight-fitting.
The same procedure was followed for the seat cushion, except after we attached much of the top and bottom we fit the seat cushion in under the seat back to assure ourselves that the pleats would line up between the seat back and the seat cushion. It is all in the details.
As an added detail, we ordered extra 3/8-diameter wind lacing and attached it around the seat cushion and the seat back. This added a more finished look to the seats and filled in the area between the seat back and the rear of the roadster body.
With the seats upholstered we turned to the shoulder panels, door panels and kick panels. The shoulder panels, door panels, and kick panels came pre-cut, upholstered, and with a binding sewn around them. Since the Model A pickup trucks were no frills, Henry just attached those panels with small nails, and that is what we had in our kit. We choose to attach our panels with industrial Velcro. If Velcro were available in 1931 maybe Henry would have not nailed the panels in place. Before we attached the chip board panels we coated them with several coats of clear polyurethane to help repel moisture.
 Steel straps were attached to the lower portion of the seat back frame and then secured to the oak body braces to hold the seat back in the proper place.
n order to keep the doors from swinging open and banging into the fenders door check straps were installed. They too came with the LeBaron Bonney kit. The Brookville body has threaded inserts in the doors and the cowl for attaching these straps. The trick is to locate the holes in the upholstered panels so that they line up with the threaded inserts. We fashioned locating dowels by cutting the heads off several #8 fine threaded screws and grinding points on the ends. We installed the screws in the body with the pointed end out and attached the panels in the proper position. By pushing the panels against the pointed screws we were able to locate where to punch holes in the panels for mounting the door check straps.
We also glued and stapled some wind lacing to the edges of the kick panels and shoulder panels. The reason for glue (3M 08090 Super Trim Adhesive or 3M Weather Stripping Adhesive) and staples was that the panels are only about an 1/8 thick, so the staples must be very small and as such have little holding power, but combined with an adhesive the wind lacing should stay in place
With the LeBaron Bonney upholstery kit installed it was time to move on to the carpet. Before we began the carpet layout we covered the floor and firewall with Hush Mat, an OEM sound deadener and insulation, available from Speedway Motors. Hush Mat comes in kit form, as well as bulk. The peel and stick product does not require any special surface clean up, is extremely pliable, and is a breeze to install. We also applied some Hush Mat to the inside of the doors and the inside of the cowl. The doors now sound much more solid when they close.
 The seat cushion frame and seat back frame is complete and trial fitted.
We chose a dark brown, German Square Weave carpet to compliment the cream interior. The carpet was available by the yard from E-Z Boy Rod Interiors.
We began the carpeting process by cutting many patterns from craft paper. Paper is much less expensive than carpet. Once we had the patterns to our liking we began to cut out the carpet.
Before we began installing the carpet we constructed floor panels from 1/4 inch thick mahogany plywood. The passenger and driver side wooden panels are easily removable for cleaning and drying-if they got wet, and to access the below the floorboard master cylinder. Like the door and kick panels, a coat of clear polyurethane was applied to the floor panels to further protect them from the elements.
Since we will be tracing the patterns onto the backside of the carpet it was very important to know front from back on our patterns. We marked the patterns with "Back." By marking the patterns we were assured that the carpeted side of the carpet would be on the proper side of the pattern.
We utilized a utility knife and a straight edge to cut the straight edges of the carpet. For the several curved shapes, we carefully followed the markings with our utility knife.
After all of the carpet pieces were cut we made a trip to our local upholstery shop. In our case it was Del Lyons, The Upholstery Man in Port Orange, Florida. After we selected a dark brown vinyl that worked well with the carpet, Del sewed a vinyl binding around the edges of the carpet and a pair of floor mats that we made out of surplus carpet. The binding around the carpet for the wooden panels was sewn to the edges of the carpets; however, it was not sewn to the backside and a strip of material was left to wrap around the floor panels and staple in place.
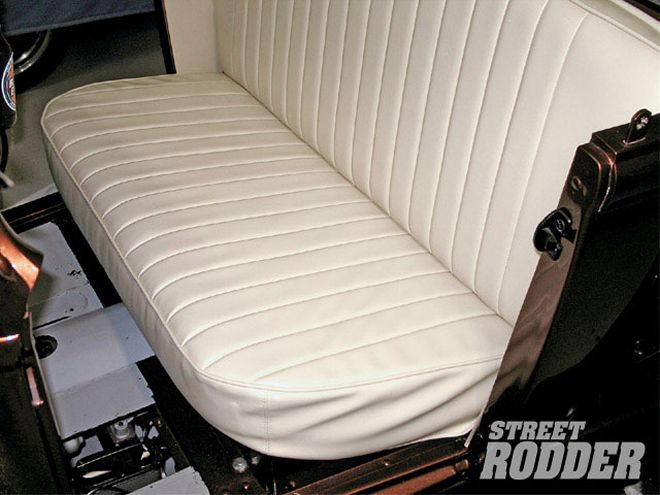 After the seat back cover was centered and stapled to the seat back frame, the completed seat back cushion was installed. The seat cushion cover was then centered and stapled several places to the seat cushion frame. Before the seat cushion was completed, the seat cushion was installed to assure ourselves that the rolls and pleats would line up.
Before we installed the floor carpeting and the floor panels we made another pattern and created a firewall cover. The firewall cover, as well as all of the other carpet pieces, is held in place with industrial Velcro. This attachment method allows easy removal for cleaning, drying, and even replacement should the carpet get wet, damaged, or stained.
Using the existing shifter and hand brake boots as patterns, we sewed up new boots using the same vinyl as the carpet binding. My wife was able to sew these on a regular home sewing machine. An option would be to have the boots made at the same time that we were having the carpet binding installed at the upholstery shop.
The final step was to install the boots using the trim rings that came with the transmission and hand brake boots. A note of caution: Do not attempt to drill through the carpet. The drill bit will catch the carpet and it will pull or create a run in it. Always cut or punch holes in carpet.
With everything in place the interior is complete. Those many how-to-do-interior articles we have read over the years, along with some careful planning and a good pre-sewn upholstery kit from LeBaron Bonney Co., resulted in a great looking interior. We are very satisfied with the results, we have saved a few dollars, and most importantly, we have the pride of doing it ourselves.