Before getting into the meat and potatoes of this story, I wanted to take a moment to introduce our brand-new monthly feature, DIY Corner. If the name doesn't come right out and say it, this segment of the magazine is dedicated to the truck enthusiast who likes to do things with his or her own two hands...no shops, no professionals, no nonsense. Whether it's a how-to like this month's spotlight on do-it-yourself upholstery, an update on a reader's project, or a finished feature on a homebuilt hauler, if it's something you can do yourself, you can find it here. And since I was tackling things myself, I figured reupholstering my Cheyenne would be a great way to kick off the first DIY Corner.
Upholstering a vehicle might seem like a daunting task to some (even I was very hesitant at first), but when you consider the fact that many of the components required to fulfill the job on most popular Ford and Chevy truck models-namely the seat material and carpet-are "fitted," then basically all you're required to do is remove the old and install the new. Everything else, like trim pieces, door panels, etc., is easily dealt with if you're proficient with a Phillips screwdriver and possibly an aerosol can. These items are things you can R&R by yourself; items like the seat covers, headliner, and carpet, however, are best accomplished with an additional pair of hands.
One of the last remaining areas to be addressed on my '75 Chevy before it was really complete was the interior. Now, the main reason I'd put it off for so long is that the truck is driven every day-it's my mobile office, my parts chaser, my kid carrier, you name it-so the interior takes a beatin'. I find it hard enough trying to keep the paint looking new, let alone clean, so the thought of taking care of a fresh interior was a bit overwhelming. Nevertheless, the old threads were getting pretty frayed, so to speak, and it was finally time to finish the truck right.
Starting with the flooring, I remembered someone recently putting an Auto Custom Carpets (ACC) pre-molded carpet kit in their car and commenting about how well it fit, so I checked out what they had for the truck. Subsequently, a box from ACC complete with a black one-piece carpet kit and a pair of floor mats (embroidered with black Bow Ties) was soon sitting on my doorstep. For the seating, paneling, and trim, I simply pulled out my latest LMC '73-87 Chevy truck catalog, found the necessary parts, picked up the phone, and made the call. Lastly, to further complement the forthcoming wood accents, I ordered a mahogany-rimmed steering wheel from Grant Products.
Before I reserved a quiet weekend to spend with my truck, I wanted to make sure I had everything I needed above and beyond the main interior components, so I headed to the local upholstery supply. Among the things on the list were heavy-duty spray glue, fasteners and clips, and a yard of 1/8-inch headliner material (on trucks with molded headliners, it's usually pretty easy to replace yourself). I also grabbed the necessary items to change the color of the existing pieces that didn't need to be replaced-that included vinyl prep, dye, and satin clearcoat (all SEM products). From here, it was just a matter of making time to devote to the job, as I knew it wasn't something I'd be able to tackle in one day.
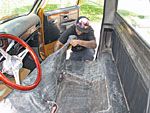
In order to get the more difficult tasks out of the way, I used up another favor on my good pal Jim Rizzo. (Actually, I asked if he minded me doing "some" work at his house, just in case I needed a second pair of hands!) Riz's help not only enabled me to get the carpet stretched and glued down relatively easily, but the seat covers wrapped over the foam and nicely hog-ringed to the frames as well. He even supplied the cold ones-thanks, ol' buddy! While it took the two of us the better part of the day to handle those two items alone (OK, so maybe the whole time wasn't spent on the truck...), at least the remaining work was simple enough to do on my own the following day.
On a difficulty scale of 1-10 (1 being the easiest, 10 the most complicated), I'd give this a 3.5. And as for tools, the basics such as screwdrivers, cordless drill, utility knife, etc. will suffice. So, follow along and see how easy reupholstering your own truck could actually be, starting with the installation of a new headliner and carpet kit. Next month, we'll finish things off with pre-fit seat covers and new paneling and trim.