For anybody who's like me, the only thing you really know about air conditioning is that you like it. (Okay, there is one more thing I know--when it doesn't work!) Granted, I live in a region of the country where the summer temps literally blow the mercury out of the thermometer, and as you may have guessed, I drive my pickup daily. As we're approaching those dreaded summer months, I began to consider that I should "address" the climate control situation before it gets too late.
Now, when I say "address," I really should say, "rectify," as the existing A/C in my Cheyenne had been, well, heavily dissected due to a cam swap (don't ask...just remember that the condenser is on front of the radiator, which needs to come out to allow room to slide the cam out). Nevertheless, the factory unit was pretty much trash, so I don't believe an R&R was what I wanted to embark upon. At the same time, I didn't really want a fully aftermarket A/C-heat unit, either. What to do?
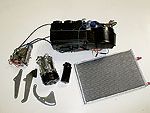
My question was answered earlier last year when Hot Rod Air introduced their Factory Control Adapt units. Basically, their new units are just their average Elite Series (Standard, Standard SE, or Deluxe), except with one major difference--the controls. If your truck never came with A/C to begin with, then that won't play much importance in your decision-making. If, however, your truck did come with factory A/C and you're fairly fond of the stock controls, here's where this particular unit really shines. Instead of having to worry about replacing the stock controls with the modern ones that came with whichever unit you chose, Hot Rod Air will build a unit "around" your old controls. Simply remove your "working" controls--vacuum or cable-operated--ship to Hot Rod Air, and in a short amount of time, the delivery man will return your controls, with an Elite Series A/C-heat unit attached!
The other benefit to using the Factory Control Adapt unit is the Elite Series under-dash evaporator. Unlike your old unit, which took up plenty of space in the engine compartment, the all-inclusive Hot Rod Air evaporator will mount concealed behind your dash, allowing you to clean up your firewall all nice-like. In some cases, you may have to sacrifice glovebox space, but in this situation, I'd gladly give up my entire glovebox for air conditioning!
Suffice it to say, after hearing about the new units, one was ordered for the '75 Cheyenne. When it arrived, complete with the modified controls and a full Alan Grove mounting bracket kit, we (the collective "we" being myself and Installation Jason) set out to adapt and install. Of course, the majority of the first day was spent tearing out the remains of the factory components, which included an elaborate molded-plastic ducting system. With all the antiquated remains out of the way, we were able to get the Elite evaporator hung, strung and singing in no time. Dealing with the "underhood" necessities like the compressor, drier and condenser were straightforward, as well.
About the only part of the entire install that took some creative thinking was the routing of the ducts/registers. Keep in mind, if you're dealing with a late-'60s or early-'70s pickup, the registers may not "take" to the universal ducting like you'd want. Hot Rod Air's Factory Control Adapt kits are more universal than direct replacement once they've modified your controls, so be prepared to perform further adapting. In our case, we ordered brand-new registers from Chevy Duty--the only people outside the dealership we could find that carried them--and then got clever with adapting the 2 1/2-inch flexible ducting (let's just say Home Depot was our friend that day). You may find easier or cheaper alternatives, but just know ahead of time that the round ducting supplied won't fit square registers!
With all that said and done, we got the lines crimped and the unit charged by Quality Air. And it was during this final stage that we also learned a valuable lesson: It is imperative that you crimp all your high-pressure lines with the appropriate crimp. In other words, don't crimp R12-style if you're using R134, which pretty much every unit on the market is these days! An R12 crimp will hold the higher pressure of 134, but not for long. Do it right the first time!